Lexus RX (RX 350L, RX450h) 2016-2026 Repair Manual: Ambient Temperature Sensor
Components
COMPONENTS
ILLUSTRATION
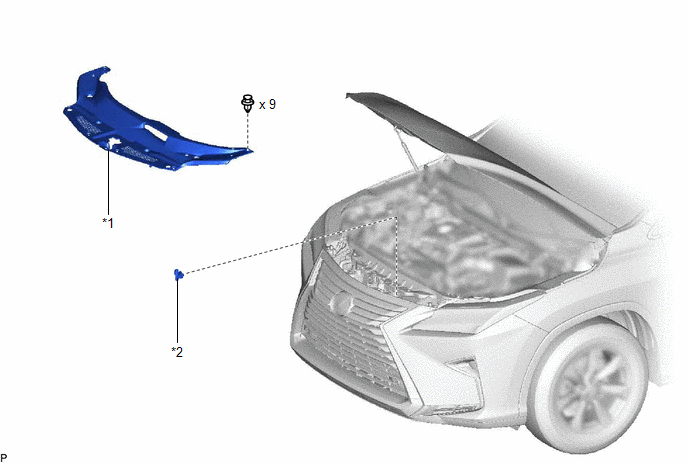
| *1 | COOL AIR INTAKE DUCT SEAL | *2 | COOLER (AMBIENT TEMP. SENSOR) THERMISTOR |
Inspection
INSPECTION
PROCEDURE
1. INSPECT COOLER (AMBIENT TEMP. SENSOR) THERMISTOR
| (a) Measure the resistance according to the value(s) in the table below. Standard resistance:
If the resistance is not as specified, replace the cooler (ambient temp. sensor) thermistor. NOTICE:
HINT: As the temperature increases, the resistance decreases (see the graph). |
|
.png)
Installation
INSTALLATION
PROCEDURE
1. INSTALL COOLER (AMBIENT TEMP. SENSOR) THERMISTOR
(a) Connect the connector.
(b) Engage the clamp to install the cooler (ambient temp. sensor) thermistor.
2. INSTALL COOL AIR INTAKE DUCT SEAL
Click here .gif)
Removal
REMOVAL
PROCEDURE
1. REMOVE COOL AIR INTAKE DUCT SEAL
Click here .gif)
2. REMOVE COOLER (AMBIENT TEMP. SENSOR) THERMISTOR
| (a) Disengage the clamp. |
|
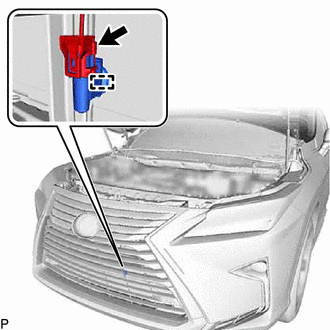
(b) Disconnect the connector to remove the cooler (ambient temp. sensor) thermistor.
 Reassembly
REASSEMBLY PROCEDURE 1. INSTALL NO. 1 COOLER THERMISTOR Click here 2. INSTALL NO. 1 COOLER EVAPORATOR SUB-ASSEMBLY (a) Install a new No. 1 cooler evaporator sub-assembly with No. 1 cooler thermis ...

Other materials:
Lexus RX (RX 350L, RX450h) 2016-2026 Repair Manual > Intuitive Parking Assist System (w/ Intelligent Clearance Sonar System): Dtc Check / Clear
DTC CHECK / CLEAR CHECK DTC (a) Connect the Techstream to the DLC3. (b) Turn the engine switch on (IG). (c) Turn the intuitive parking assist system on. (d) Turn the Techstream on. (e) Enter the following menus: Body Electrical / Advanced Parking Guidance/ICS/Intuitive P/A / Trouble Codes. (f) Check ...
Lexus RX (RX 350L, RX450h) 2016-2026 Repair Manual > Rear Center Seat Inner Belt Assembly(w/ Rear No. 2 Seat): Components
COMPONENTS ILLUSTRATION *1 CENTER SEAT HINGE COVER LH *2 NO. 1 RECLINING ADJUSTER RELEASE HANDLE RH *3 REAR CENTER SEAT INNER BELT ASSEMBLY *4 REAR SEAT COVER CAP RH *5 REAR SEAT LOCK CONTROL LEVER SUB-ASSEMBLY RH *6 SEPARATE TYPE REAR SEAT CUSHION COVER WITH PAD ...
Lexus RX (RX 350L, RX450h) 2016-{YEAR} Owners Manual
- For your information
- Pictorial index
- For safety and security
- Instrument cluster
- Operation of each component
- Driving
- Lexus Display Audio system
- Interior features
- Maintenance and care
- When trouble arises
- Vehicle specifications
- For owners
Lexus RX (RX 350L, RX450h) 2016-{YEAR} Repair Manual

0.0101