Lexus RX (RX 350L, RX450h) 2016-2026 Repair Manual: Removal
REMOVAL
PROCEDURE
1. REMOVE REAR NO. 2 SEAT ASSEMBLY
Click here .gif)
2. REMOVE REAR FLOOR FINISH PLATE
Click here
3. REMOVE REAR DOOR SCUFF PLATE RH
HINT:
Use the same procedure as for the LH side.
Click here
4. REMOVE REAR DOOR INSIDE SCUFF PLATE RH
HINT:
Use the same procedure as for the LH side.
Click here
5. REMOVE REAR SEAT OUTER TRACK BRACKET COVER RH
for 60/40 Split Seat Type:
Click here
for Captain Seat Type:
HINT:
Use the same procedure as for the LH side.
Click here
6. REMOVE FRONT DECK SIDE TRIM COVER RH
HINT:
Use the same procedure as for the LH side.
Click here
7. REMOVE REAR SEAT SIDE GARNISH RH
HINT:
Use the same procedure as for the LH side.
Click here
8. REMOVE NO. 1 LUGGAGE COMPARTMENT TRIM HOOK
Click here
9. REMOVE ROPE HOOK ASSEMBLY
HINT:
Use the same procedure as for the LH side.
Click here
10. REMOVE NO. 1 LUGGAGE COMPARTMENT LIGHT ASSEMBLY
Click here
11. REMOVE DECK TRIM SIDE PANEL ASSEMBLY RH
Click here
12. REMOVE REAR BLOWER MOTOR WITH FAN SUB-ASSEMBLY
| (a) Disconnect each connector. |
|
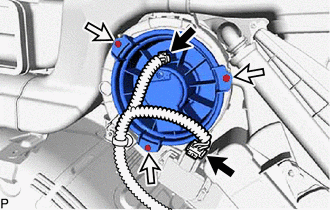
(b) Remove the 3 screws and rear blower motor with fan sub-assembly.
 Components
COMPONENTS ILLUSTRATION *1 REAR DOOR INSIDE SCUFF PLATE RH *2 REAR DOOR SCUFF PLATE RH *3 REAR FLOOR FINISH PLATE *4 REAR SEAT OUTER TRACK BRACKET COVER RH ILLUSTRATION *1 ...
 Installation
INSTALLATION PROCEDURE 1. INSTALL REAR BLOWER MOTOR WITH FAN SUB-ASSEMBLY (a) Install the rear blower motor with fan sub-assembly with the 3 screws. NOTICE: Replace the rear blower motor with fan sub- ...
Other materials:
Lexus RX (RX 350L, RX450h) 2016-2026 Repair Manual > Meter / Gauge System: Fuel Sender Open Detected (B1500)
DESCRIPTION This DTC is stored when the combination meter assembly detects a fuel sender gauge assembly malfunction via a direct line. DTC No. Detection Item DTC Detection Condition Trouble Area Memory Note B1500 Fuel Sender Open Detected When IG voltage is 9.5 V or more and the ...
Lexus RX (RX 350L, RX450h) 2016-2026 Repair Manual > Blind Spot Monitor System: Freeze Frame Data
FREEZE FRAME DATA FREEZE FRAME DATA (a) Whenever DTCs are detected, the blind spot monitor sensor stores the current vehicle (sensor) state as freeze frame data. CHECK FREEZE FRAME DATA (a) Connect the Techstream to the DLC3. (b) Turn the engine switch on (IG). (c) Turn the blind spot monitor system ...
Lexus RX (RX 350L, RX450h) 2016-{YEAR} Owners Manual
- For your information
- Pictorial index
- For safety and security
- Instrument cluster
- Operation of each component
- Driving
- Lexus Display Audio system
- Interior features
- Maintenance and care
- When trouble arises
- Vehicle specifications
- For owners
Lexus RX (RX 350L, RX450h) 2016-{YEAR} Repair Manual

0.0088