Lexus RX (RX 350L, RX450h) 2016-2026 Repair Manual: Room Temperature Sensor(for Rear)
Components
COMPONENTS
ILLUSTRATION

| *1 | COOLER (NO. 2 ROOM TEMP. SENSOR) THERMISTOR | - | - |
Inspection
INSPECTION
PROCEDURE
1. INSPECT COOLER (NO. 2 ROOM TEMP. SENSOR) THERMISTOR
| (a) Measure the resistance according to the value(s) in the table below. Standard Resistance:
NOTICE:
HINT: As the temperature increases, the resistance decreases (see the graph).
|
|

Installation
INSTALLATION
PROCEDURE
1. INSTALL COOLER (NO. 2 ROOM TEMP. SENSOR) THERMISTOR
(a) Connect the connector.
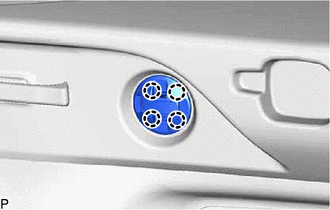
| (b) Engage the 4 claws to install the cooler (No. 2 room temp. sensor) thermistor. |
|
Removal
REMOVAL
PROCEDURE
1. REMOVE COOLER (NO. 2 ROOM TEMP. SENSOR) THERMISTOR
(a) Apply protective tape to the area shown in the illustration.
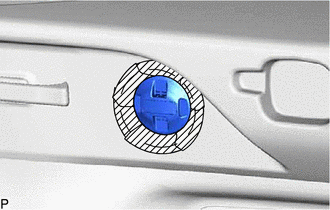
 | Protective Tape |
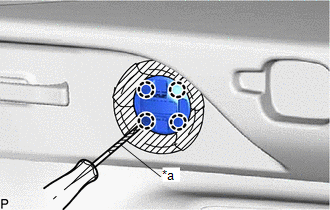
| (b) Using a screwdriver, disengage the 4 claws. HINT: Tape the screwdriver tip before use. |
|
(c) Disconnect the connector to remove the cooler (No. 2 room temp. sensor) thermistor.
 Installation
INSTALLATION PROCEDURE 1. INSTALL COOLER (ROOM TEMP. SENSOR) THERMISTOR (a) Connect the connector and aspirator. (b) Engage the 2 claws to install the cooler (room temp. sensor) thermistor as shown in ...
 Smog Ventilation Sensor
ComponentsCOMPONENTS ILLUSTRATION *1 COOL AIR INTAKE DUCT SEAL *2 SMOG VENTILATION SENSOR N*m (kgf*cm, ft.*lbf): Specified torque - - RemovalREMOVAL PROCEDURE 1. REMOVE COOL AI ...
Other materials:
Lexus RX (RX 350L, RX450h) 2016-2026 Repair Manual > Power Mirror Control System (w/ Memory): Problem Symptoms Table
PROBLEM SYMPTOMS TABLE NOTICE: If the battery voltage is low, the mirror heater function may not operate. When "Operation of Electrical Items Restricted." is displayed on the multi-information display in the combination meter assembly, check the Data List item "Battery Control Count (Body ECU)". Cli ...
Lexus RX (RX 350L, RX450h) 2016-2026 Owners Manual > Using the other interior
features: Garage door opener
The garage door opener can be programmed to operate garage doors,
gates,
entry doors, door locks, home lighting systems, security systems, and other
devices.
Programming the HomeLink
The HomeLink wireless control system in your vehicle has 3 buttons which can
be programmed to operate 3 differ ...
Lexus RX (RX 350L, RX450h) 2016-{YEAR} Owners Manual
- For your information
- Pictorial index
- For safety and security
- Instrument cluster
- Operation of each component
- Driving
- Lexus Display Audio system
- Interior features
- Maintenance and care
- When trouble arises
- Vehicle specifications
- For owners
Lexus RX (RX 350L, RX450h) 2016-{YEAR} Repair Manual

0.0094