Lexus RX (RX 350L, RX450h) 2016-2026 Repair Manual: Smog Ventilation Sensor
Components
COMPONENTS
ILLUSTRATION
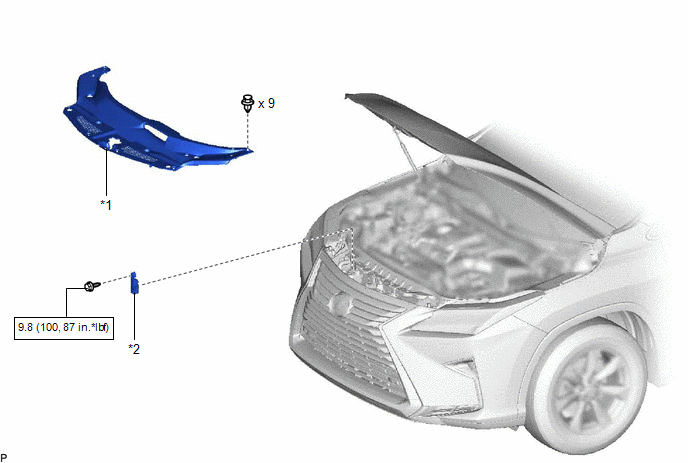
| *1 | COOL AIR INTAKE DUCT SEAL | *2 | SMOG VENTILATION SENSOR |
.png) | N*m (kgf*cm, ft.*lbf): Specified torque | - | - |
Removal
REMOVAL
PROCEDURE
1. REMOVE COOL AIR INTAKE DUCT SEAL
Click here .gif)
2. REMOVE SMOG VENTILATION SENSOR
| (a) Disconnect the connector. |
|
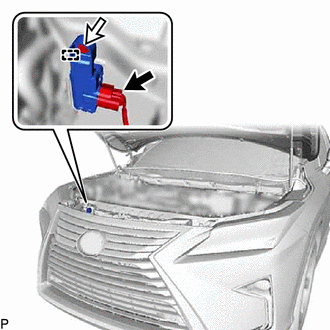
(b) Remove the bolt.
(c) Disengage the guide to remove the smog ventilation sensor.
Inspection
INSPECTION
PROCEDURE
1. INSPECT SMOG VENTILATION SENSOR (HC, CO)
| (a) Connect a positive (+) lead from the battery to terminal 3 (IG) and a negative (-) lead to terminal 6 (E). |
|
.png)
(b) Allow exhaust gas (HC, CO) to travel to the sensing portion of the smog ventilation sensor, and measure the resistance between terminals 1 (SG) and 2 (DGS).
OK:
When the sensor is exposed to exhaust gas, the resistance increases.
HINT:
The resistance of the sensor before being exposed to exhaust gas is 10 kΩ to 40 kΩ.
If the result is not as specified, replace the smog ventilation sensor.
2. INSPECT SMOG VENTILATION SENSOR (NOx)
| (a) Connect a positive (+) lead from the battery to terminal 3 (IG) and a negative (-) lead to terminal 6 (E). |
|
.png)
(b) Allow exhaust gas (NOx) to travel to the sensing portion of the smog ventilation sensor, and measure the resistance between terminals 1 (SG) and 4 (DGS1).
OK:
When the sensor is exposed to exhaust gas, the resistance increases.
HINT:
The resistance of the sensor before being exposed to exhaust gas is 10 kΩ to 40 kΩ.
If the result is not as specified, replace the smog ventilation sensor.
Installation
INSTALLATION
PROCEDURE
1. INSTALL SMOG VENTILATION SENSOR
(a) Engage the guide.
(b) Install the smog ventilation sensor with the bolt.
Torque:
9.8 N·m {100 kgf·cm, 87 in·lbf}
(c) Connect the connector.
2. INSTALL COOL AIR INTAKE DUCT SEAL
Click here .gif)
 Room Temperature Sensor(for Rear)
ComponentsCOMPONENTS ILLUSTRATION *1 COOLER (NO. 2 ROOM TEMP. SENSOR) THERMISTOR - - InspectionINSPECTION PROCEDURE 1. INSPECT COOLER (NO. 2 ROOM TEMP. SENSOR) THERMISTOR (a) Measure t ...
 Solar Sensor
...
Other materials:
Lexus RX (RX 350L, RX450h) 2016-2026 Repair Manual > Headup Display System: Data List / Active Test
DATA LIST / ACTIVE TEST DATA LIST NOTICE: In the table below, the values listed under "Normal Condition" are reference values. Do not depend solely on these reference values when deciding whether a part is faulty or not. HINT: Using the Techstream to read the Data List allows the values or states of ...
Lexus RX (RX 350L, RX450h) 2016-2026 Owners Manual > Using the air conditioning
system and defogger: Rear automatic air
conditioning system (RX450hL)
Air outlets and fan speed are automatically adjusted according to the
temperature
setting.
Control panel
■ Adjusting the temperature setting
Press
to increase the temperature and to
decrease the temperature.
■ Adjusting the fan speed setting
Press
to increase the fan speed and
to ...
Lexus RX (RX 350L, RX450h) 2016-{YEAR} Owners Manual
- For your information
- Pictorial index
- For safety and security
- Instrument cluster
- Operation of each component
- Driving
- Lexus Display Audio system
- Interior features
- Maintenance and care
- When trouble arises
- Vehicle specifications
- For owners
Lexus RX (RX 350L, RX450h) 2016-{YEAR} Repair Manual

0.0112