Lexus RX (RX 350L, RX450h) 2016-2026 Repair Manual: Inspection
INSPECTION
PROCEDURE
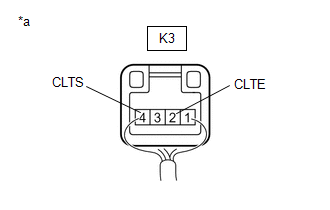
1. INSPECT AUTOMATIC LIGHT CONTROL SENSOR
| (a) Disconnect the K3 automatic light control sensor connector. |
|

(b) Measure the voltage and resistance according to the value(s) in the table below.
Standard Voltage:
| Tester Connection | Condition | Specified Condition |
|---|---|---|
| K3-1 (CLTB) - K3-2 (CLTE) | Engine switch off | Below 1 V |
| Engine switch on (IG) | 11 to 14 V |
Standard Resistance:
| Tester Connection | Condition | Specified Condition |
|---|---|---|
| K3-2 (CLTE) - Body ground | Always | Below 1 Ω |
If the result is not as specified, there may be a malfunction on the wire harness side.
| (c) Reconnect the K3 automatic light control sensor connector. |
|
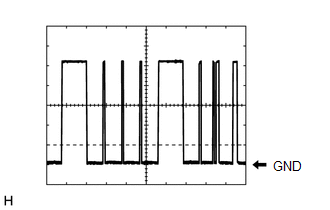
(d) Connect an oscilloscope to the automatic light control sensor connector.
| (e) Check the waveform. OK:
HINT: The communication waveform changes according to the surrounding brightness. If the result is not as specified, the automatic light control sensor may be malfunctioning. |
|
 Removal
REMOVAL CAUTION / NOTICE / HINT The necessary procedures (adjustment, calibration, initialization or registration) that must be performed after parts are removed and installed, or replaced during sola ...
 Installation
INSTALLATION PROCEDURE 1. INSTALL AUTOMATIC LIGHT CONTROL SENSOR (a) Engage the 2 claws to install the automatic light control sensor. (b) Connect the connector. 2. INSTALL INSTRUMENT PANEL SAFETY PAD ...
Other materials:
Lexus RX (RX 350L, RX450h) 2016-2026 Repair Manual > Generator (for 180 A Type): Disassembly
DISASSEMBLY PROCEDURE 1. REMOVE GENERATOR PULLEY CAP (a) Using a screwdriver, remove the generator pulley cap from the generator pulley with clutch. NOTICE: Do not reuse the generator pulley cap. 2. REMOVE GENERATOR REAR END COVER (a) Remove the 3 nuts and generator rear end cover ...
Lexus RX (RX 350L, RX450h) 2016-2026 Repair Manual > Emission Control System: On-vehicle Inspection
ON-VEHICLE INSPECTION CAUTION / NOTICE / HINT CAUTION: To prevent injury due to contact with an operating V-ribbed belt or cooling fan, keep your hands and clothing away from the V-ribbed belt and cooling fans when working in the engine compartment with the engine running or the engine switch on (IG ...
Lexus RX (RX 350L, RX450h) 2016-{YEAR} Owners Manual
- For your information
- Pictorial index
- For safety and security
- Instrument cluster
- Operation of each component
- Driving
- Lexus Display Audio system
- Interior features
- Maintenance and care
- When trouble arises
- Vehicle specifications
- For owners
Lexus RX (RX 350L, RX450h) 2016-{YEAR} Repair Manual

0.0083