Lexus RX (RX 350L, RX450h) 2016-2026 Repair Manual: Installation
INSTALLATION
PROCEDURE
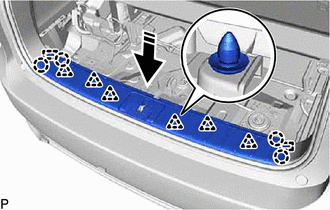
1. INSTALL ROOF HEADLINING ASSEMBLY
(a) Put the roof headlining assembly into the vehicle through the back door as shown in the illustration.
NOTICE:
Do not damage the roof headlining assembly or vehicle interior.
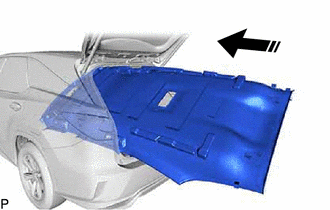
.png) | Install in this Direction |
(b) for Standard Roof:
(1) Engage the 2 claws to install each base of the visor holder.

| *a | Base of Visor Holder | - | - |
(2) Engage the 3 clips, 10 claws and 2 fasteners to install the roof headlining assembly.
(c) for Sliding Roof:
(1) Engage the guide.
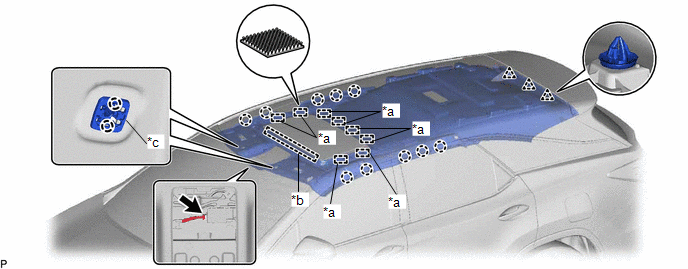
| *a | Fastener | *b | Guide |
| *c | Base of the Visor Holder | - | - |
(2) Engage the 2 claws to install each base of the visor holder.
(3) Engage the 3 clips, 10 claws and 8 fasteners to install the roof headlining assembly.
(4) Connect the connector.
(d) for Rear Pillar RH Side:
(1) Connect each connector and the washer hose assembly.
(2) Engage the 2 clamps.
(e) for Front Pillar LH Side:
(1) Remove the protective cover.
(2) Connect the 3 connectors.
(3) Engage the 4 clamps.
(4) Install the protective cover.
(f) for Front Pillar RH Side:
(1) Remove the protective cover.
(2) Connect the connector and washer hose assembly.
(3) Engage the 3 clamps.
(4) Install the protective cover.
(g) for Windshield Glass Side:
(1) Connect each connector.
2. INSTALL VISOR HOLDER LH
HINT:
Use the same procedure as for the visor holder.
Click here .gif)
3. INSTALL VISOR ASSEMBLY LH
Click here
4. INSTALL VISOR BRACKET COVER LH
HINT:
Use the same procedure as for the visor bracket cover.
Click here
5. INSTALL VISOR HOLDER RH
HINT:
Use the same procedure as for the LH side.
6. INSTALL VISOR ASSEMBLY RH
HINT:
Use the same procedure as for the LH side.
7. INSTALL VISOR BRACKET COVER RH
HINT:
Use the same procedure as for the LH side.
8. INSTALL ASSIST GRIP SUB-ASSEMBLY
HINT:
Use the same procedure as for the assist grip assembly.
Click here
9. INSTALL REAR ASSIST GRIP ASSEMBLY LH
HINT:
Use the same procedure as for the assist grip sub-assembly.
10. INSTALL REAR ASSIST GRIP ASSEMBLY RH
HINT:
Use the same procedure as for the assist grip sub-assembly.
11. INSTALL NO. 1 FORWARD RECOGNITION COVER
Click here
12. INSTALL NO. 2 FORWARD RECOGNITION COVER
Click here
13. INSTALL RAIN SENSOR
Click here
14. INSTALL RAIN SENSOR COVER
Click here
15. INSTALL SPOT LIGHT ASSEMBLY
Click here
16. INSTALL MAP LIGHT ASSEMBLY
Click here
17. INSTALL REAR ROOF SIDE RAIL GARNISH ASSEMBLY LH
(a) Install 3 new clips to the rear roof side rail garnish assembly LH.
(b) Engage the 3 clips to install the rear roof side rail garnish assembly LH.
18. INSTALL ROOF SIDE INNER GARNISH ASSEMBLY LH
(a) Install 10 new clips to the roof side inner garnish assembly LH.
(b) Engage the 10 clips and 2 claws to install the roof side inner garnish assembly LH.
19. CONNECT REAR NO. 2 SEAT OUTER BELT ASSEMBLY LH
Click here
20. INSTALL DECK TRIM SIDE PANEL ASSEMBLY LH
(a) Connect each connector.
(b) Engage the 3 clips and 6 claws.
(c) Install the deck trim side panel assembly LH with the 3 bolts and 2 clips.
21. INSTALL COOLER (NO. 2 ROOM TEMP. SENSOR) THERMISTOR
Click here
22. INSTALL NO. 2 AIR CONDITIONING CONTROL ASSEMBLY
Click here
23. INSTALL NO. 1 LUGGAGE COMPARTMENT LIGHT ASSEMBLY (for LH Side)
Click here
24. INSTALL ROPE HOOK ASSEMBLY (for LH Side)
| (a) Install the rope hook assembly with the bolt. |
|
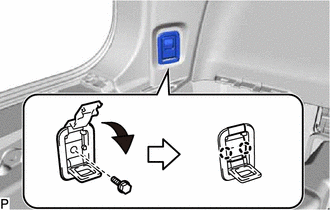
(b) Engage the 2 claws to close the cover as shown in the illustration.
25. INSTALL NO. 1 LUGGAGE COMPARTMENT TRIM HOOK (for LH Side)
Click here
26. INSTALL REAR SEAT SIDE GARNISH LH
(a) Engage the 4 clips and 10 claws.
(b) Install the rear seat side garnish LH with the clip.
27. INSTALL FRONT DECK SIDE TRIM COVER LH
(a) Engage the 2 guides and 2 claws to install the front deck side trim cover LH.
28. INSTALL REAR ROOF SIDE RAIL GARNISH ASSEMBLY RH
HINT:
Use the same procedure as for the LH side.
29. INSTALL ROOF SIDE INNER GARNISH ASSEMBLY RH
HINT:
Use the same procedure as for the LH side.
30. CONNECT REAR NO. 2 SEAT OUTER BELT ASSEMBLY RH
HINT:
Use the same procedure as for the LH side.
31. INSTALL DECK TRIM SIDE PANEL ASSEMBLY RH
(a) Engage the 3 clips and 6 claws.
(b) Install the deck trim side panel assembly RH with the 2 bolts and 2 clips.
32. INSTALL NO. 1 LUGGAGE COMPARTMENT LIGHT ASSEMBLY (for RH Side)
Click here
33. INSTALL ROPE HOOK ASSEMBLY (for RH Side)
HINT:
Use the same procedure as for the LH side.
34. INSTALL NO. 1 LUGGAGE COMPARTMENT TRIM HOOK (for RH Side)
Click here
35. INSTALL REAR SEAT SIDE GARNISH RH
(a) Connect the connector.
(b) Engage the 4 clips and 10 claws.
(c) Install the rear seat side garnish RH with the clip.
36. INSTALL FRONT DECK SIDE TRIM COVER RH
HINT:
Use the same procedure as for the LH side.
37. INSTALL REAR NO. 2 SEAT ASSEMBLY
Click here
38. INSTALL REAR NO. 1 SEAT ASSEMBLY (for 60/40 Split Seat Type RH Side)
Click here
39. INSTALL REAR NO. 1 SEAT ASSEMBLY (for 60/40 Split Seat Type LH Side)
Click here
40. INSTALL REAR NO. 1 SEAT ASSEMBLY (for Captain Seat Type)
Click here
41. INSTALL CENTER PILLAR GARNISH ASSEMBLY LH
Click here
42. CONNECT FRONT SEAT OUTER BELT ASSEMBLY LH
Click here
43. INSTALL LOWER CENTER PILLAR GARNISH LH
Click here
44. INSTALL REAR DOOR INSIDE SCUFF PLATE LH
(a) Engage the 2 guides and 8 claws to install the rear door inside scuff plate LH as shown in the illustration.
| | Install in this Direction |
45. INSTALL REAR DOOR SCUFF PLATE LH
(a) Engage the guide, 3 clips and 5 claws to install the rear door scuff plate LH.
46. INSTALL FRONT PILLAR GARNISH LH
Click here
47. INSTALL FRONT DOOR SCUFF PLATE LH
Click here
48. INSTALL CENTER PILLAR GARNISH ASSEMBLY RH
HINT:
Use the same procedure as for the LH side.
49. CONNECT FRONT SEAT OUTER BELT ASSEMBLY RH
HINT:
Use the same procedure as for the LH side.
50. INSTALL LOWER CENTER PILLAR GARNISH RH
HINT:
Use the same procedure as for the LH side.
51. INSTALL REAR DOOR INSIDE SCUFF PLATE RH
HINT:
Use the same procedure as for the LH side.
52. INSTALL REAR DOOR SCUFF PLATE RH
HINT:
Use the same procedure as for the LH side.
53. INSTALL FRONT PILLAR GARNISH RH
HINT:
Use the same procedure as for the LH side.
54. INSTALL FRONT DOOR SCUFF PLATE RH
HINT:
Use the same procedure as for the LH side.
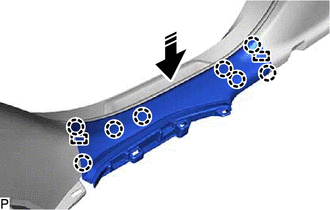
55. INSTALL REAR FLOOR FINISH PLATE
(a) Engage the 2 guides, 6 clips and 4 claws to install the rear floor finish plate as shown in the illustration.
| | Install in this Direction |
56. INSTALL FRONT DECK FLOOR BOX
(a) Engage the 2 guides, clip and 3 claws to install the front deck floor box.
57. INSTALL REAR DECK FLOOR BOX
(a) w/o Woofer:
(1) Engage the 6 claws to install the rear deck floor box.
(b) w/ Woofer:
(1) Engage the clip and 6 claws to install the rear deck floor box.
58. CONNECT REAR NO. 2 SEAT ASSEMBLY
(a) Install the 6 clips to connect the rear No. 2 seat assembly.
59. INSTALL NO. 1 DECK BOARD
(a) Engage the 5 clips to install the No. 1 deck board.
60. INSTALL DECK SIDE TRIM BOX LH
(a) Engage the 4 guides, 2 clips and 2 claws to install the deck side trim box LH.
61. INSTALL REAR NO. 4 FLOOR BOARD
(a) Install the rear No. 4 floor board.
62. INSTALL DECK BOARD ASSEMBLY
(a) Install the deck board assembly.
63. INSTALL TONNEAU COVER ASSEMBLY
(a) Install the tonneau cover assembly.
 Disassembly
DISASSEMBLY PROCEDURE 1. REMOVE NO. 2 ANTENNA CORD SUB-ASSEMBLY Click here 2. REMOVE WASHER HOSE ASSEMBLY (a) Remove the washer hose assembly. *A for Standard Roof *B for Sliding Roof ...
 Reassembly
REASSEMBLY PROCEDURE 1. INSTALL NO. 1 ROOF WIRE (a) When using a new roof headlining assembly: (1) Using a knife, cut the roof headlining assembly at the markings as shown in the illustration. *A ...
Other materials:
Lexus RX (RX 350L, RX450h) 2016-2026 Repair Manual > Safety Connect System: Dtc Check / Clear
DTC CHECK / CLEAR CHECK DTC (a) Connect the Techstream to the DLC3. (b) Turn the engine switch on (IG). (c) Turn the Techstream on. (d) Enter the following menus: Body Electrical / Telematics / Trouble Codes. Body Electrical > Telematics > Trouble Codes (e) Check for DTCs and write them down. ...
Lexus RX (RX 350L, RX450h) 2016-2026 Repair Manual > Audio And Visual System (for 12.3 Inch Display): Problem Symptoms Table
PROBLEM SYMPTOMS TABLE NOTICE: Depending on the parts that are replaced during vehicle inspection or maintenance, performing initialization, registration or calibration may be needed. Refer to Precaution for Audio and Visual System. Click here HINT:
Use the table below to help determine the cau ...
Lexus RX (RX 350L, RX450h) 2016-{YEAR} Owners Manual
- For your information
- Pictorial index
- For safety and security
- Instrument cluster
- Operation of each component
- Driving
- Lexus Display Audio system
- Interior features
- Maintenance and care
- When trouble arises
- Vehicle specifications
- For owners
Lexus RX (RX 350L, RX450h) 2016-{YEAR} Repair Manual

0.0085