Lexus RX (RX 350L, RX450h) 2016-2026 Repair Manual: Removal
REMOVAL
PROCEDURE
1. REMOVE COURTESY LIGHT ASSEMBLY (for Front Door)
| (a) Using a screwdriver with its tip wrapped with protective tape, disengage the claw. |
|
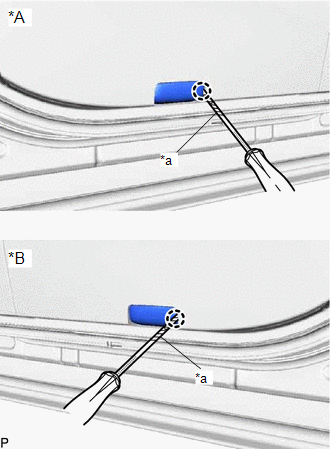
(b) Disconnect the connector to remove the courtesy light assembly.
2. REMOVE COURTESY LIGHT ASSEMBLY (for Rear Door)
| (a) Using a screwdriver with its tip wrapped with protective tape, disengage the claw. |
|
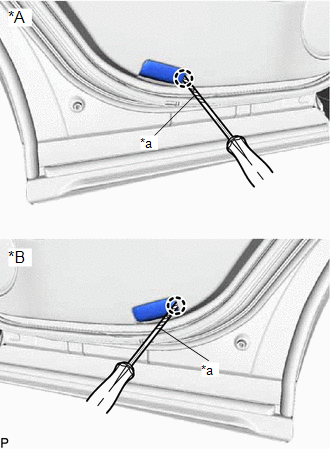
(b) Disconnect the connector to remove the courtesy light assembly.
3. REMOVE COURTESY LIGHT BULB (for Bulb Type)
(a) Using a screwdriver with its tip wrapped with protective tape, disengage the claw and remove the courtesy light housing with the courtesy light cover as shown in the illustration.
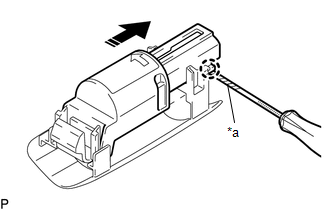
| *a | Protective Tape |
.png) | Remove in this Direction |
(b) Remove the courtesy light cover from the courtesy light housing as shown in the illustration.
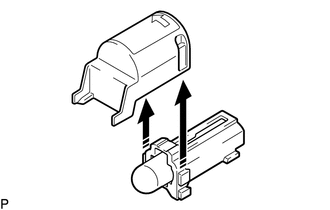
| | Remove in this Direction |
(c) Remove the courtesy light bulb from the courtesy light housing as shown in the illustration.
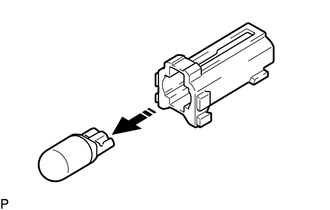
| | Remove in this Direction |
 Components
COMPONENTS ILLUSTRATION *A for Front Door *B for Bulb Type *1 COURTESY LIGHT ASSEMBLY *2 COURTESY LIGHT BULB *3 COURTESY LIGHT LENS *4 COURTESY LIGHT COVER *5 COURT ...
 Inspection
INSPECTION PROCEDURE 1. INSPECT COURTESY LIGHT ASSEMBLY (Bulb Type) (a) Apply battery voltage to the connector and check that the courtesy light comes on. OK: Measurement Condition Condition ...
Other materials:
Lexus RX (RX 350L, RX450h) 2016-2026 Repair Manual > Pre-collision System: Internal Control Module Software Incompatibility Invalid / Incompatible Software Component (U030057)
DESCRIPTION The forward recognition camera receives vehicle information from the ECM via CAN communication. If the vehicle information stored in the forward recognition camera differs from that sent from the ECM, the forward recognition camera stores this DTC. DTC No. Detection Item DTC Detec ...
Lexus RX (RX 350L, RX450h) 2016-2026 Repair Manual > Telematics System: Lost Communication with Body Control Module Missing Message (U014087,U015587,U016387)
DESCRIPTION These DTCs are stored when a malfunction occurs in the CAN communication circuit. DTC No. Detection Item DTC Detection Condition Trouble Area U014087 Lost Communication with Body Control Module Missing Message CAN reception error CAN communication system U015587 ...
Lexus RX (RX 350L, RX450h) 2016-{YEAR} Owners Manual
- For your information
- Pictorial index
- For safety and security
- Instrument cluster
- Operation of each component
- Driving
- Lexus Display Audio system
- Interior features
- Maintenance and care
- When trouble arises
- Vehicle specifications
- For owners
Lexus RX (RX 350L, RX450h) 2016-{YEAR} Repair Manual

0.0167