Lexus RX (RX 350L, RX450h) 2016-2026 Repair Manual: Removal
REMOVAL
PROCEDURE
1. REMOVE INSTRUMENT PANEL GARNISH LH
Click here .gif)
2. REMOVE FRONT DOOR SCUFF PLATE LH
Click here
3. REMOVE COWL SIDE TRIM BOARD LH
Click here
4. REMOVE NO. 1 INSTRUMENT PANEL UNDER COVER SUB-ASSEMBLY
Click here
5. DISCONNECT HOOD LOCK CONTROL LEVER SUB-ASSEMBLY
Click here
6. REMOVE LOWER INSTRUMENT PANEL FINISH PANEL SUB-ASSEMBLY
Click here
7. REMOVE HEADUP DISPLAY SWITCH ASSEMBLY (INTEGRATION CONTROL AND PANEL ASSEMBLY)
(a) Using a screwdriver, disengage the 4 claws and remove the headup display switch assembly (integration control and panel assembly) as shown in the illustration.
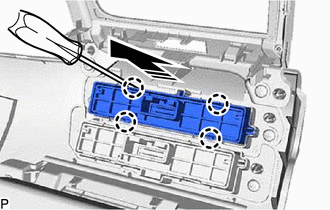
.png) | Remove in this Direction |
 Components
COMPONENTS ILLUSTRATION *1 COWL SIDE TRIM BOARD LH *2 FRONT DOOR SCUFF PLATE LH *3 HEADUP DISPLAY SWITCH ASSEMBLY (INTEGRATION CONTROL AND PANEL ASSEMBLY) *4 HOOD LOCK CONTROL LEVE ...
 Inspection
INSPECTION PROCEDURE 1. INSPECT HEADUP DISPLAY SWITCH ASSEMBLY (INTEGRATION CONTROL AND PANEL ASSEMBLY) (a) Measure the resistance according to the value(s) in the table below. Standard Resistance: ...
Other materials:
Lexus RX (RX 350L, RX450h) 2016-2026 Repair Manual > Combination Switch: Inspection
INSPECTION PROCEDURE 1. INSPECT COMBINATION SWITCH ASSEMBLY (a) Inspect the NORMAL or NORMAL CUSTOMIZE mode switch: (1) Measure the resistance according to the value(s) in the table below. Standard Resistance: Tester Connection Condition Specified Condition 8 (B) - 1 (GND) Combinati ...
Lexus RX (RX 350L, RX450h) 2016-2026 Repair Manual > Power Tilt And Power Telescopic Steering Column System: Parts Location
PARTS LOCATION ILLUSTRATION *1 TILT AND TELESCOPIC SWITCH *2 ELECTRIC POWER STEERING COLUMN SUB-ASSEMBLY (TILT STEERING GEAR ASSEMBLY W/ MOTOR) - TELESCOPIC MOTOR - TILT MOTOR *3 COMBINATION METER ASSEMBLY *4 MULTIPLEX TILT AND TELESCOPIC ECU *5 DLC3 *6 MAIN BODY ECU (M ...
Lexus RX (RX 350L, RX450h) 2016-{YEAR} Owners Manual
- For your information
- Pictorial index
- For safety and security
- Instrument cluster
- Operation of each component
- Driving
- Lexus Display Audio system
- Interior features
- Maintenance and care
- When trouble arises
- Vehicle specifications
- For owners
Lexus RX (RX 350L, RX450h) 2016-{YEAR} Repair Manual

0.0102