Lexus RX (RX 350L, RX450h) 2016-2026 Repair Manual: Removal
REMOVAL
PROCEDURE
1. REMOVE REAR NO. 2 SEAT ASSEMBLY
Click here .gif)
2. REMOVE REAR DOOR SCUFF PLATE LH
Click here
3. REMOVE REAR DOOR INSIDE SCUFF PLATE LH
Click here
4. REMOVE REAR SEAT OUTER TRACK BRACKET COVER LH
for 60/40 Split Seat Type:
Click here
for Captain Seat Type:
Click here
5. REMOVE FRONT DECK SIDE TRIM COVER LH
Click here
6. REMOVE REAR SEAT SIDE GARNISH LH
Click here
7. REMOVE NO. 1 LUGGAGE COMPARTMENT TRIM HOOK (for LH Side)
Click here
8. REMOVE ROPE HOOK ASSEMBLY (for LH Side)
Click here
9. REMOVE NO. 1 LUGGAGE COMPARTMENT LIGHT ASSEMBLY (for LH Side)
Click here
10. REMOVE NO. 2 AIR CONDITIONING CONTROL ASSEMBLY
Click here
11. REMOVE COOLER (NO. 2 ROOM TEMP. SENSOR) THERMISTOR
Click here
12. REMOVE DECK TRIM SIDE PANEL ASSEMBLY LH
Click here
13. REMOVE NO. 2 POWER OUTLET SOCKET ASSEMBLY
(a) Using a screwdriver with its tip wrapped with protective tape, disengage the claw and remove the No. 2 power outlet socket assembly as shown in the illustration.
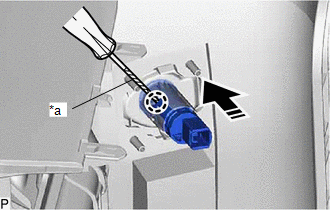
| *a | Protective Tape |
.png) | Remove in this Direction |
14. REMOVE NO. 2 POWER OUTLET SOCKET COVER
(a) Disengage the 2 claws and remove the No. 2 power outlet socket cover as shown in the illustration.

| | Remove in this Direction |
 Components
COMPONENTS ILLUSTRATION *1 COOLER (NO. 2 ROOM TEMP. SENSOR) THERMISTOR *2 DECK TRIM SIDE PANEL ASSEMBLY LH *3 FRONT DECK SIDE TRIM COVER LH *4 NO. 1 LUGGAGE COMPARTMENT LIGHT ASSEM ...
 Installation
INSTALLATION PROCEDURE 1. INSTALL NO. 2 POWER OUTLET SOCKET COVER (a) Engage the 2 claws to install the No. 2 power outlet socket cover as shown in the illustration. Install in this Direction ...
Other materials:
Lexus RX (RX 350L, RX450h) 2016-2026 Repair Manual > Heated Steering Wheel Controller: Components
COMPONENTS ILLUSTRATION *1 CRUISE CONTROL MAIN SWITCH *2 SHIFT PADDLE SWITCH (TRANSMISSION SHIFT SWITCH ASSEMBLY) *3 STEERING PAD SWITCH ASSEMBLY *4 STEERING VIBRATION AND HEATER ECU N*m (kgf*cm, ft.*lbf): Specified torque ● Non-reusable part ★ Precoated Part ...
Lexus RX (RX 350L, RX450h) 2016-2026 Repair Manual > Sfi System: Fuel Rail / System Pressure - Too Low (P008700)
DESCRIPTION The high-pressure direct injection fuel system consists of a spill control valve, check valve, fuel relief valve, fuel pressure sensor, fuel pump assembly (for high pressure side) and fuel injector assemblies (for direct injection). The spill control valve adjusts the return volume of hi ...
Lexus RX (RX 350L, RX450h) 2016-{YEAR} Owners Manual
- For your information
- Pictorial index
- For safety and security
- Instrument cluster
- Operation of each component
- Driving
- Lexus Display Audio system
- Interior features
- Maintenance and care
- When trouble arises
- Vehicle specifications
- For owners
Lexus RX (RX 350L, RX450h) 2016-{YEAR} Repair Manual

0.0094