Lexus RX (RX 350L, RX450h) 2016-2026 Repair Manual: Installation
INSTALLATION
CAUTION / NOTICE / HINT
CAUTION:
-
Be sure to read Precaution thoroughly before servicing.
Click here
.gif)
- Wear protective gloves. Sharp areas on the parts may injure your hands.
HINT:
- Use the same procedure for the RH side and LH side.
- The following procedure is for the LH side.
PROCEDURE
1. INSTALL FRONT SEAT ASSEMBLY
| (a) Place the front seat assembly in the cabin. NOTICE: Be careful not to damage the vehicle body. |
|
.png)
(b) Connect the front seat airbag assembly connector under the front seat assembly.
(1) Before connecting the connector, check that the position of the housing lock is correct as shown in the illustration.
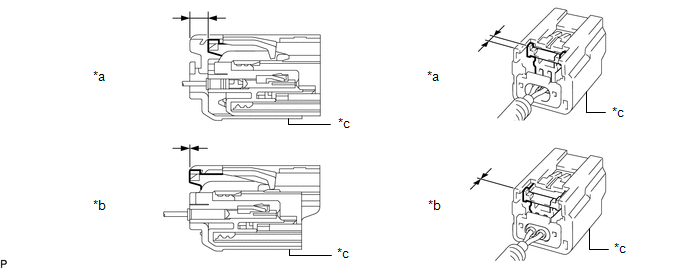
| *a | Correct | *b | Incorrect |
| *c | Yellow CPA | - | - |
(2) Be sure to engage the connectors until they are locked (when locking, make sure that a click sound can be heard).
NOTICE:
- When connecting any airbag connector, take care not to damage the airbag wire harness.
- When engaged, the white housing lock will slide. Be sure not to hold the white housing lock and upper part of the yellow CPA, as it may result in an insecure fit.
(c) Connect each connector and engage each clamp under the front seat assembly.
(d) Connect the cable to the negative (-) battery terminal.
NOTICE:
When disconnecting the cable, some systems need to be initialized after the cable is reconnected.
Click here
(e) Temporarily install the front seat assembly with the 4 bolts.
(f) Operate the slide and vertical power seat switch knob and move the front seat assembly to the rearmost position.
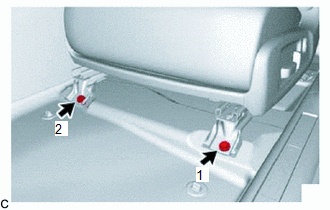
| (g) Tighten the 2 bolts on the front side of the front seat assembly. Torque: 36.7 N·m {374 kgf·cm, 27 ft·lbf} NOTICE: Tighten the bolts in the order shown in the illustration. |
|
(h) Operate the slide and vertical power seat switch knob and move the front seat assembly to the foremost position.
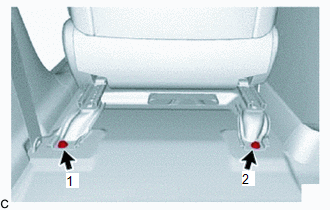
| (i) Tighten the 2 bolts on the rear side of the front seat assembly. Torque: 36.7 N·m {374 kgf·cm, 27 ft·lbf} NOTICE: Tighten the bolts in the order shown in the illustration. |
|
2. INSTALL REAR INNER SEAT TRACK BRACKET COVER
| (a) Engage the 2 claws to install the rear inner seat track bracket cover. |
|
.png)
3. INSTALL REAR OUTER SEAT TRACK BRACKET COVER
| (a) Engage the 2 claws to install the rear outer seat track bracket cover. |
|
.png)
4. INSTALL FRONT INNER SEAT TRACK BRACKET COVER
(a) Operate the slide and vertical power seat switch knob and move the front seat assembly to the rearmost position.
| (b) Engage the 2 claws to install the front inner seat track bracket cover. |
|
.png)
5. INSTALL FRONT OUTER SEAT TRACK BRACKET COVER
| (a) Engage the 2 claws to install the front outer seat track bracket cover. |
|
.png)
6. INSTALL FRONT SEAT HEADREST ASSEMBLY
(a) Install the front seat headrest assembly to the front seat assembly.
7. INITIALIZATION OF SEAT ECU (w/ Seat Position Memory System)
Click here
8. INSPECT FRONT SEAT ASSEMBLY (w/o Seat Position Memory System)
Click here
9. INSPECT FRONT SEAT ASSEMBLY (w/ Seat Position Memory System)
Click here
10. CHECK SEAT HEATER (w/ Seat Heater System)
Click here
11. INSPECT CLIMATE CONTROL SEAT SYSTEM (w/ Climate Control Seat System)
Click here
12. PERFORM DIAGNOSTIC SYSTEM CHECK
Click here
13. PERFORM ZERO POINT CALIBRATION AND SENSITIVITY CHECK (for Front Passenger Side)
Click here
 Disassembly
DISASSEMBLY CAUTION / NOTICE / HINT CAUTION: Wear protective gloves. Sharp areas on the parts may injure your hands. HINT:
Use the same procedure for the RH side and LH side.
The following proced ...
 Reassembly
REASSEMBLY CAUTION / NOTICE / HINT CAUTION: Wear protective gloves. Sharp areas on the parts may injure your hands. HINT:
Use the same procedure for the RH side and LH side.
The following procedu ...
Other materials:
Lexus RX (RX 350L, RX450h) 2016-2026 Repair Manual > Lane Control System: Problem Symptoms Table
PROBLEM SYMPTOMS TABLE HINT:
If CAN communication system and lane control system DTCs are not output and any of the following problem symptoms exist, perform troubleshooting by checking the appropriate suspected areas in the order they are listed.
Use the table below to help determine the cause ...
Lexus RX (RX 350L, RX450h) 2016-2026 Repair Manual > Amplifier Antenna (w/o Rear No. 2 Seat): Components
COMPONENTS ILLUSTRATION *1 BACK DOOR LOCK COVER *2 BACK DOOR TRIM BASE *3 BACK DOOR TRIM COVER LH *4 BACK DOOR TRIM COVER RH *5 BACK DOOR TRIM PANEL ASSEMBLY *6 BACK WINDOW UPPER PANEL TRIM *7 DOOR PULL HANDLE *8 NO. 1 AMPLIFIER ANTENNA ASSEMBLY *9 NO. 1 ...
Lexus RX (RX 350L, RX450h) 2016-{YEAR} Owners Manual
- For your information
- Pictorial index
- For safety and security
- Instrument cluster
- Operation of each component
- Driving
- Lexus Display Audio system
- Interior features
- Maintenance and care
- When trouble arises
- Vehicle specifications
- For owners
Lexus RX (RX 350L, RX450h) 2016-{YEAR} Repair Manual

0.01