Lexus RX (RX 350L, RX450h) 2016-2026 Repair Manual: Reassembly
REASSEMBLY
CAUTION / NOTICE / HINT
CAUTION:
Wear protective gloves. Sharp areas on the parts may injure your hands.
HINT:
- Use the same procedure for the RH side and LH side.
- The following procedure is for the LH side.
PROCEDURE
1. INSTALL SEAT ADJUSTER COVER CAP
| (a) Install the 2 seat adjuster cover caps. |
|
.png)
2. INSTALL FRONT SEAT CUSHION SPRING SUB-ASSEMBLY
| (a) Engage the 6 hooks to install the front seat cushion spring sub-assembly to the front seat adjuster assembly. |
|
.png)
3. INSTALL FRONT SEAT WIRE RH (for Front Passenger Side)
(a) Connect each connector and engage each clamp to install the front seat wire RH.
4. INSTALL FRONT SEAT WIRE
(a) Connect each connector and engage each clamp to install the front seat wire.
5. INSTALL FRONT SEAT CUSHION EDGE PROTECTOR LH
| (a) Engage the 3 claws and guide to install the front seat cushion edge protector LH. |
|
.png)
6. INSTALL FRONT SEAT CUSHION EDGE PROTECTOR RH
HINT:
Use the same procedure as for the LH side.
7. INSTALL FRONT SEAT LOWER CUSHION SHIELD LH (for TMC Made)
| (a) Engage the clip (B) to install the front seat lower cushion shield LH. |
|
.png)
(b) Engage the hook.
(c) Engage the clip (A).
8. INSTALL FRONT SEAT LOWER CUSHION SHIELD LH (for TMMC Made)
| (a) Engage the 2 guides to install the front seat lower cushion shield LH. |
|
.png)
(b) Engage the hook.
(c) Engage the clip.
9. INSTALL FRONT SEAT LOWER CUSHION SHIELD RH
| (a) Engage the clip to install the front seat lower cushion shield RH. |
|
.png)
(b) Engage the hook.
(c) Install the screw.
10. INSTALL SEAT CUSHION CLIMATE CONTROL BLOWER ASSEMBLY (w/ Climate Control Seat System)
| (a) Install the seat cushion climate control blower assembly. |
|
.png)
| (b) Connect the connector. |
|
.png)
11. INSTALL SEAT CUSHION CLIMATE CONTROL BRACKET (w/ Climate Control Seat System)
| (a) Using a T20 "TORX" socket wrench, install the seat cushion climate control bracket to the seat cushion climate control blower assembly with the 2 screws. |
|
.png)
12. INSTALL SEAT CUSHION CLIMATE CONTROL DUCT (w/ Climate Control Seat System)
| (a) Engage the 2 claws to install the seat cushion climate control duct to the seat cushion climate control blower assembly. |
|
.png)
13. INSTALL FRONT SEAT CUSHION AIRBAG ASSEMBLY RH (for Front Passenger Side)
Click here .gif)
14. INSTALL FRONT SEAT VERTICAL ADJUSTER ASSEMBLY (w/ Variable Seat Cushion System)
| (a) Engage the clamp. |
|
.png)
(b) Connect the connector.
| (c) Install the front seat vertical adjuster assembly with the 4 nuts. Torque: 6.0 N·m {61 kgf·cm, 53 in·lbf} |
|
.png)
15. INSTALL FRONT SEAT CUSHION HEATER ASSEMBLY (for Standard Seat Type (w/ Seat Heater System))
Click here
16. INSTALL SEAT COVER WIRE (for Standard Seat Type)
(a) Install the 6 seat cover wires.
HINT:
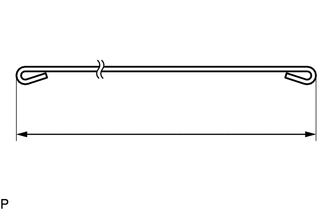
- Wire 1000 mm (3.28 ft.) or longer and shaped wire are available as supplied parts.
- For wire 1000 mm (3.28 ft.) or less in length, cut or shape 1000 mm (3.28 ft.) wire into the dimensions shown in the illustration.
-
Make sure to read the precautions before preparing the wire.
Click here
Length:
| A | 170 mm (6.70 in.) |
| B | 450 mm (1.48 ft.) |
| C | 230 mm (9.06 in.) |
| D | 250 mm (9.84 in.) |
HINT:
The dimensions shown in the illustration are the length.
17. INSTALL SEPARATE TYPE FRONT SEAT CUSHION COVER (for Standard Seat Type)
HINT:
When installing a separate type front seat cushion cover, refer to Precaution in order to prevent wrinkles from forming.
Click here
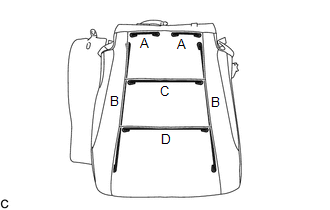
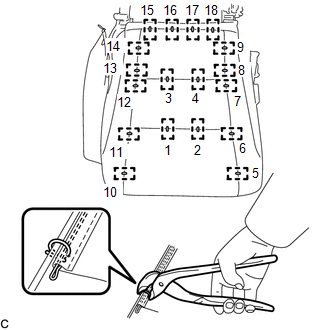
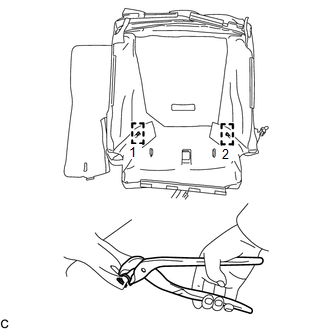
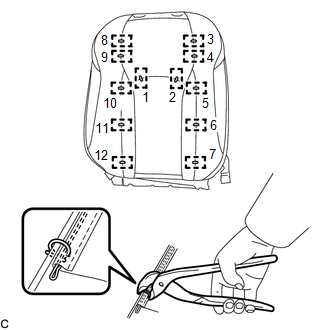
| (a) Using hog ring pliers, install the separate type front seat cushion cover to the separate type front seat cushion pad with 18 new hog rings in the order indicated in the illustration. NOTICE:
|
|
| (b) w/o Variable Seat Cushion System: (1) Using hog ring pliers, install 6 new hog rings in the order indicated in the illustration. NOTICE:
|
|
| (c) w/ Variable Seat Cushion System: (1) Using hog ring pliers, install 2 new hog rings in the order indicated in the illustration. NOTICE:
|
|
18. INSTALL SEPARATE TYPE FRONT SEAT CUSHION COVER WITH PAD (for Standard Seat Type)
(a) w/o Variable Seat Cushion System:
(1) Engage the 10 hooks to install the separate type front seat cushion cover with pad.
.png)
(b) w/ Variable Seat Cushion System:
(1) Engage the 7 hooks to install the separate type front seat cushion cover with pad.
.png)
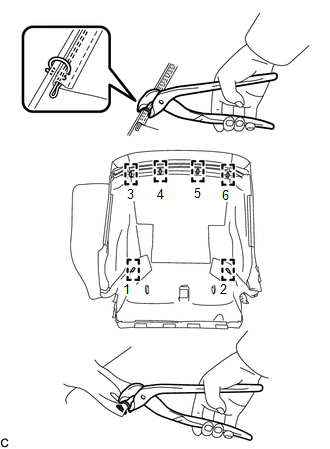
| (2) Using hog ring pliers, install 4 new hog rings in the order indicated in the illustration. NOTICE:
|
|
| (3) Engage the 4 hooks. |
|
.png)
(4) Engage the 2 fasteners.
.png)
.png) | Fastener |
(c) w/ Seat Heater System:
| (1) Engage the 4 clamps. |
|
.png)
(2) Connect the connector.
19. INSTALL FRONT SEAT CUSHION PAD WITH COVER (for Sports Seat Type)
(a) Engage the 10 hooks to install the separate type front seat cushion pad with cover.
(b) w/ Seat Heater System:
| (1) Engage the 4 clamps. |
|
(2) Connect the connector.
20. INSTALL FRONT SEAT NO. 2 WIRE
(a) Connect each connector and engage each clamp to install the front seat No. 2 wire.
21. INSTALL SEATBACK CLIMATE CONTROL BLOWER (w/ Climate Control Seat System)
| (a) Engage the 2 clips to install the seatback climate control blower. |
|
.png)
| (b) Connect the connector. |
|
.png)
22. INSTALL FRONT SEATBACK HOOK
(a) Install the 2 front seatback hooks to the lumbar support adjuster assembly.
23. INSTALL LUMBAR SUPPORT ADJUSTER ASSEMBLY
Click here
24. INSTALL FRONT SEATBACK EDGE PROTECTOR
| (a) Engage each claw to install the 2 front seatback edge protectors. |
|
.png)
25. INSTALL FRONT SEAT AIRBAG ASSEMBLY
Click here
26. INSTALL SEATBACK FELT
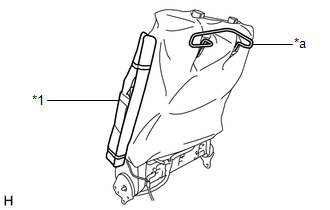
| (a) Install the seatback felt. NOTICE: Make sure to pass the front seat airbag assembly and the wire on the back of the front seatback frame sub-assembly through the seatback felt. |
|
27. INSTALL FRONT SEATBACK HEATER ASSEMBLY (for Standard Seat Type (w/ Seat Heater System))
Click here
28. INSTALL SEAT COVER WIRE (for Standard Seat Type)
(a) Install the 5 seat cover wires.
HINT:
- Wire 1000 mm (3.28 ft.) or longer and shaped wire are available as supplied parts.
- For wire 1000 mm (3.28 ft.) or less in length, cut or shape 1000 mm (3.28 ft.) wire into the dimensions shown in the illustration.
-
Make sure to read the precautions before preparing the wire.
Click here
Length:
| A | Available as a supply part. |
| B | 120 mm (4.72 in.) |
| C | 380 mm (1.25 ft.) |
HINT:
The dimensions shown in the illustration are the length.
29. INSTALL SEPARATE TYPE FRONT SEATBACK COVER (for Standard Seat Type)
HINT:
When installing a separate type front seatback cover, refer to Precaution in order to prevent wrinkles from forming.
Click here
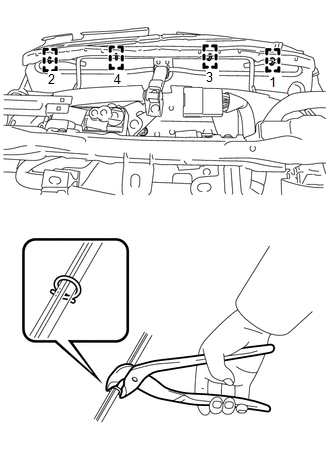
| (a) Using hog ring pliers, install the separate type front seatback cover to the separate type front seatback pad with 12 new hog rings in the order indicated in the illustration. NOTICE:
|
|
30. INSTALL SEPARATE TYPE FRONT SEATBACK COVER WITH PAD (for Standard Seat Type)
(a) Install the separate type front seatback cover with pad.
| (b) Engage the 3 brackets and install the 2 nuts. Torque: 5.5 N·m {56 kgf·cm, 49 in·lbf} NOTICE:
|
|
.png)
31. INSTALL FRONT SEATBACK PAD WITH COVER (for Sports Seat Type)
(a) Install the front seatback pad with cover.
| (b) Engage the 2 brackets and install the 2 nuts. Torque: 5.5 N·m {56 kgf·cm, 49 in·lbf} NOTICE:
|
|
.png)
32. INSTALL FRONT SEAT HEADREST SUPPORT
| (a) Engage each claw to install the 2 front seat headrest supports. |
|
.png)
| (b) Engage the 10 hooks. |
|
.png)
(c) w/ Climate Control Seat System:
| (1) Engage the 2 claws to install the seatback climate control blower. |
|
.png)
| (d) Engage the clamp to install the front seat No. 2 wire. |
|
.png)
(e) Engage the 2 fasteners.
.png)
| | Fastener |
33. INSTALL FRONT SEATBACK BOARD SUB-ASSEMBLY
| (a) Engage the 2 hooks to install the front seatback board sub-assembly. |
|
.png)
| (b) Install the 2 screws. |
|
.png)
34. INSTALL SEPARATE TYPE FRONT SEATBACK ASSEMBLY
| (a) Engage the 4 guides to install the separate type front seatback assembly to the separate type front seat cushion assembly. |
|
.png)
(b) Install the 4 bolts.
Torque:
42 N·m {428 kgf·cm, 31 ft·lbf}
| (c) Engage the claw and 3 clamps to install the front seat airbag assembly wire harness. HINT: Engage the claw first. |
|
.png)
(d) w/ Seat Heater System:
| (1) Engage the clamp. |
|
.png)
(2) Connect the connector.
(e) Engage the fastener to secure the front seat airbag assembly wire harness.
.png)
| | Fastener |
| (f) Engage the clamp. |
|
.png)
(g) Connect the connector.
| (h) Engage the 3 hooks. |
|
.png)
35. INSTALL SEAT VARIABLE CUSHION SWITCH (w/ Variable Seat Cushion System)
Click here
36. INSTALL FRONT LUMBAR POWER SEAT SWITCH
Click here
37. INSTALL FRONT POWER SEAT SWITCH (w/o Seat Position Memory System)
Click here
38. INSTALL POSITION CONTROL ECU AND SWITCH ASSEMBLY LH (w/ Seat Position Memory System)
Click here
39. INSTALL RECLINING POWER SEAT SWITCH KNOB
| (a) Engage the 4 claws to install the reclining power seat switch knob. |
|
40. INSTALL SLIDE AND VERTICAL POWER SEAT SWITCH KNOB
| (a) Engage the 4 claws to install the slide and vertical power seat switch knob. |
|

41. INSTALL FRONT SEAT INNER CUSHION SHIELD
| (a) Engage the claw and guide to install the front seat inner cushion shield. |
|
.png)
| (b) Engage the claw and 3 guides. |
|
.png)
42. INSTALL INNER NO. 1 FRONT SEAT CUSHION SHIELD (for Standard Seat Type)
| (a) Engage the claw and clip to install the inner No. 1 front seat cushion shield. |
|
.png)
(b) w/ Variable Seat Cushion System:
| (1) Engage the hook. |
|
.png)
| (c) Engage the clamp. |
|
.png)
| (d) Install the 2 screws. |
|
.png)
43. INSTALL FRONT SEAT CUSHION SHIELD (for Standard Seat Type)
| (a) Connect the front lumbar power seat switch connector. |
|
.png)
| (b) w/o Seat Position Memory System: (1) Connect the front power seat switch connector. |
|
.png)
| (c) w/ Seat Position Memory System: (1) Connect the 2 position control ECU and switch assembly LH connectors. |
|
.png)
(d) w/ Variable Seat Cushion System:
| (1) Connect the seat variable cushion switch connector. |
|
.png)
| (e) Engage the 3 claws to close the wire harness cover. |
|
.png)
(f) Install the wire harness to the wire harness guide.
.png)
.png) | Wire Harness Guide |
(g) Engage the 2 clamps.
| (h) Engage the 3 claws. |
|
.png)
| (i) Engage the clip and 2 guides to install the front seat cushion shield. |
|
.png)
| (j) Engage the claw and 3 guides. |
|
.png)
44. INSTALL FRONT SEAT CUSHION SHIELD (for Sports Seat Type)
| (a) Connect the front lumbar power seat switch connector. |
|
| (b) w/o Seat Position Memory System: (1) Connect the front power seat switch connector. |
|
| (c) w/ Seat Position Memory System: (1) Connect the 2 position control ECU and switch assembly LH connectors. |
|
| (d) Engage the 3 claws to close the wire harness cover. |
|
(e) Install the wire harness to the wire harness guide.
| | Wire Harness Guide |
(f) Engage the 2 clamps.
| (g) Engage the clip and 2 guides to install the front seat cushion shield. |
|
| (h) Engage the claw and 3 guides. |
|
45. INSTALL INNER NO. 1 FRONT SEAT CUSHION SHIELD (for Sports Seat Type)
| (a) Engage the clamp. |
|
| (b) Install the clip to the inner No. 1 front seat cushion shield. |
|
| (c) Engage the 3 guides to install the inner No. 1 front seat cushion shield. |
|
.png)
(d) Engage the 2 claws as shown in the illustration.
.png) | Slide |
| (e) Engage the claw. |
|
.png)
| (f) Engage the clip. |
|
| (g) Install the screw. |
|
.png)
46. CONNECT FRONT SEATBACK BOARD SUB-ASSEMBLY
| (a) Connect the 2 rubber bands of the front seatback board sub-assembly. |
|
.png)
47. INSTALL FRONT SEAT INNER BELT ASSEMBLY LH (for Driver Side)
Click here
48. INSTALL FRONT SEAT INNER BELT ASSEMBLY RH (for Front Passenger Side)
Click here
49. INSTALL SEAT HEATER CONTROL SUB-ASSEMBLY (w/ Seat Heater System)
Click here
50. INSTALL OCCUPANT DETECTION ECU (for Front Passenger Side)
Click here
51. INSTALL SEAT POSITION AIRBAG SENSOR (for Driver Side)
Click here
 Installation
INSTALLATION CAUTION / NOTICE / HINT CAUTION:
Be sure to read Precaution thoroughly before servicing.
Click here
Wear protective gloves. Sharp areas on the parts may injure your hands.
HIN ...

Other materials:
Lexus RX (RX 350L, RX450h) 2016-2026 Repair Manual > Steering Pad Switch: Removal
REMOVAL CAUTION / NOTICE / HINT The necessary procedures (adjustment, calibration, initialization, or registration) that must be performed after parts are removed, installed, or replaced during the steering pad switch assembly removal/installation are shown below. Necessary Procedure After Parts Rem ...
Lexus RX (RX 350L, RX450h) 2016-2026 Repair Manual > Rear Door Speaker: Installation
INSTALLATION CAUTION / NOTICE / HINT HINT:
Use the same procedure for the RH side and LH side.
The following procedure is for the LH side.
PROCEDURE 1. INSTALL REAR SPEAKER ASSEMBLY NOTICE: Do not touch the speaker cone. (a) Connect the connector. (b) Engage the 2 guides to temporarily insta ...
Lexus RX (RX 350L, RX450h) 2016-{YEAR} Owners Manual
- For your information
- Pictorial index
- For safety and security
- Instrument cluster
- Operation of each component
- Driving
- Lexus Display Audio system
- Interior features
- Maintenance and care
- When trouble arises
- Vehicle specifications
- For owners
Lexus RX (RX 350L, RX450h) 2016-{YEAR} Repair Manual

0.0115