Lexus RX (RX 350L, RX450h) 2016-2026 Repair Manual: Inspection
INSPECTION
PROCEDURE
1. INSPECT FOLD SEAT SWITCH ASSEMBLY
(a) Inspect fold seat switch assembly
| (1) Measure the resistance according to the value(s) in the table below. Standard Resistance: Ground
|
|
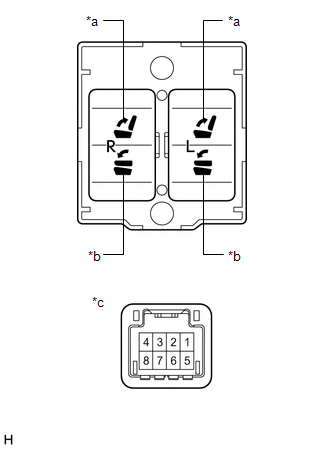
(b) Check that the illuminates.
(1) Apply battery voltage to the fold seat switch assembly and check that the illuminates.
OK:
| Battery Connection | Specified Condition |
|---|---|
| Battery positive (+) → 5 Battery negative (-) → 4 | Illuminates |
2. INSPECT NO. 1 FOLD SEAT SWITCH ASSEMBLY
(a) Inspect No. 1 fold seat switch assembly
| (1) Measure the resistance according to the value(s) in the table below. Standard Resistance: Ground
|
|
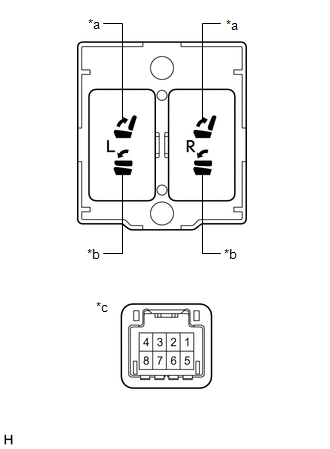
(b) Check that the illuminates.
(1) Apply battery voltage to the No. 1 fold seat switch assembly and check that the illuminates.
OK:
| Battery Connection | Specified Condition |
|---|---|
| Battery positive (+) → 5 Battery negative (-) → 4 | Illuminates |
 Removal
REMOVAL PROCEDURE 1. REMOVE REAR DOOR SCUFF PLATE RH (for Front Side) HINT: Use the same procedure as for the LH side. Click here 2. REMOVE REAR DOOR INSIDE SCUFF PLATE RH (for Front Side) HINT: Us ...
 Installation
INSTALLATION PROCEDURE 1. INSTALL NO. 1 FOLD SEAT SWITCH ASSEMBLY (for Rear Side) (a) Engage the 2 guides and 4 claws to install the No. 1 fold seat switch assembly as shown in the illustration. ...
Other materials:
Lexus RX (RX 350L, RX450h) 2016-2026 Repair Manual > Navigation System: Speaker Circuit
DESCRIPTION If there is a short in a speaker circuit, the stereo component amplifier assembly detects it and stops output to the speakers. Thus sound cannot be heard from the speakers even if there is no malfunction in the stereo component amplifier assembly, DCM (telematics transceiver) or speakers ...
Lexus RX (RX 350L, RX450h) 2016-2026 Repair Manual > Rear Door Outside Moulding: Installation
INSTALLATION CAUTION / NOTICE / HINT HINT:
Use the same procedure for the RH side and LH side.
The following procedure is for the LH side.
PROCEDURE 1. INSTALL NO. 3 REAR DOOR WEATHERSTRIP (a) Engage the 7 clips to install the No. 3 rear door weatherstrip. 2. INSTALL REAR DOOR LOWER OUTSIDE ...
Lexus RX (RX 350L, RX450h) 2016-{YEAR} Owners Manual
- For your information
- Pictorial index
- For safety and security
- Instrument cluster
- Operation of each component
- Driving
- Lexus Display Audio system
- Interior features
- Maintenance and care
- When trouble arises
- Vehicle specifications
- For owners
Lexus RX (RX 350L, RX450h) 2016-{YEAR} Repair Manual

0.0111