Lexus RX (RX 350L, RX450h) 2016-2026 Repair Manual: Removal
REMOVAL
PROCEDURE
1. REMOVE REAR DOOR SCUFF PLATE RH (for Front Side)
HINT:
Use the same procedure as for the LH side.
Click here .gif)
2. REMOVE REAR DOOR INSIDE SCUFF PLATE RH (for Front Side)
HINT:
Use the same procedure as for the LH side.
Click here
3. REMOVE REAR SEAT OUTER TRACK BRACKET COVER RH (for Front Side)
for 60/40 Split Seat Type:
Click here
for Captain Seat Type:
HINT:
Use the same procedure as for the LH side.
Click here
4. REMOVE FRONT DECK SIDE TRIM COVER RH (for Front Side)
HINT:
Use the same procedure as for the LH side.
Click here
5. REMOVE REAR SEAT SIDE GARNISH RH (for Front Side)
HINT:
Use the same procedure as for the LH side.
Click here
6. REMOVE FOLD SEAT SWITCH ASSEMBLY (for Front Side)
(a) Disengage the 4 claws and 2 guides to remove the fold seat switch assembly as shown in the illustration.
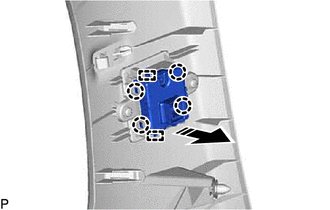
.png) | Remove in this Direction |
7. REMOVE TONNEAU COVER ASSEMBLY (for Rear Side)
Click here
8. REMOVE DECK BOARD ASSEMBLY (for Rear Side)
Click here
9. REMOVE REAR NO. 4 FLOOR BOARD (for Rear Side)
Click here
10. REMOVE NO. 1 DECK BOARD (for Rear Side)
Click here
11. DISCONNECT REAR NO. 2 SEAT ASSEMBLY (for Rear Side)
Click here
12. REMOVE DECK SIDE TRIM BOX LH (for Rear Side)
Click here
13. REMOVE REAR DECK FLOOR BOX (for Rear Side)
Click here
14. REMOVE FRONT DECK FLOOR BOX (for Rear Side)
Click here
15. REMOVE REAR FLOOR FINISH PLATE (for Rear Side)
Click here
16. REMOVE REAR DOOR SCUFF PLATE LH (for Rear Side)
Click here
17. REMOVE REAR DOOR INSIDE SCUFF PLATE LH (for Rear Side)
Click here
18. REMOVE REAR SEAT OUTER TRACK BRACKET COVER LH (for Rear Side)
for 60/40 Split Seat Type:
Click here
for Captain Seat Type:
Click here
19. REMOVE FRONT DECK SIDE TRIM COVER LH (for Rear Side)
Click here
20. REMOVE REAR SEAT SIDE GARNISH LH (for Rear Side)
Click here
21. REMOVE NO. 1 LUGGAGE COMPARTMENT TRIM HOOK (for Rear Side)
Click here
22. REMOVE ROPE HOOK ASSEMBLY (for Rear Side)
Click here
23. REMOVE NO. 1 LUGGAGE COMPARTMENT LIGHT ASSEMBLY (for Rear Side)
Click here
24. REMOVE NO. 2 AIR CONDITIONING CONTROL ASSEMBLY (for Rear Side)
Click here
25. REMOVE COOLER (NO. 2 ROOM TEMP. SENSOR) THERMISTOR (for Rear Side)
Click here
26. REMOVE DECK TRIM SIDE PANEL ASSEMBLY LH (for Rear Side)
Click here
27. REMOVE NO. 1 FOLD SEAT SWITCH ASSEMBLY (for Rear Side)
(a) Disengage the 4 claws and 2 guides to remove the No. 1 fold seat switch assembly as shown in the illustration.
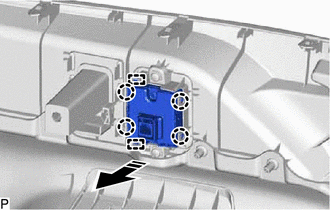
| | Remove in this Direction |
 Components
COMPONENTS ILLUSTRATION *A for Front Side - - *1 FOLD SEAT SWITCH ASSEMBLY *2 FRONT DECK SIDE TRIM COVER RH *3 REAR DOOR INSIDE SCUFF PLATE RH *4 REAR DOOR SCUFF PLATE RH ...
 Inspection
INSPECTION PROCEDURE 1. INSPECT FOLD SEAT SWITCH ASSEMBLY (a) Inspect fold seat switch assembly (1) Measure the resistance according to the value(s) in the table below. Standard Resistance: Ground ...
Other materials:
Lexus RX (RX 350L, RX450h) 2016-2026 Repair Manual > Front Door Speaker: Components
COMPONENTS ILLUSTRATION *A for Driver Side *B for Front Passenger Side *1 COURTESY LIGHT ASSEMBLY *2 DOOR ARMREST COVER *3 FRONT DOOR INSIDE HANDLE BEZEL PLUG *4 FRONT DOOR NO. 1 STIFFENER CUSHION *5 FRONT DOOR TRIM BOARD SUB-ASSEMBLY *6 FRONT NO. 1 SPEAKER AS ...
Lexus RX (RX 350L, RX450h) 2016-2026 Repair Manual > Vehicle Stability Control System: Brake Switch "A" Circuit Short to Ground (P057111)
DESCRIPTION The skid control ECU (brake actuator assembly) inputs the stop light signal and brake operation condition. When the brake pedal is depressed and the stop light switch signal is not input, this DTC is output. DTC No. Detection Item DTC Detection Condition Trouble Area P057111 ...
Lexus RX (RX 350L, RX450h) 2016-{YEAR} Owners Manual
- For your information
- Pictorial index
- For safety and security
- Instrument cluster
- Operation of each component
- Driving
- Lexus Display Audio system
- Interior features
- Maintenance and care
- When trouble arises
- Vehicle specifications
- For owners
Lexus RX (RX 350L, RX450h) 2016-{YEAR} Repair Manual

0.0114