Lexus RX (RX 350L, RX450h) 2016-2026 Repair Manual: Installation
INSTALLATION
CAUTION / NOTICE / HINT
CAUTION:
Wear protective gloves. Sharp areas on the seat frame may injure your hands.
PROCEDURE
1. INSTALL REFRESHING SEAT SWITCH (for Console Box)
(a) Engage the 2 guides.
(b) Install the refreshing seat switch with the 3 screws.
2. INSTALL CONSOLE REAR END PANEL SUB-ASSEMBLY (for Console Box)
Click here .gif)
3. INSTALL REAR SEAT HEATER SWITCH (for Armrest)
(a) Install the rear seat heater switch with the 3 screws.
(b) Connect the connector.
4. INSTALL NO. 2 REAR SEAT CENTER ARMREST BOX (for Armrest)
Click here
5. INSTALL REAR SEAT CENTER ARMREST DOOR SUB-ASSEMBLY (for Armrest)
Click here
6. INSTALL CUP HOLDER ASSEMBLY (for Armrest)
Click here
7. INSTALL REAR SEAT CENTER ARMREST COVER (for Armrest)
Click here
8. INSTALL REAR SEAT CENTER ARMREST ASSEMBLY (for Armrest)
Click here
9. INSTALL CENTER ARMREST HINGE COVER RH (for Armrest)
Click here
10. INSTALL ARMREST ASSEMBLY (for Armrest)
Click here
11. INSTALL NO. 1 SEAT ARMREST ASSEMBLY (for Armrest)
Click here
12. INSTALL CENTER ARMREST HINGE COVER LH (for Armrest)
Click here
13. INSTALL REAR SEATBACK BOARD SUB-ASSEMBLY (for Armrest)
(a) Engage the 5 clips and 10 claws to install the rear seatback board sub-assembly as shown in the illustration.
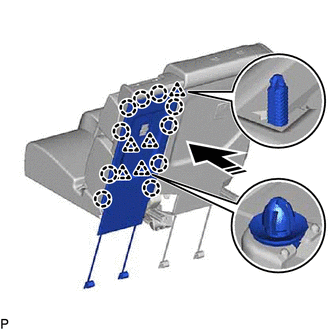
.png) | Install in this Direction |
(b) Engage the 4 hooks.
(c) Engage the 2 hooks.
14. INSTALL REAR SEATBACK COVER (for Armrest)
Click here
15. INSTALL REAR NO. 1 SEAT ASSEMBLY RH (for Armrest)
for 60/40 Split Seat Type RH Side:
Click here
 Removal
REMOVAL CAUTION / NOTICE / HINT The necessary procedures (adjustment, calibration, initialization or registration) that must be performed after parts are removed and installed, or replaced during rear ...

Other materials:
Lexus RX (RX 350L, RX450h) 2016-2026 Repair Manual > Audio And Visual System (for 8 Inch Display): USB Device Malfunction (B1585)
DESCRIPTION This DTC is stored when a malfunction occurs in a connected device. DTC No. Detection Item DTC Detection Condition Trouble Area B1585 USB Device Malfunction When any of the following conditions is met:
A non mass-storage class or incompatible protocol USB device is co ...
Lexus RX (RX 350L, RX450h) 2016-2026 Repair Manual > Audio And Visual System (for 12.3 Inch Display): Reverse Signal Circuit between Radio Receiver Assembly and Navigation ECU
DESCRIPTION This circuit includes the navigation ECU and radio receiver assembly. WIRING DIAGRAM PROCEDURE 1. CHECK HARNESS AND CONNECTOR (RADIO RECEIVER ASSEMBLY - NAVIGATION ECU) (a) Disconnect the J149 radio receiver assembly connector. (b) Disconnect the J153 navigation ECU connector. ...
Lexus RX (RX 350L, RX450h) 2016-{YEAR} Owners Manual
- For your information
- Pictorial index
- For safety and security
- Instrument cluster
- Operation of each component
- Driving
- Lexus Display Audio system
- Interior features
- Maintenance and care
- When trouble arises
- Vehicle specifications
- For owners
Lexus RX (RX 350L, RX450h) 2016-{YEAR} Repair Manual

0.0128