Lexus RX (RX 350L, RX450h) 2016-2026 Repair Manual: Installation
INSTALLATION
PROCEDURE
1. INSTALL REAR CENTER SEAT OUTER BELT ASSEMBLY
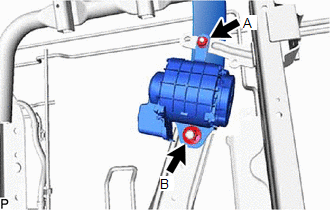
(a) Install the rear center seat outer belt assembly with the 2 nuts.
Torque:
Nut (A) :
12.5 N·m {127 kgf·cm, 9 ft·lbf}
Nut (B) :
42 N·m {428 kgf·cm, 31 ft·lbf}
2. INSTALL SEATBACK FELT RH (for TMK Made)
Click here .gif)
3. INSTALL SEPARATE TYPE REAR SEATBACK COVER WITH PAD
Click here
4. INSTALL REAR SEAT SHOULDER BELT COVER
Click here
5. INSTALL SEAT BELT ANCHOR COVER CAP
Click here
6. INSTALL REAR SEATBACK BOARD CARPET ASSEMBLY RH
Click here
7. INSTALL REAR SEATBACK COVER RH
Click here
8. CONNECT REAR CENTER SEAT OUTER BELT ASSEMBLY
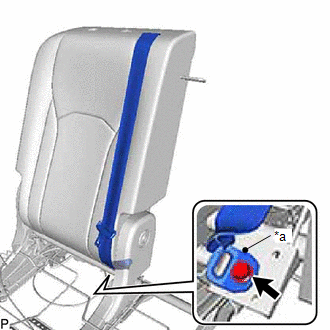
| *a | Protruding Part |
(a) Connect the anchor of the rear center seat outer belt assembly with the bolt.
Torque:
42 N·m {428 kgf·cm, 31 ft·lbf}
NOTICE:
Do not allow the anchor part of the rear center seat outer belt assembly to overlap the protruding part of the seatback frame.
9. INSTALL SEPARATE TYPE REAR SEAT CUSHION COVER WITH PAD
Click here
10. CONNECT SEPARATE TYPE REAR SEAT CUSHION COVER WITH PAD
Click here
11. INSTALL NO. 1 RECLINING ADJUSTER RELEASE HANDLE RH (for Manual Seat)
Click here
12. INSTALL REAR SEAT COVER CAP RH (for Manual Seat)
Click here
13. INSTALL POWER SEAT SWITCH ASSEMBLY (for Power Seat)
Click here
14. INSTALL REAR SEAT ASSEMBLY RH
Click here
 Inspection
INSPECTION PROCEDURE 1. INSPECT REAR CENTER SEAT OUTER BELT ASSEMBLY (a) Before installing the rear center seat outer belt assembly, check the ELR function. NOTICE: Do not disassemble the retractor ...

Other materials:
Lexus RX (RX 350L, RX450h) 2016-2026 Repair Manual > Power Back Door Control Switch: Installation
INSTALLATION PROCEDURE 1. INSTALL DOOR CONTROL SWITCH (INTEGRATION CONTROL AND PANEL ASSEMBLY) (a) Engage the 4 claws as shown in the illustration to install the door control switch (integration control and panel assembly). Install in this Direction 2. INSTALL LOWER INSTRUMENT PANEL FINISH ...
Lexus RX (RX 350L, RX450h) 2016-2026 Repair Manual > Can Communication System: Open in Bus 5 Main Bus Line
DESCRIPTION There may be an open circuit in one of the bus 5 main lines when the resistance between terminals 15 (CA5H) and 16 (CA5L) of the network gateway ECU is 70 Ω or higher. Symptom Trouble Area Resistance between terminals 15 (CA5H) and 16 (CA5L) of network gateway ECU is 70 Ω or h ...
Lexus RX (RX 350L, RX450h) 2016-{YEAR} Owners Manual
- For your information
- Pictorial index
- For safety and security
- Instrument cluster
- Operation of each component
- Driving
- Lexus Display Audio system
- Interior features
- Maintenance and care
- When trouble arises
- Vehicle specifications
- For owners
Lexus RX (RX 350L, RX450h) 2016-{YEAR} Repair Manual

0.0087