
Lexus RX (RX 350L, RX450h) 2016-2026 Repair Manual: Components
COMPONENTS
ILLUSTRATION
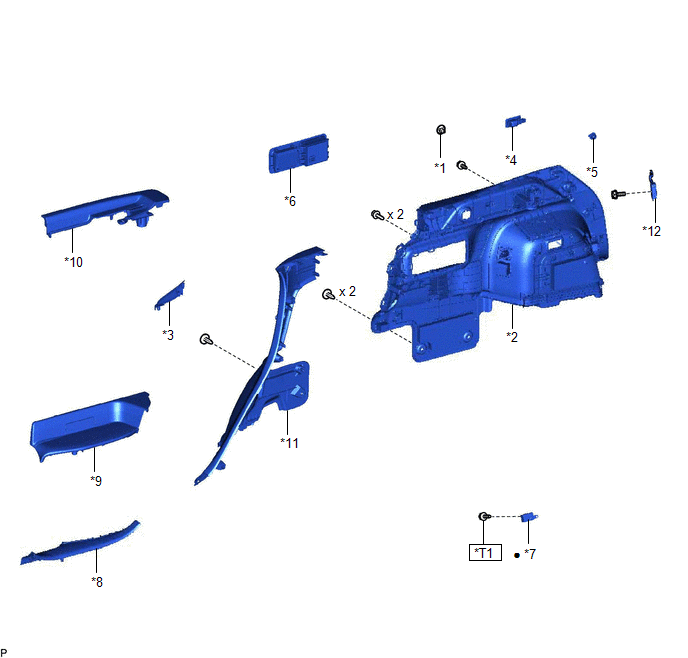
| *1 | COOLER (NO. 2 ROOM TEMP. SENSOR) THERMISTOR | *2 | DECK TRIM SIDE PANEL ASSEMBLY LH |
| *3 | FRONT DECK SIDE TRIM COVER LH | *4 | NO. 1 LUGGAGE COMPARTMENT LIGHT ASSEMBLY |
| *5 | NO. 1 LUGGAGE COMPARTMENT TRIM HOOK | *6 | NO. 2 AIR CONDITIONING CONTROL ASSEMBLY |
| *7 | RADIO SETTING CONDENSER | *8 | REAR DOOR INSIDE SCUFF PLATE LH |
| *9 | REAR DOOR SCUFF PLATE LH | *10 | REAR SEAT OUTER TRACK BRACKET COVER LH |
| *11 | REAR SEAT SIDE GARNISH LH | *12 | ROPE HOOK ASSEMBLY |
.png) | N*m (kgf*cm, ft.*lbf): Specified torque | ● | Non-reusable part |
| *T1 | for Type A: 7.5 (76, 66 in.*lbf) for Type B: 10 (102, 7) | - | - |

 On-vehicle Inspection
ON-VEHICLE INSPECTION PROCEDURE 1. INSPECT RADIO SETTING CONDENSER (a) With the radio setting condenser installed, check that there is no looseness or other abnormalities. (b) Measure the resistanc ...
Other materials:
Lexus RX (RX 350L, RX450h) 2016-2026 Repair Manual > Luggage Speaker(w/ Rear No. 2 Seat): Inspection
INSPECTION PROCEDURE 1. INSPECT REAR NO. 3 SPEAKER ASSEMBLY (a) With the speaker installed, check that there is no looseness or other abnormalities. (b) Check that there is no foreign matter in the speaker, no tears on the speaker cone or other abnormalities. (c) Measure the resistance of the spe ...
Lexus RX (RX 350L, RX450h) 2016-2026 Owners Manual > Adjusting the seats: Front seats
Adjustment procedure
Seat position adjustment switch
Seat cushion (front) angle adjustment
switch
Vertical height adjustment switch
Seatback angle adjustment switch
Lumbar support firmness adjustment
switch
Lumbar support height adjustment
switch (if equipped)
Seat cushion leng ...
Lexus RX (RX 350L, RX450h) 2016-{YEAR} Owners Manual
- For your information
- Pictorial index
- For safety and security
- Instrument cluster
- Operation of each component
- Driving
- Lexus Display Audio system
- Interior features
- Maintenance and care
- When trouble arises
- Vehicle specifications
- For owners
Lexus RX (RX 350L, RX450h) 2016-{YEAR} Repair Manual

0.01