Lexus RX (RX 350L, RX450h) 2016-2026 Repair Manual: Installation
INSTALLATION
CAUTION / NOTICE / HINT
HINT:
- Use the same procedure for the RH side and LH side.
- The following procedure is for the LH side.
PROCEDURE
1. INSTALL OUTER BELT ANCHOR BRACKET SUB-ASSEMBLY (for TMC Made)
(a) Install the outer belt anchor bracket sub-assembly with the 2 bolts.
Torque:
42 N·m {428 kgf·cm, 31 ft·lbf}
2. INSPECT REAR NO. 1 SEAT OUTER BELT ASSEMBLY
Click here .gif)
3. INSTALL REAR NO. 1 SEAT OUTER BELT ASSEMBLY (for TMC Made)
(a) Engage the guide and temporarily install the rear No. 1 seat outer belt assembly with the nut and bolt.
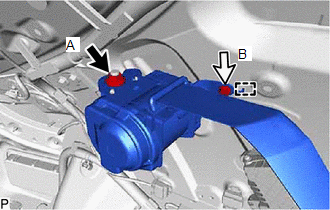
.png) | Nut |
.png) | Bolt |
(b) Fully tighten the nut (A) and then the bolt (B) to install the rear No. 1 seat outer belt assembly.
Torque:
Nut (A) :
42 N·m {428 kgf·cm, 31 ft·lbf}
Bolt (B) :
12.5 N·m {127 kgf·cm, 9 ft·lbf}
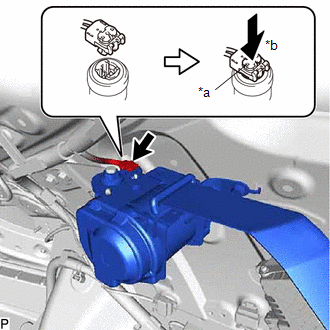
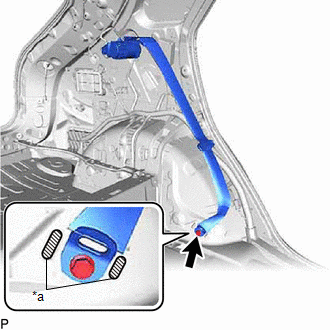
| (c) Connect the pretensioner connector and lock the locking button as shown in the illustration. NOTICE: Securely lock the locking button. |
|
(d) Check that the ELR locks.
NOTICE:
This check should be performed with the rear No. 1 seat outer belt assembly installed to the vehicle.
(1) With the rear No. 1 seat outer belt assembly installed to the vehicle, check that the belt locks when it is pulled out quickly.
4. INSTALL REAR NO. 1 SEAT OUTER BELT ASSEMBLY (for TMMC Made)
| (a) Engage the guide and temporarily install the rear No. 1 seat outer belt assembly with the 3 bolts. |
|
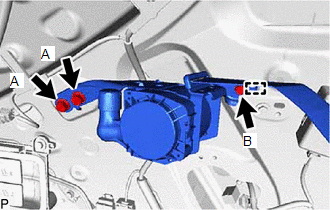
(b) Fully tighten the 3 bolts to install the rear No. 1 seat outer belt assembly.
Torque:
Bolt (A) :
42 N·m {428 kgf·cm, 31 ft·lbf}
Bolt (B) :
12.5 N·m {127 kgf·cm, 9 ft·lbf}
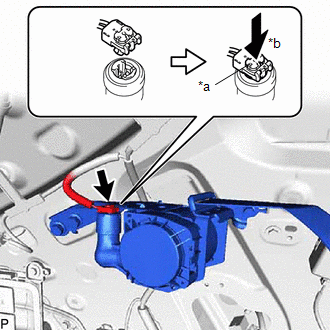
| (c) Connect the pretensioner connector and lock the locking button as shown in the illustration. NOTICE: Securely lock the locking button. |
|
(d) Check that the ELR locks.
NOTICE:
This check should be performed with the rear No. 1 seat outer belt assembly installed to the vehicle.
(1) With the rear No. 1 seat outer belt assembly installed to the vehicle, check that the belt locks when it is pulled out quickly.
5. INSTALL NO. 2 CLEARANCE WARNING BUZZER (for RH Side)
w/ Intelligent Clearance Sonar System:
Click here
6. CONNECT REAR NO. 1 SEAT OUTER BELT ASSEMBLY
| (a) Connect the floor anchor of the rear No. 1 seat outer belt assembly with the bolt. Torque: 42 N·m {428 kgf·cm, 31 ft·lbf} NOTICE: Do not allow the anchor part of the rear No. 1 seat outer belt assembly to overlap the protruding parts of the floor panel. |
|
7. INSTALL ROOF SIDE INNER GARNISH ASSEMBLY
Click here
8. INSTALL DECK TRIM SIDE PANEL ASSEMBLY LH (for LH Side)
Click here
9. INSTALL DECK TRIM SIDE PANEL ASSEMBLY RH (for RH Side)
Click here
10. INSTALL RECLINING REMOTE CONTROL BEZEL RH (for RH Side)
w/o Rear Power Seat System:
Click here
11. INSTALL FOLD SEAT SWITCH ASSEMBLY (for RH Side)
w/ Rear Power Seat System:
Click here
12. INSTALL NO. 1 LUGGAGE COMPARTMENT LIGHT ASSEMBLY (for LH Side)
Click here
13. INSTALL NO. 1 LUGGAGE COMPARTMENT LIGHT ASSEMBLY (for RH Side)
Click here
14. INSTALL ROPE HOOK ASSEMBLY (for LH Side)
Click here
15. INSTALL NO. 1 LUGGAGE COMPARTMENT TRIM HOOK (for LH Side)
Click here
16. INSTALL NO. 1 LUGGAGE COMPARTMENT TRIM HOOK (for RH Side)
Click here
17. INSTALL REAR FLOOR FINISH SIDE PLATE
Click here
18. INSTALL REAR SEAT SIDE GARNISH
Click here
19. INSTALL UPPER QUARTER TRIM PAD
Click here
20. INSTALL REAR SEAT ASSEMBLY LH (for LH Side)
Click here
21. INSTALL REAR SEAT ASSEMBLY RH (for RH Side)
Click here
22. INSTALL REAR DOOR SCUFF PLATE
Click here
23. INSTALL REAR FLOOR FINISH PLATE
Click here
24. INSTALL DECK SIDE TRIM BOX RH
Click here
25. INSTALL FRONT DECK FLOOR BOX (for LH Side)
Click here
26. INSTALL REAR NO. 4 FLOOR BOARD
Click here
27. INSTALL REAR DECK FLOOR BOX
Click here
28. INSTALL REAR NO. 3 FLOOR BOARD
Click here
29. INSTALL DECK BOARD ASSEMBLY
Click here
30. INSTALL TONNEAU COVER ASSEMBLY
Click here
31. CONNECT CABLE TO NEGATIVE BATTERY TERMINAL
NOTICE:
When disconnecting the cable, some systems need to be initialized after the cable is reconnected.
Click here
32. INSPECT SRS WARNING LIGHT
Click here
 Disposal
DISPOSAL CAUTION / NOTICE / HINT CAUTION: Before performing pre-disposal deployment of any SRS part, review and closely follow all applicable environmental and hazardous material regulations. Pre-disp ...
 Seat Belt Tension Reducer System
Parts LocationPARTS LOCATION ILLUSTRATION *A w/ Seat Position Memory System - - *1 FRONT SEAT INNER BELT ASSEMBLY LH *2 FRONT SEAT INNER BELT ASSEMBLY RH *3 FRONT SEAT OUTER ...
Other materials:
Lexus RX (RX 350L, RX450h) 2016-2026 Repair Manual > Audio And Visual System (for 12.3 Inch Display): Microphone Circuit
DESCRIPTION
The radio receiver assembly and telephone microphone assembly are connected to each other using the microphone connection detection signal lines.
Using this circuit, the radio receiver assembly sends power to the telephone microphone assembly, and the telephone microphone assembly s ...
Lexus RX (RX 350L, RX450h) 2016-2026 Repair Manual > Mass Air Flow Meter: Inspection
INSPECTION PROCEDURE 1. INSPECT MASS AIR FLOW METER SUB-ASSEMBLY (a) Perform a visual check for any foreign matter on the intake air temperature sensor (thermistor) of the mass air flow meter sub-assembly shown in the illustration. OK: There is no foreign matter. If the result is not as specifie ...
Lexus RX (RX 350L, RX450h) 2016-{YEAR} Owners Manual
- For your information
- Pictorial index
- For safety and security
- Instrument cluster
- Operation of each component
- Driving
- Lexus Display Audio system
- Interior features
- Maintenance and care
- When trouble arises
- Vehicle specifications
- For owners
Lexus RX (RX 350L, RX450h) 2016-{YEAR} Repair Manual

0.0107