Lexus RX (RX 350L, RX450h) 2016-2026 Repair Manual: Operation Check
OPERATION CHECK
PRECAUTION FOR OPERATION CHECK
CAUTION:
Use the correct procedure to replace the airbag parts.
.png)
CHECK SRS WARNING LIGHT
(a) Primary check

(1) Turn the engine switch on (IG) and check that the SRS warning light turns on.
(2) Turn the engine switch off. Wait for at least 2 seconds, and then turn the engine switch on (IG). Check that the SRS warning light illuminates for approximately 6 seconds while diagnosis of the airbag system is performed.
HINT:
- If the SRS warning light remains on for more than approximately 6 seconds after the engine switch is turned on (IG), the airbag system may be malfunctioning.
- If the SRS warning light occasionally turns on after the engine switch has been on (IG) for approximately 6 seconds, there may be an open, or short to +B or ground in the SRS warning light circuit.
- If the SRS warning light illuminates after the engine switch is turned off or on (ACC), there may be a malfunction in the airbag sensor assembly power source circuit or combination meter assembly.
- After the initial check, if the SRS warning light turns off and then on repeatedly, a drop in airbag sensor assembly power source voltage is occurring. The SRS warning light will turn off 10 seconds after the power source voltage returns to normal.
FUNCTION OF PASSENGER AIRBAG ON/OFF INDICATOR
(a) Initial check
(1) Turn the engine switch on (IG).
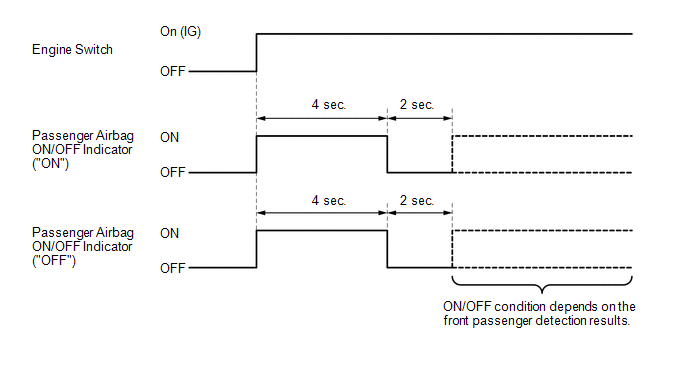
(2) The passenger airbag ON/OFF indicator comes on for approximately 4 seconds, then turns off for approximately 2 seconds.
(3) Approximately 6 seconds after the engine switch is turned on (IG), the passenger airbag ON/OFF indicator will indicate ON/OFF depending on the following conditions.
Indicator Operation| Front Passenger Seat Condition | Passenger Airbag ON/OFF Indicator | SRS Warning Light | |
|---|---|---|---|
| ON Indicator | OFF Indicator | ||
| Vacant | OFF | ON | OFF |
| Adult*1 is seated | ON | OFF | OFF |
| Child*2 is seated | ON or OFF*2 | OFF or ON*2 | OFF |
| Child restraint system is installed | OFF | ON | OFF |
| Occupant classification system failure | OFF | ON | ON |
- *1: The system judges a person of average adult weight or more as an adult. If a smaller adult sits in the front passenger seat, the system may not recognize them as an adult depending on their physique and posture.
- *2: The system may not recognize a child or a child in a child restrain system as a child depending on factors such as the positioning of the child restraint system or the child's physique or posture.
HINT:
- The passenger airbag ON/OFF indicator illuminates based on the following timing chart in order to check the indicator light circuit.
- When the occupant classification system is malfunctioning, both the SRS warning light and passenger airbag ON/OFF indicator ("OFF") come on. In this case, perform troubleshooting for the airbag system DTCs first.
PASSENGER AIRBAG ON/OFF INDICATOR CHECK
(a) Turn the engine switch on (IG).
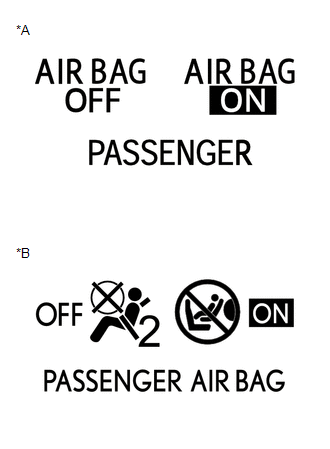
| *A | for Type A |
| *B | for Type B |
(b) Check that the passenger airbag ON/OFF indicator ("ON" and "OFF") comes on for approximately 4 seconds, then turns off for approximately 2 seconds.
HINT:
Refer to the indicator operation table in Function of Passenger Airbag ON/OFF Indicator for the passenger airbag ON/OFF indicator operation when the engine switch is turned on (IG) and approximately 6 seconds elapse.
CHECK HORN BUTTON ASSEMBLY
Click here .gif)
CHECK INSTRUMENT PANEL PASSENGER AIRBAG ASSEMBLY
Click here
CHECK LOWER NO. 1 INSTRUMENT PANEL AIRBAG ASSEMBLY
Click here
CHECK FRONT SEAT AIRBAG ASSEMBLY
Click here
CHECK FRONT SEAT CUSHION AIRBAG ASSEMBLY
Click here
CHECK REAR SEAT AIRBAG ASSEMBLY
w/o Rear No. 2 Seat: Click here
w/ Rear No. 2 Seat: Click here
for Captain Seat Type: Click here
CHECK CURTAIN SHIELD AIRBAG ASSEMBLY
w/o Rear No. 2 Seat: Click here
w/ Rear No. 2 Seat: Click here
CHECK FRONT SEAT OUTER BELT ASSEMBLY
Click here
CHECK REAR NO. 1 SEAT OUTER BELT ASSEMBLY
w/o Rear No. 2 Seat: Click here
w/ Rear No. 2 Seat: Click here
CHECK AIRBAG SENSOR ASSEMBLY
Click here
CHECK FRONT AIRBAG SENSOR
Click here
CHECK DOOR SIDE AIRBAG SENSOR
Click here
CHECK REAR AIRBAG SENSOR
w/o Rear No. 2 Seat: Click here
w/ Rear No. 2 Seat: Click here
CHECK SEAT POSITION AIRBAG SENSOR
Click here
CHECK OCCUPANT DETECTION ECU
Click here
CHECK HARNESS AND CONNECTOR
(a) for Vehicle not Involved in Collision
(1) Perform a diagnostic system check.
(b) for Vehicle Involved in Collision and Airbag not Deployed
(1) Perform a diagnostic system check.
(c) for Vehicle Involved in Collision and Airbag Deployed
(1) Perform a diagnostic system check.
(2) Check any of the wire harnesses in exposed contact with the airbag wire harness for damage.
(3) Check the connector of the airbag wire harness for scratches, cracks or damage.
 How To Proceed With Troubleshooting
CAUTION / NOTICE / HINT HINT:
Use the following procedure to troubleshoot the airbag system.
*: Use the Techstream.
PROCEDURE 1. VEHICLE BROUGHT TO WORKSHOP
NEXT 2 ...
 Problem Symptoms Table
PROBLEM SYMPTOMS TABLE HINT:
Use the table below to help determine the cause of problem symptoms. If multiple suspected areas are listed, the potential causes of the symptoms are listed in order of ...
Other materials:
Lexus RX (RX 350L, RX450h) 2016-2026 Repair Manual > Intuitive Parking Assist System (w/ Intelligent Clearance Sonar System): CAN Communication Failure (Message Registry) (U1000)
DESCRIPTION If DTC U1000 is stored frequently, duplicate the conditions that cause the problem symptoms and perform the inspection again even if the DTC is not output when rechecking for DTCs. DTC No. Detection Item DTC Detection Condition Trouble Area U1000 CAN Communication Failure ...
Lexus RX (RX 350L, RX450h) 2016-2026 Repair Manual > Seat Belt Warning System: How To Proceed With Troubleshooting
CAUTION / NOTICE / HINT HINT:
Use the following procedure to troubleshoot the seat belt warning system.
*: Use the Techstream.
PROCEDURE 1. VEHICLE BROUGHT TO WORKSHOP
NEXT 2. CUSTOMER PROBLEM ANALYSIS (a) Interview the customer to confirm the problem. Clic ...
Lexus RX (RX 350L, RX450h) 2016-{YEAR} Owners Manual
- For your information
- Pictorial index
- For safety and security
- Instrument cluster
- Operation of each component
- Driving
- Lexus Display Audio system
- Interior features
- Maintenance and care
- When trouble arises
- Vehicle specifications
- For owners
Lexus RX (RX 350L, RX450h) 2016-{YEAR} Repair Manual

0.0124