Lexus RX (RX 350L, RX450h) 2016-2026 Repair Manual: Installation
INSTALLATION
PROCEDURE
1. INSTALL AIRBAG SENSOR ASSEMBLY
(a) Check that the engine switch is off.
(b) Check that the cable is disconnected from the negative (-) battery terminal.
CAUTION:
Wait at least 90 seconds after disconnecting the cable from the negative (-) battery terminal to disable the SRS system.
.png)
| (c) Install the airbag sensor assembly with the 3 bolts. Torque: 17.5 N·m {178 kgf·cm, 13 ft·lbf} NOTICE:
|
|
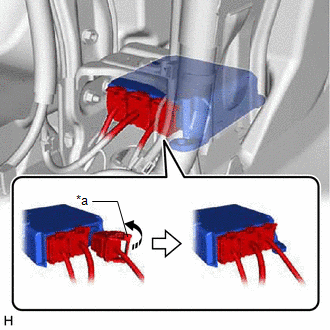
(d) Temporarily connect the connector and then move the lock lever in the direction indicated by the arrow to securely connect the connectors.
NOTICE:
When connecting any airbag connector, take care not to damage the airbag wire harness.

| *a | Lock Lever |
.png) | Move in this Direction |
(e) Check that there is no looseness in the installed parts of the airbag sensor assembly.
2. INSTALL FRONT NO. 1 CONSOLE BOX INSERT
Click here .gif)
3. INSTALL FRONT NO. 2 CONSOLE BOX INSERT
Click here .gif)
4. INSTALL CONSOLE BOX ASSEMBLY
Click here .gif)
5. CONNECT CABLE TO NEGATIVE BATTERY TERMINAL
NOTICE:
When disconnecting the cable, some systems need to be initialized after the cable is reconnected.
Click here .gif)
6. PERFORM DIAGNOSTIC SYSTEM CHECK
Click here .gif)
7. INSPECT SRS WARNING LIGHT
Click here .gif)
8. PERFORM CALIBRATION (w/ Optitron Meter Type)
(a) When the airbag sensor assembly (center airbag sensor assembly) is replaced, perform calibration.
for VSC System: Click here .gif)
for Dynamic Torque Control AWD System: Click here .gif)
 Removal
REMOVAL CAUTION / NOTICE / HINT The necessary procedures (adjustment, calibration, initialization, or registration) that must be performed after parts are removed, installed, or replaced during the ai ...
Other materials:
Lexus RX (RX 350L, RX450h) 2016-2026 Repair Manual > Can Communication System: Check Bus 3 Lines for Short Circuit
DESCRIPTION There may be a short circuit between the bus 3 main lines and/or bus 3 branch lines when the resistance between terminals 6 (CA3H) and 21 (CA3L) of the network gateway ECU is below 54 Ω. Symptom Trouble Area Resistance between terminals 6 (CA3H) and 21 (CA3L) of network gateway ...
Lexus RX (RX 350L, RX450h) 2016-2026 Repair Manual > Front Blower Motor: Installation
INSTALLATION PROCEDURE 1. INSTALL BLOWER MOTOR WITH FAN SUB-ASSEMBLY (a) Install the blower motor with fan sub-assembly with the 3 screws. NOTICE:
Replace the blower motor with fan sub-assembly if it has been dropped or subjected to a severe impact.
Do not apply excessive force to the blower mo ...
Lexus RX (RX 350L, RX450h) 2016-{YEAR} Owners Manual
- For your information
- Pictorial index
- For safety and security
- Instrument cluster
- Operation of each component
- Driving
- Lexus Display Audio system
- Interior features
- Maintenance and care
- When trouble arises
- Vehicle specifications
- For owners
Lexus RX (RX 350L, RX450h) 2016-{YEAR} Repair Manual
0.0161

.png)
