Lexus RX (RX 350L, RX450h) 2016-2026 Repair Manual: Installation
INSTALLATION
PROCEDURE
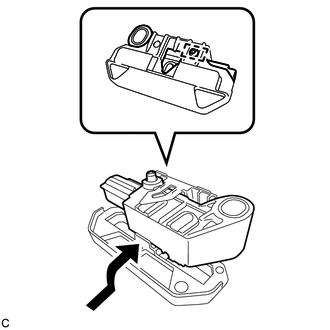
1. INSTALL SEAT POSITION AIRBAG SENSOR
| (a) Engage the pin to install the seat position airbag sensor to the seat slide position sensor protector as shown in the illustration. |
|
| (b) Using a 1.3 mm (0.0512 in.) feeler gauge, temporarily install the seat position airbag sensor with the "TORX" bolt. NOTICE:
|
|
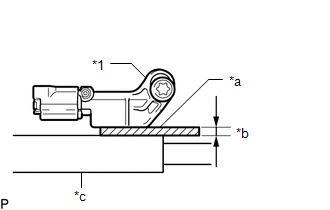
(c) Using a T30 "TORX" socket wrench, tighten the "TORX" bolt.
Torque:
8.0 N·m {82 kgf·cm, 71 in·lbf}
(d) Make sure that the clearance between the seat position airbag sensor and seat rail is 1.3 mm (0.0512 in.).
(e) Connect the connector.
(f) Check that there is no looseness in the installed parts of the seat position airbag sensor.
2. INSTALL FRONT SEAT ASSEMBLY LH
Click here .gif)
3. PERFORM DIAGNOSTIC SYSTEM CHECK
Click here
 Removal
REMOVAL CAUTION / NOTICE / HINT The necessary procedures (adjustment, calibration, initialization, or registration) that must be performed after parts are removed, installed, or replaced during the se ...
 Side Airbag Sensor
ComponentsCOMPONENTS ILLUSTRATION *A for Driver Side *B for Front Passenger Side *1 COURTESY LIGHT ASSEMBLY *2 DOOR ARMREST COVER *3 DOOR SIDE AIRBAG SENSOR *4 FRONT DOOR ...
Other materials:
Lexus RX (RX 350L, RX450h) 2016-2026 Repair Manual > Power Mirror Control System (w/o Memory): Precaution
PRECAUTION PRECAUTION FOR DISCONNECTING CABLE FROM NEGATIVE BATTERY TERMINAL NOTICE: When disconnecting the cable from the negative (-) battery terminal, initialize the following systems after the cable is reconnected. System Name See Procedure Lane Control System Pre-collision Sys ...
Lexus RX (RX 350L, RX450h) 2016-2026 Repair Manual > Audio And Visual System (for 12.3 Inch Display): Operation Check
OPERATION CHECK REMOTE TOUCH (REMOTE OPERATION CONTROLLER ASSEMBLY) SELF CHECK NOTICE:
Before entering self-diagnostic mode, make sure there are no obstructions which may interfere with operation of the remote touch screen, and that the remote touch screen is not dirty.
Do not touch the remote ...
Lexus RX (RX 350L, RX450h) 2016-{YEAR} Owners Manual
- For your information
- Pictorial index
- For safety and security
- Instrument cluster
- Operation of each component
- Driving
- Lexus Display Audio system
- Interior features
- Maintenance and care
- When trouble arises
- Vehicle specifications
- For owners
Lexus RX (RX 350L, RX450h) 2016-{YEAR} Repair Manual

0.0254