Lexus RX (RX 350L, RX450h) 2016-2026 Repair Manual: Side Airbag Sensor
Components
COMPONENTS
ILLUSTRATION
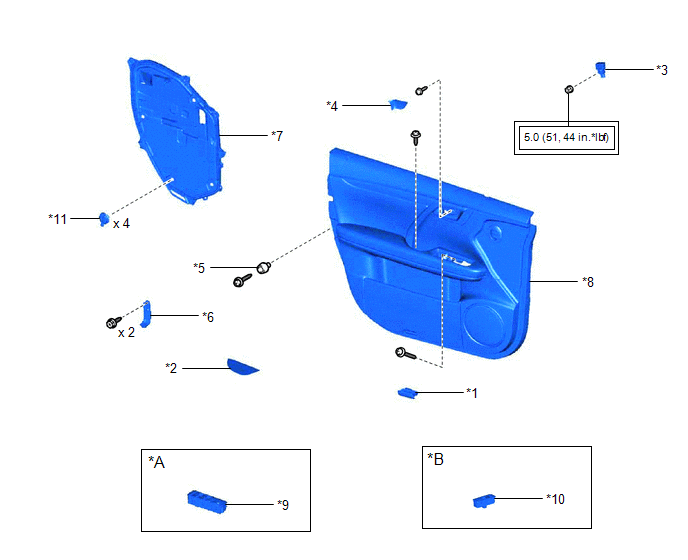
| *A | for Driver Side | *B | for Front Passenger Side |
| *1 | COURTESY LIGHT ASSEMBLY | *2 | DOOR ARMREST COVER |
| *3 | DOOR SIDE AIRBAG SENSOR | *4 | FRONT DOOR INSIDE HANDLE BEZEL PLUG |
| *5 | FRONT DOOR NO. 1 STIFFENER CUSHION | *6 | FRONT DOOR NO. 1 TRIM BRACKET |
| *7 | FRONT DOOR SERVICE HOLE COVER | *8 | FRONT DOOR TRIM BOARD SUB-ASSEMBLY |
| *9 | MULTIPLEX NETWORK MASTER SWITCH ASSEMBLY WITH FRONT DOOR UPPER ARMREST BASE PANEL | *10 | POWER WINDOW REGULATOR SWITCH ASSEMBLY WITH FRONT DOOR UPPER ARMREST BASE PANEL |
| *11 | FRONT DOOR WEATHERSTRIP CLIP | - | - |
.png) | Tightening torque for "Major areas involving basic vehicle performance such as moving/turning/stopping" : N*m (kgf*cm, ft.*lbf) | - | - |
On-vehicle Inspection
ON-VEHICLE INSPECTION
CAUTION / NOTICE / HINT
CAUTION:
Be sure to correctly follow the removal and installation procedures for the door side airbag sensors.
PROCEDURE
1. INSPECT DOOR SIDE AIRBAG SENSOR (for Vehicle not Involved in Collision)
(a) Perform a diagnostic system check.
Click here .gif)
2. INSPECT DOOR SIDE AIRBAG SENSOR (for Vehicle Involved in Collision and Airbag not Deployed)
(a) Perform a diagnostic system check.
Click here
(b) Visually check the door side airbag sensors for defects if a front door of the vehicle or the area around a front door is damaged.
HINT:
The defects are as follows:
- Cracks in the sensor housing
- Dents in the sensor housing
- Chips in the sensor housing
- Cracks or other damage to the connector
- Damage to the waterproof rubber seal
OK:
No defects are found.
If any defects are found, replace the door side airbag sensor with a new one.
3. INSPECT DOOR SIDE AIRBAG SENSOR (for Vehicle Involved in Collision and Airbag is Deployed)
(a) When airbags have deployed as the result of a collision, be sure to replace all door side airbag sensors in the damaged areas (anywhere in need of repair).
(b) Visually check the door side airbag sensors in undamaged areas for defects.
HINT:
The defects are as follows:
- Cracks in the sensor housing
- Dents in the sensor housing
- Chips in the sensor housing
- Cracks or other damage to the connector
- Damage to the waterproof rubber seal
OK:
No defects are found.
If any defects are found or a door side airbag sensor has detected a major collision, replace the door side airbag sensor with a new one.
 Installation
INSTALLATION PROCEDURE 1. INSTALL SEAT POSITION AIRBAG SENSOR (a) Engage the pin to install the seat position airbag sensor to the seat slide position sensor protector as shown in the illustration. ...
 Spiral Cable
...
Other materials:
Lexus RX (RX 350L, RX450h) 2016-2026 Repair Manual > Meter / Gauge System: Tachometer Malfunction
DESCRIPTION In this circuit, the combination meter assembly receives engine speed signals from the ECM via CAN communication. The combination meter assembly displays the engine speed calculated based on the data received from the ECM. WIRING DIAGRAM CAUTION / NOTICE / HINT NOTICE:
When replacing ...
Lexus RX (RX 350L, RX450h) 2016-2026 Repair Manual > Rocker Panel Moulding: Removal
REMOVAL CAUTION / NOTICE / HINT HINT:
Use the same procedure for the RH side and LH side.
The following procedure is for the LH side.
PROCEDURE 1. REMOVE FRONT FENDER MOULDING SUB-ASSEMBLY Click here 2. REMOVE QUARTER OUTSIDE MOULDING SUB-ASSEMBLY Click here 3. REMOVE NO. 6 ROCKER PANEL ...
Lexus RX (RX 350L, RX450h) 2016-{YEAR} Owners Manual
- For your information
- Pictorial index
- For safety and security
- Instrument cluster
- Operation of each component
- Driving
- Lexus Display Audio system
- Interior features
- Maintenance and care
- When trouble arises
- Vehicle specifications
- For owners
Lexus RX (RX 350L, RX450h) 2016-{YEAR} Repair Manual

0.0088