Lexus RX (RX 350L, RX450h) 2016-2026 Repair Manual: Engine Hood Courtesy Switch Circuit
DESCRIPTION
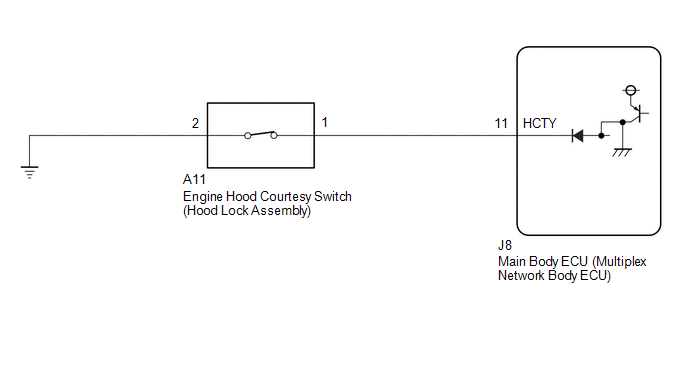
The engine hood courtesy switch is built into the hood lock assembly. This switch turns on when the engine hood is closed and turns off when the engine hood is opened.
WIRING DIAGRAM
CAUTION / NOTICE / HINT
NOTICE:
Before replacing the main body ECU (multiplex network body ECU), refer to Registration.
Click here .gif)
PROCEDURE
| 1. | READ VALUE USING TECHSTREAM (HOOD COURTESY SW) |
(a) Connect the Techstream to the DLC3.
(b) Turn the engine switch on (IG).
(c) Turn the Techstream on.
(d) Enter the following menus: Body Electrical / Main Body / Data List.
(e) Read the Data List according to the display on the Techstream.
Body Electrical > Main Body > Data List| Tester Display | Measurement Item | Range | Normal Condition | Diagnostic Note |
|---|---|---|---|---|
| Hood Courtesy SW | Engine hood courtesy switch | ON or OFF | ON: Engine hood open OFF: Engine hood closed | - |
| Tester Display |
|---|
| Hood Courtesy SW |
OK:
The Techstream display changes correctly in response to the engine hood courtesy switch (hood lock assembly) status.
| OK | .gif) | REPLACE MAIN BODY ECU (MULTIPLEX NETWORK BODY ECU) |
|
.gif)
| 2. | INSPECT ENGINE HOOD COURTESY SWITCH (HOOD LOCK ASSEMBLY) |
(a) Remove the hood lock assembly.
Click here
(b) Inspect the engine hood courtesy switch (hood lock assembly).
Click here
| NG | | REPLACE ENGINE HOOD COURTESY SWITCH (HOOD LOCK ASSEMBLY) |
|
| 3. | CHECK HARNESS AND CONNECTOR (MAIN BODY ECU (MULTIPLEX NETWORK BODY ECU) - ENGINE HOOD COURTESY SWITCH (HOOD LOCK ASSEMBLY) - BODY GROUND) |
(a) Disconnect the J8 main body ECU (multiplex network body ECU) connector.
(b) Measure the resistance according to the value(s) in the table below.
Standard Resistance:
| Tester Connection | Condition | Specified Condition |
|---|---|---|
| J8-11 (HCTY) - A11-1 | Always | Below 1 Ω |
| J8-11 (HCTY) or A11-1 - Body ground | Always | 10 kΩ or higher |
| A11-2 - Body ground | Always | Below 1 Ω |
| OK | | REPLACE MAIN BODY ECU (MULTIPLEX NETWORK BODY ECU) |
| NG | | REPAIR OR REPLACE HARNESS OR CONNECTOR |
 Data List / Active Test
DATA LIST / ACTIVE TEST DATA LIST HINT: Using the Techstream to read the Data List allows the values or states of switches, sensors, actuators and other items to be read without removing any parts. Th ...
 Horn Circuit
DESCRIPTION When the theft deterrent system is switched from the armed state to the alarm sounding state, the main body ECU (multiplex network body ECU) transmits a signal to cause the horns to sound ...
Other materials:
Lexus RX (RX 350L, RX450h) 2016-2026 Repair Manual > Audio And Visual System (for 12.3 Inch Display): USB Device Malfunction (B1585)
DESCRIPTION This DTC is stored when a malfunction occurs in a connected device. DTC No. Detection Item DTC Detection Condition Trouble Area B1585 USB Device Malfunction When any of the following conditions is met:
A non mass-storage class or incompatible protocol USB device is co ...
Lexus RX (RX 350L, RX450h) 2016-2026 Repair Manual > Wireless Door Lock Control System: Terminals Of Ecu
TERMINALS OF ECU CHECK INSTRUMENT PANEL JUNCTION BLOCK ASSEMBLY AND MAIN BODY ECU (MULTIPLEX NETWORK BODY ECU) (a) Remove the main body ECU (multiplex network body ECU) from the instrument panel junction block assembly. (b) Reconnect the instrument panel junction block assembly connector. (c) Measu ...
Lexus RX (RX 350L, RX450h) 2016-{YEAR} Owners Manual
- For your information
- Pictorial index
- For safety and security
- Instrument cluster
- Operation of each component
- Driving
- Lexus Display Audio system
- Interior features
- Maintenance and care
- When trouble arises
- Vehicle specifications
- For owners
Lexus RX (RX 350L, RX450h) 2016-{YEAR} Repair Manual

0.0102