Lexus RX (RX 350L, RX450h) 2016-2026 Repair Manual: On-vehicle Inspection
ON-VEHICLE INSPECTION
PROCEDURE
1. INSPECT GARAGE DOOR OPENER
| (a) Press each garage door opener ("HomeLink") switch and check that the ("HomeLink") indicator light turns on. If one or more of the garage door opener ("HomeLink") switches does not turn on the ("HomeLink") indicator light, check the condition of the fuse and wire harness. if the wire of the fuse is broken or the wire harness is malfunctioning repair or replace it. If not, replace the inner rear view mirror assembly (garage door opener). Click here |
|
.png)
2. INSPECT GARAGE DOOR OPENER REGISTRATION AND TRANSMITTING
HINT:
Use the "HomeLink" tester and a tester transmitter for this test. First clear the customer transmitter codes, and then register the tester transmitter code.
Click here .gif)
(a) Check if the tester transmitter code was successfully registered.
HINT:
- Any garage door opener ("HomeLink") switch can be pressed.
-
If the code cannot be registered, replace the inner rear view mirror assembly (garage door opener).
Click here
HINT:
Click here
(b) Apply battery voltage to the "HomeLink" tester as shown in the illustration.
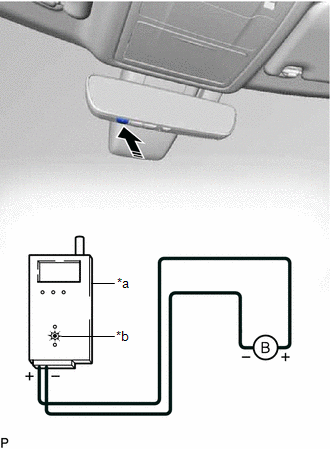
| *a | "HomeLink" Tester |
| *b | Red LED |
.png) | Press |
(c) Press a garage door opener ("HomeLink") switch. Check if the red LED of the "HomeLink" tester illuminates.
HINT:
If the red LED does not illuminate, replace the inner rear view mirror assembly (garage door opener).
Click here
Click here
(d) When the inspection is complete, register the customer transmitter code(s) again.
HINT:
- Registration of the customer transmitter code(s) may not be possible in the service facility if the customer's transmitters are not available or if any of the buttons are used for rolling code-type systems.
- Refer to the Owner's Manual for additional information about registration (programming) of transmitter codes.
 Registration
REGISTRATION PROCEDURE 1. REGISTER TRANSMITTER CODE HINT:
The vehicle garage door opener records transmitter codes for systems such as garage doors, gates, entry gates, door locks, home lighting sy ...

Other materials:
Lexus RX (RX 350L, RX450h) 2016-2026 Repair Manual > Power Steering System: Assist Map Number Mismatch (C1582)
DESCRIPTION When an incorrect ECM, main body ECU (multiplex network body ECU) or skid control ECU (brake actuator assembly) is installed after the assist map has been written to the power steering ECU assembly, DTC C1582 is stored because the information stored in the power steering ECU assembly doe ...
Lexus RX (RX 350L, RX450h) 2016-2026 Repair Manual > Intelligent Clearance Sonar System: Data List / Active Test
DATA LIST / ACTIVE TEST DATA LIST NOTICE: In the table below, the values listed under "Normal Condition" are reference values. Do not depend solely on these reference values when deciding whether a part is faulty or not. HINT: Using the Techstream to read the Data List allows the values or states of ...
Lexus RX (RX 350L, RX450h) 2016-{YEAR} Owners Manual
- For your information
- Pictorial index
- For safety and security
- Instrument cluster
- Operation of each component
- Driving
- Lexus Display Audio system
- Interior features
- Maintenance and care
- When trouble arises
- Vehicle specifications
- For owners
Lexus RX (RX 350L, RX450h) 2016-{YEAR} Repair Manual

0.0113