
Lexus RX (RX 350L, RX450h) 2016-2026 Repair Manual: Radio Broadcast cannot be Received or Poor Reception
CAUTION / NOTICE / HINT
NOTICE:
Depending on the parts that are replaced during vehicle inspection or maintenance, performing initialization, registration or calibration may be needed. Refer to Precaution for Navigation System.
Click here 
PROCEDURE
| 1. | CHECK RADIO RECEIVER ASSEMBLY |
(a) Check the radio automatic station search function.
(1) Check the radio automatic station search function by activating it.
| Result | Proceed to |
|---|---|
| Automatic station search function does not stop. | A |
| Automatic station search function stops on a station. | B |
| B |  | REPLACE RADIO RECEIVER ASSEMBLY |
|

| 2. | CHECK OPTIONAL COMPONENTS |
(a) Check if any optional components that may decrease reception capacity, such as a sunshade film or a telephone antenna, are installed.
| Result | Proceed to |
|---|---|
| Optional components are not installed. | A |
| Optional components are installed. | B |
NOTICE:
Do not remove optional components without the permission of the customer.
| B | | REMOVE OPTIONAL COMPONENTS AND CHECK AGAIN (SEE NOTICE ABOVE) |
|
| 3. | CHECK RADIO RECEIVER ASSEMBLY |
| (a) Preparation for check (1) Disconnect the antenna connector from the radio receiver assembly. |
|

(b) Check for noise
(1) Turn the engine switch on (ACC) with the radio receiver assembly connector connected.
(2) Turn the radio on and tune into AM mode.
(3) Place a screwdriver, thin wire or other metal object on the radio receiver assembly antenna jack and check that noise can be heard from the speakers.
OK:
Noise can be heard from the speakers.
| NG | | REPLACE RADIO RECEIVER ASSEMBLY |
|
| 4. | INSPECT RADIO RECEIVER ASSEMBLY |
(a) Disconnect the RA radio receiver assembly connector.
| (b) Measure the voltage according to the value(s) in the table below. Standard Voltage:
|
|
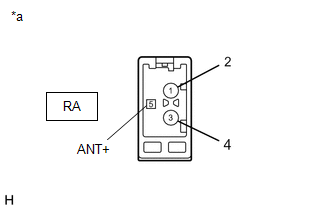
| NG | | REPLACE RADIO RECEIVER ASSEMBLY |
|
| 5. | REPLACE ANTENNA CORD SUB-ASSEMBLY |
(a) Replace the antenna cord sub-assembly with a new or known good one and check if radio broadcasts can be received normally.
w/ Rear No. 2 Seat: Click here
w/o Rear No. 2 Seat: Click here
OK:
Radio broadcasts can be received normally.
| OK | | END |
|
| 6. | REPLACE NO. 2 ANTENNA CORD SUB-ASSEMBLY |
(a) Replace the No. 2 antenna cord sub-assembly with a new or known good one and check if radio broadcasts can be received normally.
w/ Rear No. 2 Seat: Click here
w/o Rear No. 2 Seat: Click here
OK:
Radio broadcasts can be received normally.
| Result | Proceed to |
|---|---|
| OK | A |
| NG (w/o Rear No. 2 Seat) | B |
| NG (w/ Rear No. 2 Seat (w/ SDARS System)) | C |
| NG (w/ Rear No. 2 Seat (w/o SDARS System)) | D |
| A | | END |
| C | | GO TO STEP 9 |
| D | | GO TO STEP 12 |
|
| 7. | REPLACE NO. 3 ANTENNA CORD SUB-ASSEMBLY |
(a) Replace the No. 3 antenna cord sub-assembly with a new or known good one and check if radio broadcasts can be received normally.
Click here
OK:
Radio broadcasts can be received normally.
| OK | | END |
|
| 8. | REPLACE REAR SPOILER SUB-ASSEMBLY |
(a) Replace the rear spoiler sub-assembly with a new or known good one and check if radio broadcasts can be received normally.
Click here
OK:
Radio broadcasts can be received normally.
| OK | | END |
| NG | | REPLACE RADIO RECEIVER ASSEMBLY |
| 9. | REPLACE NO. 6 ANTENNA CORD SUB-ASSEMBLY |
(a) Replace the No. 6 antenna cord sub-assembly with a new or known good one and check if radio broadcasts can be received normally.
Click here
OK:
Radio broadcasts can be received normally.
| OK | | END |
|
| 10. | REPLACE NO. 3 ANTENNA CORD SUB-ASSEMBLY |
(a) Replace the No. 3 antenna cord sub-assembly with a new or known good one and check if radio broadcasts can be received normally.
Click here
OK:
Radio broadcasts can be received normally.
| OK | | END |
|
| 11. | REPLACE REAR SPOILER SUB-ASSEMBLY |
(a) Replace the rear spoiler sub-assembly with a new or known good one and check if radio broadcasts can be received normally.
Click here
OK:
Radio broadcasts can be received normally.
| OK | | END |
| NG | | REPLACE RADIO RECEIVER ASSEMBLY |
| 12. | REPLACE NO. 5 ANTENNA CORD SUB-ASSEMBLY |
(a) Replace the No. 5 antenna cord sub-assembly with a new or known good one and check if radio broadcasts can be received normally.
Click here
OK:
Radio broadcasts can be received normally.
| OK | | END |
|
| 13. | REPLACE NO. 3 ANTENNA CORD SUB-ASSEMBLY |
(a) Replace the No. 3 antenna cord sub-assembly with a new or known good one and check if radio broadcasts can be received normally.
Click here
OK:
Radio broadcasts can be received normally.
| OK | | END |
|
| 14. | REPLACE REAR SPOILER SUB-ASSEMBLY |
(a) Replace the rear spoiler sub-assembly with a new or known good one and check if radio broadcasts can be received normally.
Click here
OK:
Radio broadcasts can be received normally.
| OK | | END |
| NG | | REPLACE RADIO RECEIVER ASSEMBLY |
 Illumination for Panel Switch does not Come on with Tail Switch ON
CAUTION / NOTICE / HINT NOTICE: Depending on the parts that are replaced during vehicle inspection or maintenance, performing initialization, registration or calibration may be needed. Refer to Precau ...
 Display does not Dim when Light Control Switch is Turned ON
DESCRIPTION When the navigation system is activated with the light control switch in the tail or head position, before AVC-LAN communication is established, the multi-display assembly dims the display ...
Other materials:
Lexus RX (RX 350L, RX450h) 2016-2026 Repair Manual > Safety Connect System: GNSS Antenna Circuit Short to Ground (B15C111,B15C113)
DESCRIPTION These DTCs are stored when a malfunction occurs in the telephone and GPS antenna (for Roof Side) circuit. DTC No. Detection Item DTC Detection Condition Trouble Area B15C111 GNSS Antenna Circuit Short to Ground Current to the GNSS antenna is lower than the malfunction th ...
Lexus RX (RX 350L, RX450h) 2016-2026 Repair Manual > Airbag System: P Seat Airbag Active Mode Indicator (B1660)
DESCRIPTION The passenger airbag ON/OFF indicator circuit consists of the airbag sensor assembly and passenger airbag ON/OFF indicator (radio receiver assembly). The passenger airbag ON/OFF indicator indicates the operation condition of the instrument panel passenger airbag assembly and front seat c ...
Lexus RX (RX 350L, RX450h) 2016-{YEAR} Owners Manual
- For your information
- Pictorial index
- For safety and security
- Instrument cluster
- Operation of each component
- Driving
- Lexus Display Audio system
- Interior features
- Maintenance and care
- When trouble arises
- Vehicle specifications
- For owners
Lexus RX (RX 350L, RX450h) 2016-{YEAR} Repair Manual

0.0106