Lexus RX (RX 350L, RX450h) 2016-2026 Repair Manual: Installation
INSTALLATION
PROCEDURE
1. INSTALL CLEARANCE WARNING ECU ASSEMBLY
(a) Engage the 2 claws to install the clearance warning ECU assembly as shown in the illustration.
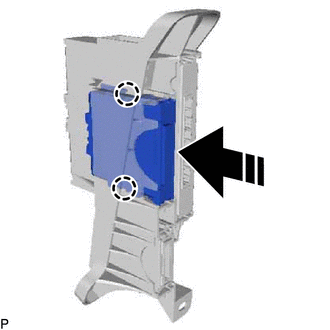
.png) | Install in this Direction |
2. INSTALL ECU INTEGRATION BOX RH
(a) Install the ECU integration box RH with the bolt and 2 nuts.
Torque:
Nut :
8.0 N·m {82 kgf·cm, 71 in·lbf}
(b) Engage the clamp.
(c) Connect each connector.
3. INSTALL PARKING ASSIST ECU (w/ Panoramic View Monitor System)
Click here .gif)
4. INSTALL GLOVE COMPARTMENT DOOR ASSEMBLY
Click here
5. INSTALL NO. 2 INSTRUMENT PANEL UNDER COVER SUB-ASSEMBLY
Click here
6. INSTALL COWL SIDE TRIM BOARD RH
HINT:
Use the same procedure as for the LH side.
Click here
7. INSTALL FRONT DOOR SCUFF PLATE RH
HINT:
Use the same procedure as for the LH side.
Click here
8. INSTALL INSTRUMENT PANEL GARNISH RH
Click here
9. INSTALL LOWER NO. 1 INSTRUMENT PANEL FINISH PANEL
Click here
10. CONNECT CABLE TO NEGATIVE BATTERY TERMINAL
NOTICE:
When disconnecting the cable, some systems need to be initialized after the cable is reconnected.
Click here
11. PERFORM CALIBRATION
Click here
SST: 09989-00020
 Components
COMPONENTS ILLUSTRATION *A w/ Panoramic View Monitor System - - *1 COWL SIDE TRIM BOARD RH *2 ECU INTEGRATION BOX RH *3 FRONT DOOR SCUFF PLATE RH *4 GLOVE COMPARTMENT DOO ...
 Removal
REMOVAL CAUTION / NOTICE / HINT The necessary procedures (adjustment, calibration, initialization, or registration) that must be performed after parts are removed and installed, or replaced during cle ...
Other materials:
Lexus RX (RX 350L, RX450h) 2016-2026 Repair Manual > Wiper And Washer System: System Description
SYSTEM DESCRIPTION FRONT WIPER AND WASHER CONTROL FUNCTION Control/Function Function Description Wiper speed regulation Maintains the default speed of the wipers even when the supply voltage or resistance changes. Door Open Linked Wiper Suspend Function (w/ Rain Sensor) Stops the fr ...
Lexus RX (RX 350L, RX450h) 2016-2026 Repair Manual > Front Blower Motor: Components
COMPONENTS ILLUSTRATION *1 BLOWER MOTOR WITH FAN SUB-ASSEMBLY *2 COWL SIDE TRIM BOARD RH *3 FRONT DOOR SCUFF PLATE RH *4 NO. 2 INSTRUMENT PANEL UNDER COVER SUB-ASSEMBLY ...
Lexus RX (RX 350L, RX450h) 2016-{YEAR} Owners Manual
- For your information
- Pictorial index
- For safety and security
- Instrument cluster
- Operation of each component
- Driving
- Lexus Display Audio system
- Interior features
- Maintenance and care
- When trouble arises
- Vehicle specifications
- For owners
Lexus RX (RX 350L, RX450h) 2016-{YEAR} Repair Manual

0.0097