Lexus RX (RX 350L, RX450h) 2016-2026 Repair Manual: Removal
REMOVAL
CAUTION / NOTICE / HINT
NOTICE:
If both the LH and RH rear flexible hoses are to be disconnected at the same time, put identification marks on each rear flexible hose so that it can be installed to its original position.
HINT:
- Use the same procedure for the RH side and LH side.
- The following procedure is for the LH side.
PROCEDURE
1. REMOVE REAR WHEEL
Click here .gif)
2. DRAIN BRAKE FLUID
NOTICE:
If brake fluid leaks onto any painted surface, immediately wash it off.
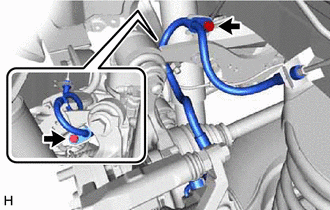
3. REMOVE REAR FLEXIBLE HOSE
| (a) Remove the union bolt, gasket and rear flexible hose from the rear disc brake cylinder assembly. |
|
.png)
| (b) Remove the 2 bolts and separate the rear flexible hose. |
|
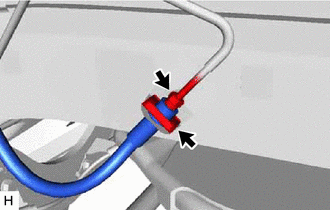
| (c) Using a union nut wrench, disconnect the brake line while holding the rear flexible hose with a wrench. NOTICE:
|
|
(d) Remove the clip and rear flexible hose from the vehicle.
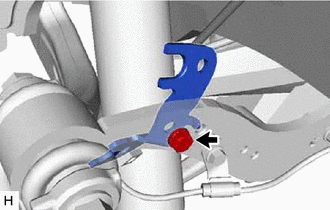
4. REMOVE NO. 2 FLEXIBLE HOSE BRACKET
| (a) Remove the bolt and No. 2 flexible hose bracket from the rear upper control arm assembly. |
|
 Components
COMPONENTS ILLUSTRATION *1 NO. 2 FLEXIBLE HOSE BRACKET *2 REAR FLEXIBLE HOSE *3 GASKET - - Tightening torque for "Major areas involving basic vehicle performance such as mov ...
 Installation
INSTALLATION CAUTION / NOTICE / HINT NOTICE:
Because the left and right rear flexible hoses are not interchangeable, verify the part number when installing the rear flexible hoses.
When reusing t ...
Other materials:
Lexus RX (RX 350L, RX450h) 2016-2026 Repair Manual > Audio And Visual System (for 8 Inch Display): Touch Panel Switch does not Function
CAUTION / NOTICE / HINT NOTICE: Depending on the parts that are replaced during vehicle inspection or maintenance, performing initialization, registration or calibration may be needed. Refer to Precaution for Audio and Visual System. Click here PROCEDURE 1. CHECK MULTI-DISPLAY (a) Check i ...
Lexus RX (RX 350L, RX450h) 2016-2026 Repair Manual > Seat Heater System: Problem Symptoms Table
PROBLEM SYMPTOMS TABLE NOTICE:
If the battery voltage is low, the seat heater system may not operate. When "Operation of Electrical Items Restricted." is displayed on the multi-information display in the combination meter assembly, inspect the battery, referring to On-vehicle Inspection for the c ...
Lexus RX (RX 350L, RX450h) 2016-{YEAR} Owners Manual
- For your information
- Pictorial index
- For safety and security
- Instrument cluster
- Operation of each component
- Driving
- Lexus Display Audio system
- Interior features
- Maintenance and care
- When trouble arises
- Vehicle specifications
- For owners
Lexus RX (RX 350L, RX450h) 2016-{YEAR} Repair Manual

0.0126