Lexus RX (RX 350L, RX450h) 2016-2026 Repair Manual: Adjustment
ADJUSTMENT
PROCEDURE
1. INSPECT AND ADJUST BRAKE PEDAL HEIGHT
(a) Remove the front door scuff plate LH.
w/o Rear No. 2 Seat: Click here .gif)
w/ Rear No. 2 Seat: Click here
(b) Remove the cowl side trim board LH.
Click here
(c) Remove the No. 1 instrument panel under cover sub-assembly.
Click here
(d) Check the brake pedal height.
HINT:
Inspect and adjust the brake pedal height with the floor carpet folded back.
(1) Measure the shortest distance between the brake pedal pad surface and front floor footrest as shown in the illustration.
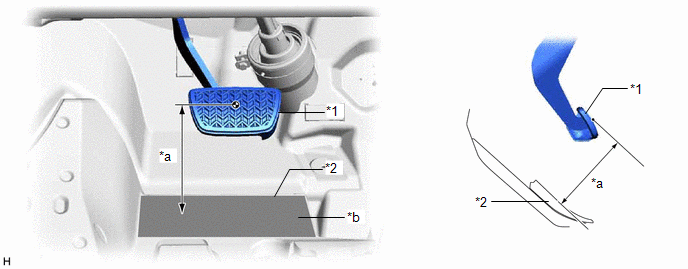
| *1 | Brake Pedal Pad | *2 | Front Floor Footrest |
| *a | Brake Pedal Height | *b | Measuring Plane of Front Floor Footrest |
Brake Pedal Height from Front Floor Footrest:
151.7 to 161.7 mm (5.97 to 6.37 in.)
If the brake pedal height is not as specified, inspect and adjust the push rod length according to the procedure below.
(e) Adjust the push rod length.
| (1) Disconnect the connector from the stop light switch assembly. |
|
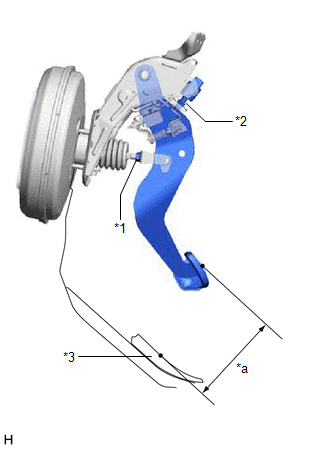
(2) Loosen the stop light switch assembly lock nut, and then turn the stop light switch assembly to allow for brake pedal free play.
(3) Loosen the lock nut and adjust the brake pedal height by turning the push rod to achieve the correct height.
Brake Pedal Height from Front Floor Footrest:
151.7 to 161.7 mm (5.97 to 6.37 in.)
(4) Tighten the lock nut.
Torque:
26 N·m {265 kgf·cm, 19 ft·lbf}
(5) Install the stop light switch assembly.
Click here
(f) Install the No. 1 instrument panel under cover sub-assembly.
Click here
(g) Install the cowl side trim board LH.
Click here
(h) Install the front door scuff plate LH.
w/o Rear No. 2 Seat: Click here
w/ Rear No. 2 Seat: Click here
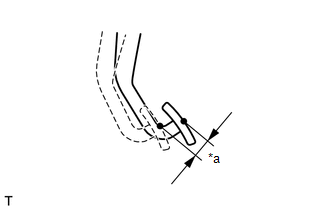
2. INSPECT BRAKE PEDAL FREE PLAY
(a) Stop the engine and firmly depress the brake pedal several times until no vacuum is left in the brake booster assembly.
| (b) Depress the brake pedal until a slight resistance is felt. Measure the distance as shown in the illustration. Brake Pedal Free Play: 1.0 to 6.0 mm (0.0394 to 0.236 in.) If the brake pedal free play is not as specified, check the stop light switch clearance. Click here If the brake pedal free play is as specified, proceed to the Inspect Brake Pedal Reserve Distance procedure. |
|
3. INSPECT BRAKE PEDAL RESERVE DISTANCE
(a) With the engine running, depress the brake pedal and measure the brake pedal reserve distance as shown in the illustration.
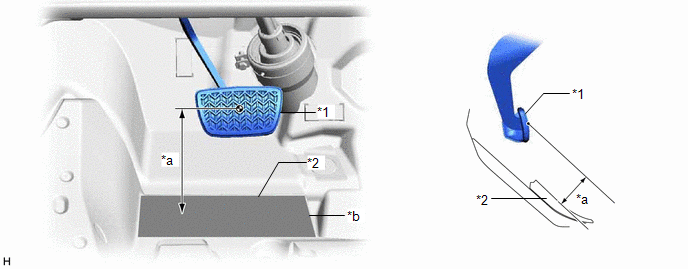
| *1 | Brake Pedal Pad | *2 | Front Floor Footrest |
| *a | Brake Pedal Reserve Distance | *b | Measuring Plane of Front Floor Footrest |
Brake Pedal Reserve Distance from Front Floor Footrest at 490 N (50 kgf, 110.2 lbf):
86 mm (3.39 in.) or more
If the distance is not as specified, troubleshoot the brake system.
Click here
 Disassembly
DISASSEMBLY PROCEDURE 1. REMOVE BRAKE PEDAL SUB-ASSEMBLY (a) Disengage the 2 clamps. (b) Remove the bolt, nut and brake pedal sub-assembly from the brake pedal support sub-assembly. ...
 Reassembly
REASSEMBLY PROCEDURE 1. INSTALL BRAKE PEDAL PAD (a) Install the brake pedal pad to the brake pedal sub-assembly. 2. INSTALL BRAKE PEDAL BUSHING (a) Apply lithium soap base glycol grease to 2 new brake ...
Other materials:
Lexus RX (RX 350L, RX450h) 2016-2026 Repair Manual > Power Tilt And Power Telescopic Steering Column System: ECU Power Source Circuit Malfunction (B2620)
DESCRIPTION The ECU power source circuit supplies positive (+) voltage to the multiplex tilt and telescopic ECU. DTC No. Detection Item DTC Detection Condition Trouble Area B2620 ECU Power Source Circuit Malfunction The voltage of the ECU power source drops to 8 V or less and this c ...
Lexus RX (RX 350L, RX450h) 2016-2026 Repair Manual > Television Camera (for Rear): Installation
INSTALLATION PROCEDURE 1. INSTALL REAR TELEVISION CAMERA ASSEMBLY (a) Push the television camera assembly in the direction indicated by the arrow (1) to engage the guide and push it in the direction indicated by the arrow (2) to engage the claw and install the television camera assembly. Inst ...
Lexus RX (RX 350L, RX450h) 2016-{YEAR} Owners Manual
- For your information
- Pictorial index
- For safety and security
- Instrument cluster
- Operation of each component
- Driving
- Lexus Display Audio system
- Interior features
- Maintenance and care
- When trouble arises
- Vehicle specifications
- For owners
Lexus RX (RX 350L, RX450h) 2016-{YEAR} Repair Manual

0.0103