Lexus RX (RX 350L, RX450h) 2016-2026 Repair Manual: Installation
INSTALLATION
CAUTION / NOTICE / HINT
HINT:
- Use the same procedure for the RH side and LH side.
- The following procedure is for the LH side.
PROCEDURE
1. INSTALL REAR AXLE HUB AND BEARING ASSEMBLY (for 2WD)
(a) Install the rear axle hub and bearing assembly and rear disc brake dust cover sub-assembly to the rear axle carrier sub-assembly with the 4 bolts.
Torque:
125 N·m {1275 kgf·cm, 92 ft·lbf}
2. INSTALL REAR AXLE HUB AND BEARING ASSEMBLY (for AWD)
(a) Apply 0.1 to 0.3 g (0.00353 to 0.0105 oz) of Toyota Body Grease W to each of the 4 areas shown in the illustration.
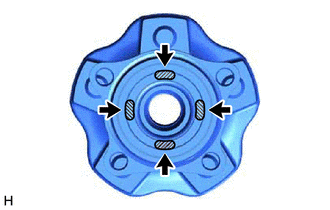
.png) | Toyota Body Grease W |
| (b) Install the rear axle hub and bearing assembly and rear disc brake dust cover sub-assembly to the rear drive shaft assembly. NOTICE: Align the matchmarks on the rear drive shaft assembly and rear axle hub and bearing assembly. |
|
.png)
(c) Install the rear axle hub and bearing assembly to the rear axle carrier sub-assembly with the 4 bolts.
Torque:
125 N·m {1275 kgf·cm, 92 ft·lbf}
3. INSTALL REAR DISC (for AWD)
Click here .gif)
4. INSTALL REAR DISC BRAKE CALIPER ASSEMBLY (for AWD)
Click here
5. TEMPORARILY INSTALL REAR AXLE SHAFT NUT (for AWD)
(a) Clean the threaded parts on the rear drive shaft assembly and a new rear axle shaft nut using non-residue solvent.
NOTICE:
- Be sure to perform this work even when using a new rear drive shaft assembly.
- Keep the threaded parts free of oil and foreign matter.
(b) Using a 30 mm deep socket wrench, temporarily install the rear axle shaft nut.
Torque:
294 N·m {2998 kgf·cm, 217 ft·lbf}
NOTICE:
Stake the rear axle shaft nut after inspecting for looseness and runout in the following steps.
HINT:
Keep depressing the brake pedal to prevent the rear drive shaft assembly from rotating.
6. SEPARATE REAR DISC BRAKE CALIPER ASSEMBLY (for AWD)
Click here
7. REMOVE REAR DISC (for AWD)
Click here
8. INSPECT REAR AXLE HUB BEARING LOOSENESS
Click here
9. INSPECT REAR AXLE HUB RUNOUT
Click here
10. INSTALL REAR SKID CONTROL SENSOR WIRE (for 2WD)
Click here
11. INSTALL REAR SPEED SENSOR (for AWD)
(a) Install the rear speed sensor to the rear axle carrier sub-assembly with the bolt.
Torque:
8.5 N·m {87 kgf·cm, 75 in·lbf}
NOTICE:
Do not twist the rear speed sensor when installing it.
12. INSTALL REAR DISC
Click here
13. INSTALL REAR DISC BRAKE CALIPER ASSEMBLY
Click here
14. INSTALL REAR SUSPENSION ARM COVER
Click here
15. STAKE REAR AXLE SHAFT NUT (for AWD)
| (a) Using a chisel and hammer, stake the rear axle shaft nut. |
|
.png)
16. INSTALL REAR WHEEL
Click here
17. CHECK FOR SPEED SENSOR SIGNAL
Click here
 Removal
REMOVAL CAUTION / NOTICE / HINT HINT:
Use the same procedure for the RH side and LH side.
The following procedure is for the LH side.
PROCEDURE 1. REMOVE REAR WHEEL Click here 2. REMOVE REAR ...
 Rear Axle Hub Bolt
ComponentsCOMPONENTS ILLUSTRATION *1 REAR AXLE HUB BOLT *2 REAR DISC *3 REAR DISC BRAKE CALIPER ASSEMBLY *4 REAR FLEXIBLE HOSE *5 NO. 2 PARKING BRAKE WIRE ASSEMBLY - - ...
Other materials:
Lexus RX (RX 350L, RX450h) 2016-2026 Repair Manual > Lin Communication System: Data List / Active Test
DATA LIST / ACTIVE TEST DATA LIST HINT: Using the Techstream to read the Data List allows the values or states of switches, sensors, actuators and other items to be read without removing any parts. This non-intrusive inspection can be very useful because intermittent conditions or signals may be dis ...
Lexus RX (RX 350L, RX450h) 2016-2026 Repair Manual > Steering Lock System: Data List / Active Test
DATA LIST / ACTIVE TEST READ DATA LIST HINT: Using the Techstream to read the Data List allows the values or states of switches, sensors, actuators and other items to be read without removing any parts. This non-intrusive inspection can be very useful because intermittent conditions or signals may b ...
Lexus RX (RX 350L, RX450h) 2016-{YEAR} Owners Manual
- For your information
- Pictorial index
- For safety and security
- Instrument cluster
- Operation of each component
- Driving
- Lexus Display Audio system
- Interior features
- Maintenance and care
- When trouble arises
- Vehicle specifications
- For owners
Lexus RX (RX 350L, RX450h) 2016-{YEAR} Repair Manual

0.0103