Lexus RX (RX 350L, RX450h) 2016-2026 Repair Manual: Rear Axle Hub Bolt
Components
COMPONENTS
ILLUSTRATION
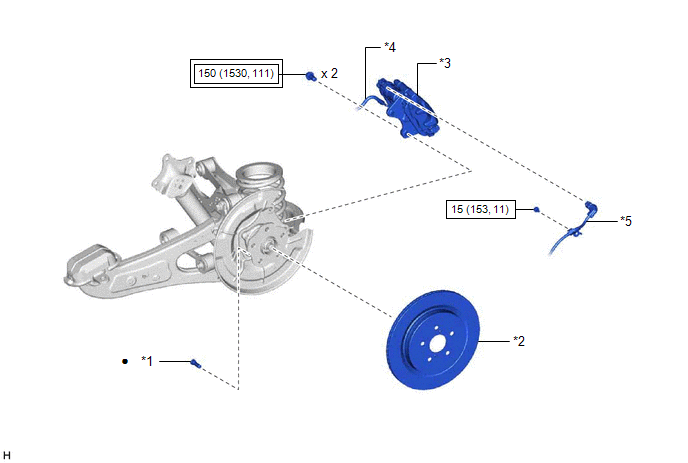
| *1 | REAR AXLE HUB BOLT | *2 | REAR DISC |
| *3 | REAR DISC BRAKE CALIPER ASSEMBLY | *4 | REAR FLEXIBLE HOSE |
| *5 | NO. 2 PARKING BRAKE WIRE ASSEMBLY | - | - |
.png) | Tightening torque for "Major areas involving basic vehicle performance such as moving/turning/stopping" : N*m (kgf*cm, ft.*lbf) | .png) | N*m (kgf*cm, ft.*lbf): Specified torque |
| ● | Non-reusable part | - | - |
Replacement
REPLACEMENT
CAUTION / NOTICE / HINT
HINT:
- Use the same procedure for the RH side and LH side.
- The following procedure is for the LH side.
PROCEDURE
1. REMOVE REAR WHEEL
Click here .gif)
2. SEPARATE REAR DISC BRAKE CALIPER ASSEMBLY
| (a) Disconnect the No. 2 parking brake wire assembly connector. |
|
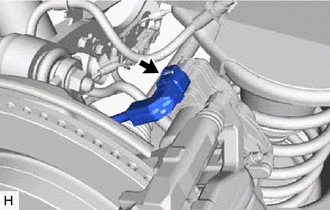
| (b) Remove the bolt and separate the No. 2 parking brake wire assembly from the rear axle carrier sub-assembly. |
|
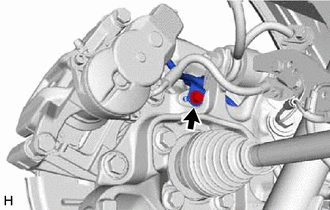
(c) Remove the 2 bolts and separate the rear disc brake caliper assembly from the rear axle carrier sub-assembly.
NOTICE:
Use wire or an equivalent tool to keep the rear disc brake caliper assembly from hanging by the rear flexible hose.
3. REMOVE REAR DISC
Click here
4. REMOVE REAR AXLE HUB BOLT
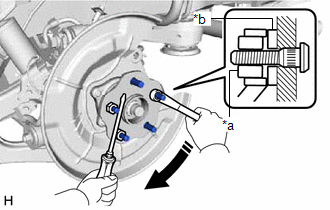
| (a) Temporarily install 2 service nuts to the rear axle hub bolts as shown in the illustration. Recommended Service Nut: Thread diameter: 12.0 mm (0.472 in.) Thread pitch: 1.5 mm (0.0591 in.) NOTICE: Install the service nuts to prevent damage to the rear axle hub bolts. |
|
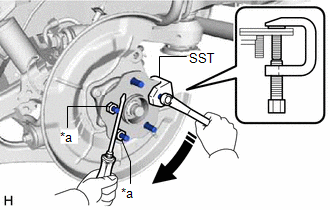
(b) Using SST and a screwdriver or an equivalent tool to hold the rear axle hub and bearing assembly, remove the rear axle hub bolt.
SST: 09628-10011
NOTICE:
Do not damage the threads of the rear axle hub bolts.
5. INSTALL REAR AXLE HUB BOLT
| (a) Temporarily install a new rear axle hub bolt to the rear axle hub and bearing assembly. |
|
(b) Install a washer and service nut to the rear axle hub bolt as shown in the illustration.
Recommended Service Nut:
Thread diameter: 12.0 mm (0.472 in.)
Thread pitch: 1.5 mm (0.0591 in.)
HINT:
Recommended washer thickness is 5 mm (0.197 in.) or more.
(c) Using a screwdriver or an equivalent tool to hold the rear axle hub and bearing assembly, install the rear axle hub bolt by tightening the service nut.
NOTICE:
- Install the service nuts to prevent damage to the rear axle hub bolts.
- Do not damage the threads of the rear axle hub bolts.
(d) Remove the 3 service nuts and washer from the 3 rear axle hub bolts.
6. INSTALL REAR DISC
Click here
7. INSTALL REAR DISC BRAKE CALIPER ASSEMBLY
(a) Install the rear disc brake caliper assembly to the rear axle carrier sub-assembly with the 2 bolts.
Torque:
150 N·m {1530 kgf·cm, 111 ft·lbf}
(b) Install the No. 2 parking brake wire assembly to the rear axle carrier sub-assembly with the bolt.
Torque:
15 N·m {153 kgf·cm, 11 ft·lbf}
(c) Connect the No. 2 parking brake wire assembly connector.
8. INSTALL REAR WHEEL
Click here
 Installation
INSTALLATION CAUTION / NOTICE / HINT HINT:
Use the same procedure for the RH side and LH side.
The following procedure is for the LH side.
PROCEDURE 1. INSTALL REAR AXLE HUB AND BEARING ASSEMB ...

Other materials:
Lexus RX (RX 350L, RX450h) 2016-2026 Repair Manual > Power Mirror Control System (w/o Memory): Data List / Active Test
DATA LIST / ACTIVE TEST DATA LIST HINT: Using the Techstream to read the Data List allows the values or states of switches, sensors, actuators and other items to be read without removing any parts. This non-intrusive inspection can be very useful because intermittent conditions or signals may be dis ...
Lexus RX (RX 350L, RX450h) 2016-2026 Repair Manual > Fuel Pump (for High Pressure): Components
COMPONENTS ILLUSTRATION *A for TMC Made *B for TMMC Made *1 NO. 2 ENGINE UNDER COVER - - ILLUSTRATION *1 FUEL PUMP ASSEMBLY *2 FUEL PUMP PROTECTOR *3 NO. 1 FUEL PIPE SUB-ASSEMBLY *4 NO. 2 FUEL TUBE SUB-ASSEMBLY *5 FUEL PUMP LIFTER ASSEMBLY *6 FUEL ...
Lexus RX (RX 350L, RX450h) 2016-{YEAR} Owners Manual
- For your information
- Pictorial index
- For safety and security
- Instrument cluster
- Operation of each component
- Driving
- Lexus Display Audio system
- Interior features
- Maintenance and care
- When trouble arises
- Vehicle specifications
- For owners
Lexus RX (RX 350L, RX450h) 2016-{YEAR} Repair Manual

0.0112