Lexus RX (RX 350L, RX450h) 2016-2026 Repair Manual: Replacement
REPLACEMENT
CAUTION / NOTICE / HINT
The necessary procedures (adjustment, calibration, initialization or registration) that must be performed after parts are removed and installed, or replaced during transfer case oil seal RH removal/installation are shown below.
Necessary Procedures After Parts Removed/Installed/Replaced| Replacement Part or Performed Procedure | Necessary Procedure | Effect/Inoperative Function when Necessary Procedure not Performed | Link |
|---|---|---|---|
| Front wheel alignment adjustment | Calibration |
| |
PROCEDURE
1. REMOVE FRONT WHEEL OPENING EXTENSION PAD LH
Click here .gif)
2. REMOVE NO. 3 ENGINE UNDER COVER
Click here .gif)
3. REMOVE FRONT FENDER APRON SEAL LH
Click here .gif)
4. DRAIN AUTOMATIC TRANSAXLE FLUID
Click here .gif)
5. DRAIN TRANSFER OIL
Click here .gif)
6. REMOVE FRONT DRIVE SHAFT ASSEMBLY RH
Click here .gif)
7. REMOVE TRANSFER CASE OIL SEAL RH
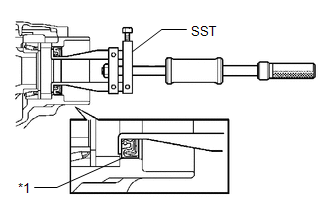
| (a) Using SST, remove the transfer case oil seal RH from the transfer case sub-assembly. SST: 09308-00010 NOTICE: Do not damage the transfer case oil seal RH contact surface to the transfer case sub-assembly. |
|
8. INSTALL TRANSFER CASE OIL SEAL RH
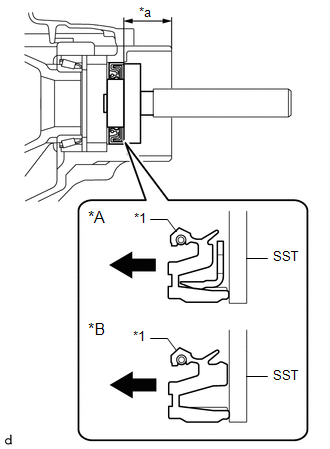
(a) Using SST and a hammer, install a new transfer case oil seal RH to the transfer case sub-assembly as shown in the illustration.

| *A | Type A |
| *B | Type B |
| *1 | Transfer Case Oil Seal RH |
| *a | Depth |
.png) | Install in this Direction |
SST: 09950-60010
09951-00350
09951-00580
09952-06010
SST: 09950-70010
09951-07150
Standard Depth:
33.5 to 34.5 mm (1.32 to 1.36 in.)
NOTICE:
- Be sure to install the transfer case oil seal RH in the correct orientation.
- Tap in the transfer case oil seal RH uniformly so that the transfer case oil seal RH is straight.
- Do not tap in the transfer case oil seal RH in too far.
(b) Apply a small amount of MP grease to the lip of the transfer case oil seal RH.
9. INSTALL FRONT DRIVE SHAFT ASSEMBLY RH
Click here .gif)
10. ADD TRANSFER OIL
Click here .gif)
11. ADD AUTOMATIC TRANSAXLE FLUID
Click here .gif)
12. INSPECT FOR OIL LEAK
13. INSTALL FRONT FENDER APRON SEAL LH
Click here .gif)
14. INSTALL NO. 3 ENGINE UNDER COVER
Click here .gif)
15. INSTALL FRONT WHEEL OPENING EXTENSION PAD LH
Click here .gif)
 Components
COMPONENTS ILLUSTRATION *1 FRONT WHEEL OPENING EXTENSION PAD LH *2 NO. 3 ENGINE UNDER COVER *3 FRONT FENDER APRON SEAL LH - - ILLUSTRATION *1 REFILL PLUG *2 DRAIN PLUG ...
 Transfer Case Rear Oil Seal
ComponentsCOMPONENTS ILLUSTRATION *1 TRANSFER EXTENSION HOUSING TYPE T OIL SEAL - - ● Non-reusable part MP grease ReplacementREPLACEMENT PROCEDURE 1. REMOVE PROPELLER SHAFT W ...
Other materials:
Lexus RX (RX 350L, RX450h) 2016-2026 Repair Manual > Smart Access System With Push-button Start (for Entry Function): How To Proceed With Troubleshooting
CAUTION / NOTICE / HINT HINT:
Use these procedures to troubleshoot the smart access system with push-button start (for Entry Function).
*: Use the Techstream.
PROCEDURE 1. VEHICLE BROUGHT TO WORKSHOP
NEXT 2. CUSTOMER PROBLEM ANALYSIS HINT:
In troubleshoo ...
Lexus RX (RX 350L, RX450h) 2016-2026 Repair Manual > Lighting System (w/o Automatic Headlight Beam Level Control System): Taillight Relay Circuit
DESCRIPTION The main body ECU (multiplex network body ECU) controls the operation of the TAIL relay. WIRING DIAGRAM CAUTION / NOTICE / HINT NOTICE:
Inspect the fuses for circuits related to this system before performing the following procedure.
Before replacing the main body ECU (multiplex net ...
Lexus RX (RX 350L, RX450h) 2016-{YEAR} Owners Manual
- For your information
- Pictorial index
- For safety and security
- Instrument cluster
- Operation of each component
- Driving
- Lexus Display Audio system
- Interior features
- Maintenance and care
- When trouble arises
- Vehicle specifications
- For owners
Lexus RX (RX 350L, RX450h) 2016-{YEAR} Repair Manual
0.0143

