Lexus RX (RX 350L, RX450h) 2016-2026 Repair Manual: Hydraulic Test
HYDRAULIC TEST
PERFORM HYDRAULIC TEST
(a) Measure the line pressure.
CAUTION:
A line pressure test should always be carried out with at least 2 people. One person should observe the condition of wheels and wheel chocks while the other is performing the test.
NOTICE:
- Perform this test with the ATF (Automatic Transaxle Fluid) at the normal operating temperature: 50 to 80°C (122 to 176°F)
- Be careful to prevent the SST hose from contacting the exhaust pipe.
- This check must be conducted after checking and confirming that the engine is normal.
- Perform this test with the air conditioning off.
- Do not perform the stall test for longer than 5 seconds.
- When performing the stall speed test repeatedly, wait for 15 seconds or more between tests.
- The installation position of SST is different for the D position and R position line pressure tests.
- Perform this test with the AUTO function (shift-linked function) of the electronic parking brake system off.
(1) Warm up the ATF.
(2) Lift the vehicle.
(3) Remove the engine under cover.
(4) Remove the test plug A on the front side of the transaxle case and install SST.
SST: 09993-19015
09993-00010
09993-00040
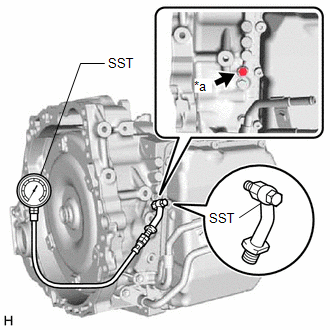
| *a | Test Plug A |
(5) Lower the vehicle.
(6) Fully apply the parking brake and chock all 4 wheels.
HINT:
When the electric parking brake switch assembly is pulled 2 times (2 lock operations), the maximum amount of braking force is applied.
(7) Start the engine and check the idle speed.
(8) Keep your left foot firmly on the brake pedal and move the shift lever to D.
(9) Measure the line pressure with the engine idling.
(10) Depress the accelerator pedal as much as possible with your right foot. Quickly read the highest line pressure reading when the engine speed reaches stall speed.
Specified Line Pressure| Condition | D Position |
|---|---|
| Idling | 420 to 510 kPa (4.2 to 5.3 kgf/cm2, 60 to 74 psi) |
| Stall test | 1560 to 1750 kPa (15.9 to 17.9 kgf/cm2, 226 to 254 psi) |
(11) Turn the engine switch off.
(12) Remove SST and install the test plug A.
(13) Remove the test plug B on the left side of the transaxle case and install SST.

| *a | Test Plug B |
SST: 09993-19015
09993-00010
09993-00040
(14) Start the engine and check the idle speed.
(15) Keep your left foot firmly on the brake pedal and move the shift lever to R.
(16) Measure the line pressure with the engine idling.
(17) Depress the accelerator pedal as much as possible with your right foot. Quickly read the highest line pressure reading when the engine speed reaches stall speed.
Specified Line Pressure| Condition | R Position |
|---|---|
| Idling | 560 to 670 kPa (5.7 to 6.9 kgf/cm2, 81 to 98 psi) |
| Stall test | 1750 to 2050 kPa (17.8 to 21.0 kgf/cm2, 253 to 298 psi) |
(18) Turn the engine switch off.
(19) Remove SST and install the test plug B.
(20) Clear the DTCs.
Click here .gif)
| Problem | Possible Cause |
|---|---|
| Measured values at all positions are higher than specified |
|
| Measured values at all positions are lower than specified |
|
| Pressure is low when shift lever is in D only |
|
| Pressure is low when shift lever is in R only |
|
 Mechanical System Tests
MECHANICAL SYSTEM TESTS STALL SPEED TEST HINT: This test is to check the overall performance of the engine and transaxle. CAUTION:
This test should be done on a paved surface (a surface that is not ...
 Manual Shifting Test
MANUAL SHIFTING TEST MANUAL SHIFTING TEST HINT:
Using this test, it can be determined whether a problem is in an electrical circuit or if it is a mechanical problem in the transaxle.
If any abnor ...
Other materials:
Lexus RX (RX 350L, RX450h) 2016-2026 Repair Manual > Dynamic Torque Control Awd System: Diameter of the Tire is not Uniform (C1337)
DESCRIPTION The 4WD ECU assembly stores this DTC if a difference in tire size is detected. DTC No. Detection Item DTC Detection Condition Trouble Area C1337 Diameter of the Tire is not Uniform When the following continues for 36 seconds or more: At a vehicle speed of 30 km/h (18.6 m ...
Lexus RX (RX 350L, RX450h) 2016-2026 Repair Manual > Front Power Seat Control System (w/ Memory): Wireless Transmitter Memory Function does not Operate
DESCRIPTION With the engine switch on (IG) and the driver door closed, pressing the manual lock or unlock switch on the multiplex network master switch assembly while holding a seat memory switch LH (M1, M2 or M3 switch) will register the transmitter recognition code into the seat memory switch LH t ...
Lexus RX (RX 350L, RX450h) 2016-{YEAR} Owners Manual
- For your information
- Pictorial index
- For safety and security
- Instrument cluster
- Operation of each component
- Driving
- Lexus Display Audio system
- Interior features
- Maintenance and care
- When trouble arises
- Vehicle specifications
- For owners
Lexus RX (RX 350L, RX450h) 2016-{YEAR} Repair Manual

0.0115