Lexus RX (RX 350L, RX450h) 2016-2026 Repair Manual: Removal
REMOVAL
CAUTION / NOTICE / HINT
The necessary procedures (adjustment, calibration, initialization or registration) that must be performed after parts are removed and installed, or replaced during cooling fan motor LH or cooling fan motor RH removal/installation are shown below.
Necessary Procedures After Parts Removed/Installed/Replaced| Replaced Part or Performed Procedure | Necessary Procedure | Effect/Inoperative Function when Necessary Procedure not Performed | Link |
|---|---|---|---|
| Battery terminal is disconnected/reconnected | Memorize steering angle neutral point | Lane Control System | |
| Pre-collision system | |||
| Intelligent clearance sonar system*1 | |||
| Lighting system (w/ Automatic Headlight Beam Level Control System) | | ||
| Parking assist monitor system | | ||
| Panoramic view monitor system | | ||
| Initialize back door lock | Power door lock control system | | |
| Reset back door close position | Power back door system (w/ Outside Door Control Switch) | | |
| Front television camera view adjustment | Panoramic view monitor system | |
| Front bumper assembly (w/ Intelligent clearance sonar system) |
|
| |
*1: When performing learning using the Techstream.
Click here .gif)
NOTICE:
After the engine switch is turned off, the radio receiver assembly records various types of memory and settings. As a result, after turning the engine switch off, make sure to wait at least 120 seconds before disconnecting the cable from the negative (-) battery terminal.
PROCEDURE
1. REMOVE RADIATOR ASSEMBLY
Click here
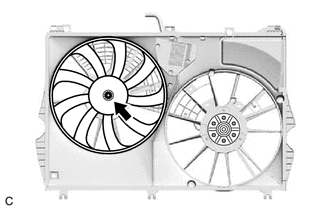
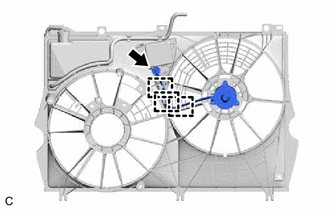
2. REMOVE FAN LH
| (a) Remove the nut and fan LH. |
|
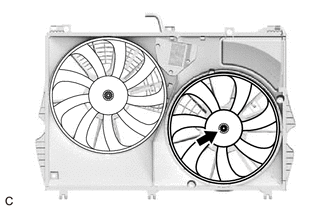
3. REMOVE FAN RH
| (a) Remove the nut and fan RH. |
|
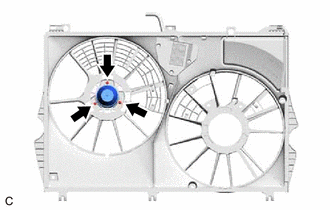
4. REMOVE COOLING FAN MOTOR LH
| (a) Disconnect the cooling fan motor LH connector. |
|
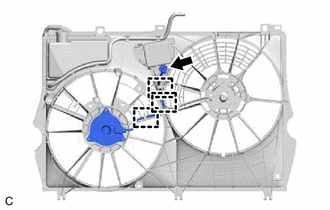
(b) Disengage the 3 clamps.
| (c) Remove the 3 screws and cooling fan motor LH. |
|
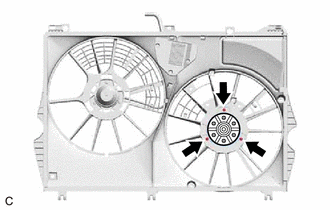
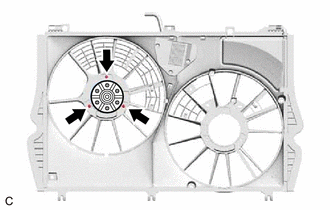
5. REMOVE COOLING FAN MOTOR RH
(a) Cooling Fan Motor 100 W Type:
| (1) Disconnect the cooling fan motor RH connector. |
|
(2) Disengage the 3 clamps.
| (3) Remove the 3 screws and cooling fan motor RH. |
|
(b) Cooling Fan Motor 200 W Type:
| (1) Disconnect the cooling fan motor RH connector. |
|

(2) Disengage the 2 clamps.
| (3) Remove the 3 screws and cooling fan motor RH. |
|
 On-vehicle Inspection
ON-VEHICLE INSPECTION CAUTION / NOTICE / HINT CAUTION: To prevent injury due to contact with an operating cooling fan, keep your hands and clothing away from the cooling fans when inspecting the cooli ...
 Installation
INSTALLATION PROCEDURE 1. INSTALL COOLING FAN MOTOR RH (a) Cooling Fan Motor 100 W Type: (1) Install the cooling fan motor RH with the 3 screws. Torque: 2.6 N·m {27 kgf·cm, 23 in·lbf} (2) Engage t ...
Other materials:
Lexus RX (RX 350L, RX450h) 2016-2026 Repair Manual > Sliding Roof Housing (for Slidng Roof): Installation
INSTALLATION PROCEDURE 1. INSTALL SLIDING ROOF HOUSING ASSEMBLY (a) Loosen the 10 bolts of the brackets of the sliding roof housing assembly. (b) Temporarily install the sliding roof housing assembly with the 6 nuts and 8 bolts. (c) Tighten the 2 nuts. HINT: Tighten the 2 nuts in the order shown in ...
Lexus RX (RX 350L, RX450h) 2016-2026 Repair Manual > Power Steering System: Assist Map Number Mismatch (C1582)
DESCRIPTION When an incorrect ECM, main body ECU (multiplex network body ECU) or skid control ECU (brake actuator assembly) is installed after the assist map has been written to the power steering ECU assembly, DTC C1582 is stored because the information stored in the power steering ECU assembly doe ...
Lexus RX (RX 350L, RX450h) 2016-{YEAR} Owners Manual
- For your information
- Pictorial index
- For safety and security
- Instrument cluster
- Operation of each component
- Driving
- Lexus Display Audio system
- Interior features
- Maintenance and care
- When trouble arises
- Vehicle specifications
- For owners
Lexus RX (RX 350L, RX450h) 2016-{YEAR} Repair Manual

0.0099