Lexus RX (RX 350L, RX450h) 2016-2026 Repair Manual: Removal
REMOVAL
CAUTION / NOTICE / HINT
The necessary procedures (adjustment, calibration, initialization or registration) that must be performed after parts are removed and installed, or replaced during radiator assembly removal/installation are shown below.
Necessary Procedures After Parts Removed/Installed/Replaced| Replaced Part or Performed Procedure | Necessary Procedure | Effect/Inoperative Function when Necessary Procedure not Performed | Link |
|---|---|---|---|
| Battery terminal is disconnected/reconnected | Memorize steering angle neutral point | Lane Control System | |
| Pre-collision system | |||
| Intelligent clearance sonar system*1 | |||
| Lighting system (w/ Automatic Headlight Beam Level Control System) | | ||
| Parking assist monitor system | | ||
| Panoramic view monitor system | | ||
| Initialize back door lock | Power door lock control system | | |
| Reset back door close position | Power back door system (w/ Outside Door Control Switch) | | |
| Front television camera view adjustment | Panoramic view monitor system | |
| Front bumper assembly (w/ Intelligent clearance sonar system) |
|
| |
*1: When performing learning using the Techstream.
Click here .gif)
NOTICE:
After the engine switch is turned off, the radio receiver assembly records various types of memory and settings. As a result, after turning the engine switch off, make sure to wait at least 120 seconds before disconnecting the cable from the negative (-) battery terminal.
PROCEDURE
1. PRECAUTION
NOTICE:
After turning the engine switch off, waiting time may be required before disconnecting the cable from the negative (-) battery terminal. Therefore, make sure to read the disconnecting the cable from the negative (-) battery terminal notices before proceeding with work.
Click here
2. REMOVE FRONT WHEEL OPENING EXTENSION PAD LH
Click here
3. REMOVE FRONT WHEEL OPENING EXTENSION PAD RH
Click here
4. REMOVE NO. 3 ENGINE UNDER COVER
Click here
5. REMOVE NO. 1 ENGINE UNDER COVER
Click here
6. DRAIN ENGINE COOLANT
Click here
7. DISCONNECT CABLE FROM NEGATIVE BATTERY TERMINAL
NOTICE:
When disconnecting the cable, some systems need to be initialized after the cable is reconnected.
Click here
8. REMOVE BATTERY
for 2WD: Click here
for AWD: Click here
9. REMOVE FRONT BUMPER COVER
Click here
10. REMOVE HOOD LOCK CONTROL CABLE COVER
Click here
11. REMOVE HOOD LOCK RELEASE LEVER PROTECTOR
Click here
12. REMOVE HOOD LOCK ASSEMBLY
Click here
13. REMOVE INLET AIR CLEANER ASSEMBLY
Click here
14. REMOVE UPPER RADIATOR SUPPORT SUB-ASSEMBLY
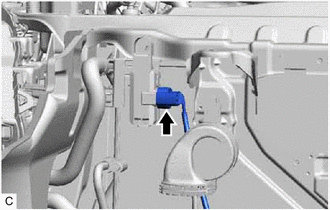
(a) w/ Smog Ventilation Sensor:
| (1) Disconnect the smog ventilation sensor connector. |
|
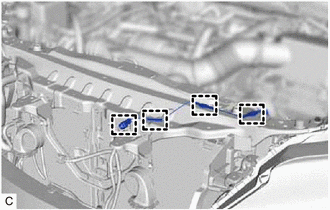
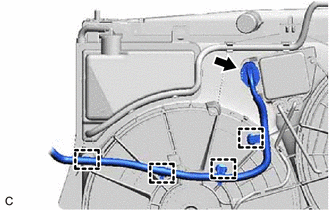
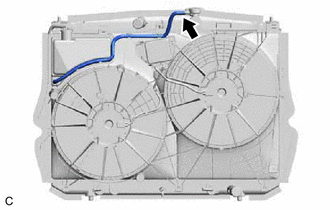
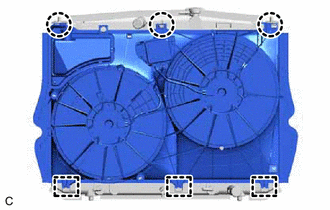
| (b) Disengage the 4 clamps and disconnect the wire harness from the upper radiator support sub-assembly. |
|
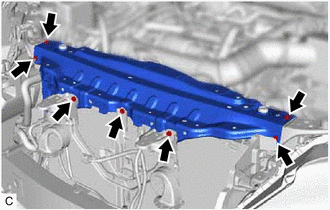
| (c) Remove the 7 bolts and upper radiator support sub-assembly. |
|
15. DISCONNECT NO. 1 RADIATOR HOSE
| (a) Slide the clip and disconnect the No. 1 radiator hose. |
|
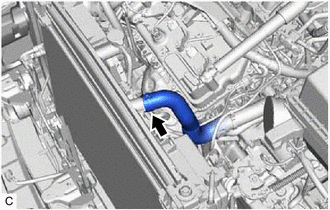
16. DISCONNECT NO. 2 RADIATOR HOSE
| (a) Disengage the clamp and disconnect the No. 2 radiator hose from the fan shroud assembly. |
|
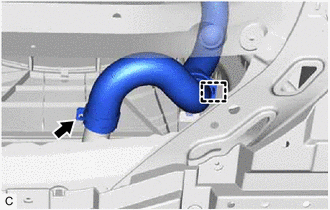
(b) Slide the clip and disconnect the No. 2 radiator hose.
17. DISCONNECT INLET NO. 1 OIL COOLER HOSE
| (a) Disengage the clamp to disconnect the inlet No. 1 oil cooler hose from the fan shroud assembly. |
|
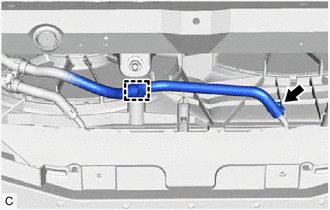
(b) Slide the clip and disconnect the inlet No. 1 oil cooler hose.
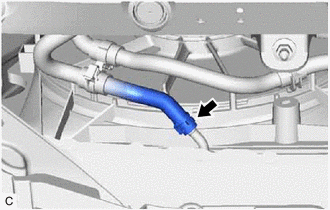
18. DISCONNECT OUTLET NO. 1 OIL COOLER HOSE
| (a) Slide the clip and disconnect the outlet No. 1 oil cooler hose. |
|
19. REMOVE RADIATOR ASSEMBLY
| (a) Disengage the 2 claws. |
|
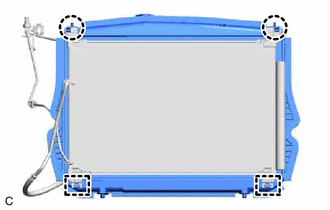
(b) Disengage the 2 guides to separate the cooler condenser assembly from the radiator assembly.
NOTICE:
Make sure not to damage the cooler condenser assembly when removing the radiator assembly.
| (c) Disconnect the cooling fan ECU connector. |
|
(d) Disengage the 4 wire harness clamps.
(e) Remove the radiator assembly with the fan shroud assembly from the vehicle body.
NOTICE:
Do not apply excessive force to the cooler condenser assembly or pipe when removing the radiator assembly with the fan shroud assembly.
| (f) Disconnect the radiator reserve tank hose from the radiator assembly. |
|
| (g) Disengage the 3 claws. |
|
(h) Disengage the 3 guides to remove the fan shroud assembly from the radiator assembly.
NOTICE:
Do not damage the radiator assembly when removing the fan shroud assembly.
20. REMOVE RADIATOR SUPPORT CUSHION
(a) Remove the 2 radiator support cushions from the radiator assembly.
21. REMOVE LOWER RADIATOR SUPPORT
(a) Remove the 2 lower radiator supports from the radiator assembly.
 Installation
INSTALLATION PROCEDURE 1. INSTALL LOWER RADIATOR SUPPORT (a) Install the 2 lower radiator supports to the radiator assembly. 2. INSTALL RADIATOR SUPPORT CUSHION (a) Install the 2 radiator support cush ...
 Relay
Relay
On-vehicle InspectionON-VEHICLE INSPECTION PROCEDURE 1. INSPECT FAN RELAY (a) Measure the resistance according to the value(s) in the table below. Standard Resistance: Tester Connection Condi ...
Other materials:
Lexus RX (RX 350L, RX450h) 2016-2026 Repair Manual > Power Tilt And Power Telescopic Steering Column System: Tilt and Telescopic Manual Switch Circuit Malfunction (B2603)
DESCRIPTION Different voltage values are sent to the multiplex tilt and telescopic ECU by operating the tilt and telescopic switch. The multiplex tilt and telescopic ECU then judges which motor and in which direction that motor should operate based on the voltage value. DTC No. Detection Item ...
Lexus RX (RX 350L, RX450h) 2016-2026 Repair Manual > Audio And Visual System (for 8 Inch Display): Main Body ECU Vehicle Information Reading/Writing Process Malfunction (B15F6)
DESCRIPTION This DTC is stored when items controlled by the main body ECU (multiplex network body ECU) cannot be customized via the audio and visual system vehicle customization screen. HINT: The main body ECU (multiplex network body ECU) controls the items for the following systems that are customi ...
Lexus RX (RX 350L, RX450h) 2016-{YEAR} Owners Manual
- For your information
- Pictorial index
- For safety and security
- Instrument cluster
- Operation of each component
- Driving
- Lexus Display Audio system
- Interior features
- Maintenance and care
- When trouble arises
- Vehicle specifications
- For owners
Lexus RX (RX 350L, RX450h) 2016-{YEAR} Repair Manual

0.0101