Lexus RX (RX 350L, RX450h) 2016-2026 Repair Manual: Inspection
INSPECTION
PROCEDURE
1. INSPECT CAMSHAFT TIMING OIL CONTROL SOLENOID ASSEMBLY
HINT:
Use the same procedure for the intake side and exhaust side.
(a) Check the resistance.
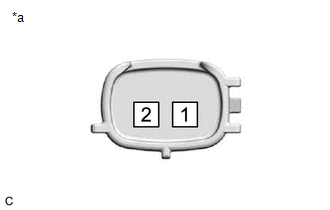
| (1) Measure the resistance according to the value(s) in the table below. Standard Resistance:
If the result is not as specified, replace the camshaft timing oil control solenoid assembly. |
|
(b) Stroke Amount Inspection
(1) Using vernier calipers, measure length (A) and (B) with the shaft of the camshaft timing oil control solenoid assembly set in the respective positions shown in the illustration.
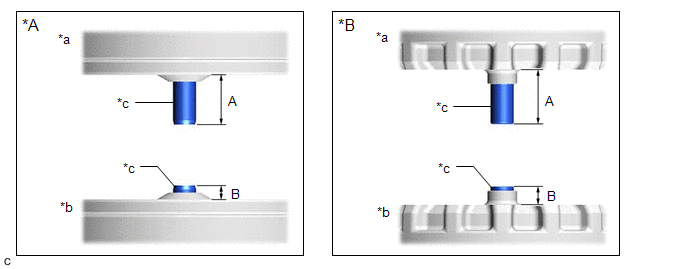
| *A | Type A | *B | Type B |
| *a | Shaft Side Facing Down | *b | Shaft Side Facing Up |
| *c | Shaft | - | - |
NOTICE:
Do not apply battery voltage to the terminals of the camshaft timing oil control solenoid assembly.
HINT:
If the shaft does not extend under its own weight, extend the shaft with your fingers.
(2) Calculate the stroke amount based on the difference of length (A) and (B).
Standard:
6.5 mm (0.256 in.) or more
HINT:
Stroke amount = length (A) - length (B)
If the value is not as specified, replace the camshaft timing oil control solenoid assembly.
 Removal
REMOVAL CAUTION / NOTICE / HINT The necessary procedures (adjustment, calibration, initialization or registration) that must be performed after parts are removed and installed, or replaced during cams ...
 Installation
INSTALLATION CAUTION / NOTICE / HINT CAUTION:
The engine assembly with transaxle is very heavy. Be sure to follow the procedure described in the repair manual, or the engine lifter may suddenly dro ...
Other materials:
Lexus RX (RX 350L, RX450h) 2016-2026 Repair Manual > Vehicle Stability Control System: Right Rear Wheel Speed Sensor Signal Stuck Low (C051223)
DESCRIPTION Refer to DTC C05121F. Click here DTC No. Detection Item DTC Detection Condition Trouble Area C051223 Right Rear Wheel Speed Sensor Signal Stuck Low Any of the following is detected:
When the +BS terminal voltage is 17.4 V or less at a vehicle speed of 10 km/h (6 mph ...
Lexus RX (RX 350L, RX450h) 2016-2026 Repair Manual > Rear Door Speaker: Inspection
INSPECTION PROCEDURE 1. INSPECT REAR SPEAKER ASSEMBLY (a) With the speaker installed, check that there is no looseness or other abnormalities. (b) Check that there is no foreign matter in the speaker, no tears on the speaker cone or other abnormalities. (c) Measure the resistance of the speaker. ...
Lexus RX (RX 350L, RX450h) 2016-{YEAR} Owners Manual
- For your information
- Pictorial index
- For safety and security
- Instrument cluster
- Operation of each component
- Driving
- Lexus Display Audio system
- Interior features
- Maintenance and care
- When trouble arises
- Vehicle specifications
- For owners
Lexus RX (RX 350L, RX450h) 2016-{YEAR} Repair Manual

0.0129