Lexus RX (RX 350L, RX450h) 2016-2026 Owners Manual: If you have a flat tire
Your vehicle is equipped with a spare tire. The flat tire can be replaced with the spare tire.
WARNING
■ If you have a flat tire Do not continue driving with a flat tire.
Driving even a short distance with a flat tire can damage the tire and the wheel beyond repair, which could result in an accident.
Before jacking up the vehicle
- Stop the vehicle in a safe place on a hard, flat surface.
- Set the parking brake.
- Shift the shift lever to P.
- Stop the hybrid system.
- Turn on the emergency flashers.
Location of the spare tire, jack and tools
RX450h
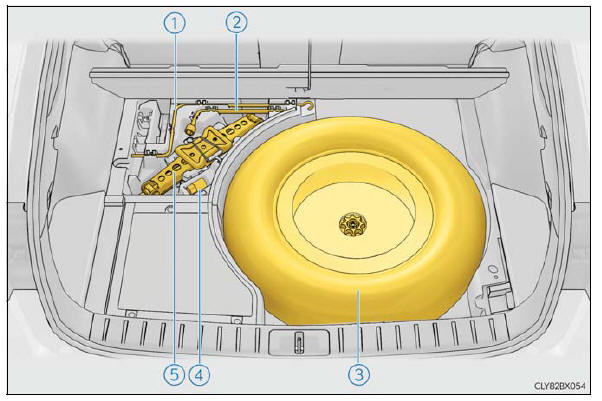
- Jack handle
- Wheel nut wrench
- Spare tire
- Wheel lock key* (if equipped)
- Jack
*: Documentation relating to the wheel lock key, such as the registration and I.D. card, is inside the glove box.
RX450hL
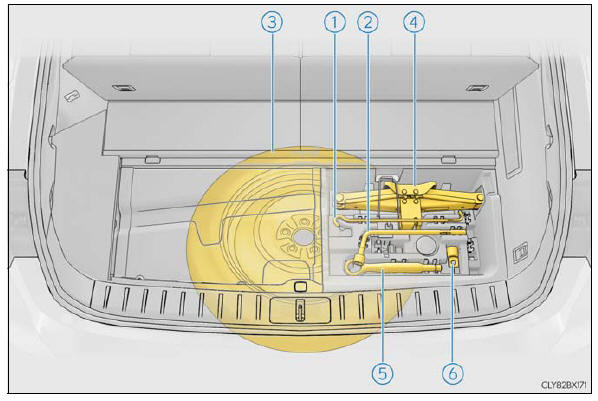
- Jack handle
- Wheel nut wrench
- Spare tire
- Jack
- Towing eyelet
- Adapter socket
WARNING
■ Using the tire jack Observe the following precautions.
Improper use of the tire jack may cause the vehicle to suddenly fall off the jack, leading to death or serious injury.
- Do not use the tire jack for any purpose other than replacing tires or installing and removing tire chains.
- Only use the tire jack that comes with this vehicle for replacing a
flat tire.
Do not use it on other vehicles, and do not use other tire jacks for replacing tires on this vehicle.
- Put the jack properly in its jack point.
- Do not put any part of your body under the vehicle while it is supported by the jack.
- Do not start the hybrid system or drive the vehicle while the vehicle is supported by the jack.
- Do not raise the vehicle while someone is inside.
- When raising the vehicle, do not put an object on or under the jack.
- Do not raise the vehicle to a height greater than that required to replace the tire.
- Use a jack stand if it is necessary to get under the vehicle.
- When lowering the vehicle, make sure that there is no-one near the vehicle. If there are people nearby, warn them vocally before lowering.
Wheel lock nut (if equipped)
When replacing tires on a vehicle with wheel lock nuts, use the following procedures to remove and install the wheel lock nuts. The wheel lock key is stored in the tray inside the luggage compartment. Always return the wheel lock key to its original position after use, so that it does not get lost.
■ Removal For ease of removal, the wheel lock nut should always be the first one loosened.
1. Place the wheel lock key on top of the wheel lock nut, turning until the wheel lock key and wheel lock nut patterns engage.
2. Place the wheel nut wrench on the wheel lock key, and while applying pressure on the wheel lock key, loosen the wheel lock nut.
■ Installation For ease of installation, the wheel lock nut should always be the last one tightened.
1. By hand, install a wheel lock nut on each wheel.
2. Place the wheel lock key on top of the wheel lock nut, turning until the wheel lock key and wheel lock nut patterns engage.
3. Place the wheel nut wrench on the wheel lock key, and while applying pressure on the wheel lock key, tighten the wheel lock nut to the recommended torque.
NOTICE Do not use an impact wrench. Using an impact wrench may cause permanent damage to wheel lock nut and wheel lock key. If in doubt about wheel lock application, contact your Lexus dealer.
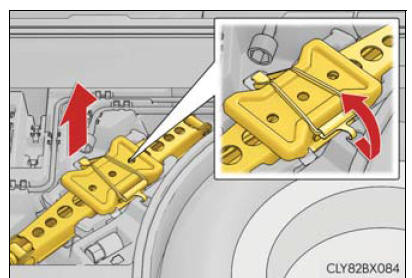
Taking out the jack
1. Secure the deck board using the hook.
2. Disengage the hook and take out the jack.
RX450h: Remove the wheel nut
wrench and then the jack
RX450hL: Remove the jack handle and
then the jack
Taking out the spare tire
RX450h
1. Secure the deck board using the hook.
2. Remove the spare tire cover.
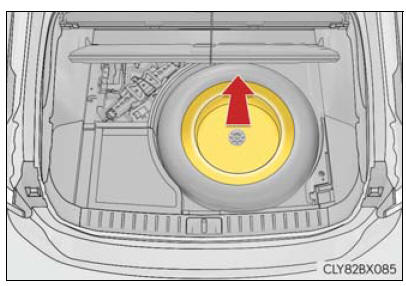
3. Loosen the center fastener that secures the spare tire.
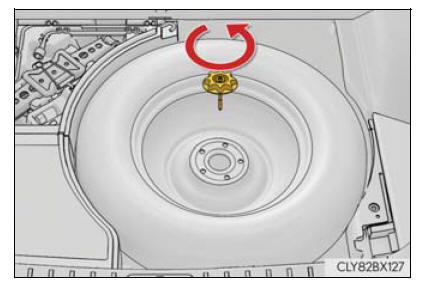
RX450hL
1. Remove the deck board.
2. Remove the cover.
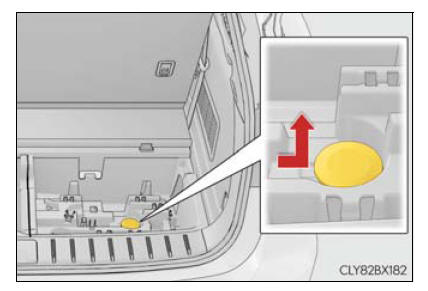
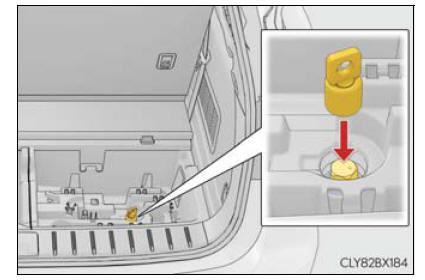
3. Attach the adapter socket to the spare tire clamp bolt.
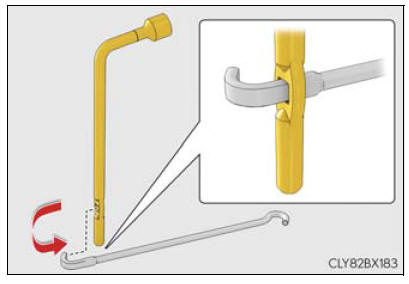
4. Assemble the jack handle extension.
5. Connect the jack handle to the adapter socket. Turn the jack handle counterclockwise.
The tire will be lowered completely to the ground.
Turn the jack handle slowly to lower the spare tire. If the handle is turned quickly, the wire cable may come off the shaft inside the unit and the tire may not be lowered.
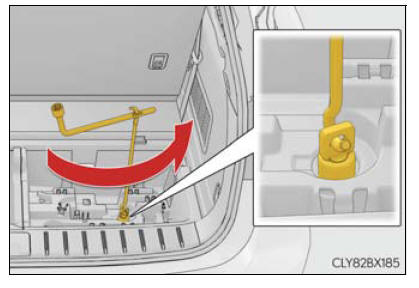
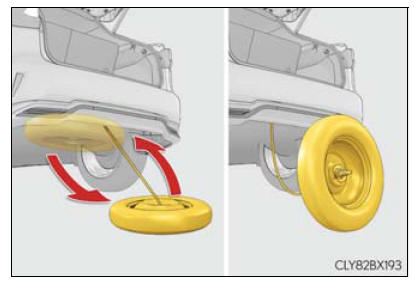
6. Pull out the spare tire and stand it against the bumper.
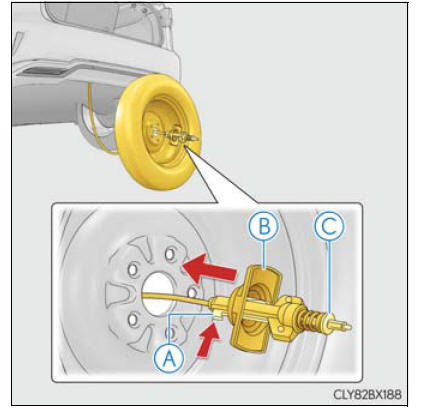
7. Fully depress the secondary latch
- A. and remove the holding bracket
- B. from the hoist assembly C.
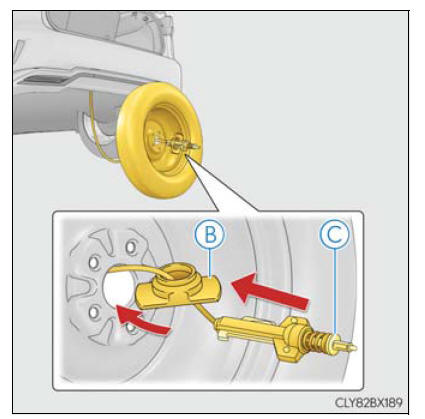
8. Tilt the bracket B and pass it through the wheel opening. Then remove the hoist assembly C.
WARNING
■ When storing the spare tire Be careful not to catch fingers or other body parts between the spare tire and the body of the vehicle.
Replacing a flat tire
1. Chock the tires.
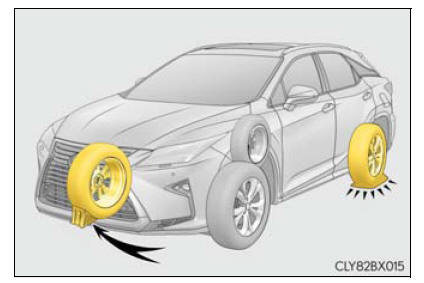
| Flat tire | Wheel chock positions | |
| Front | Left-hand side | Behind the rear right-hand side tire |
| Right-hand side | Behind the rear left-hand side tire | |
| Rear | Left-hand side | In front of the front right-hand side tire |
| Right-hand side | In front of the front left-hand side tire | |
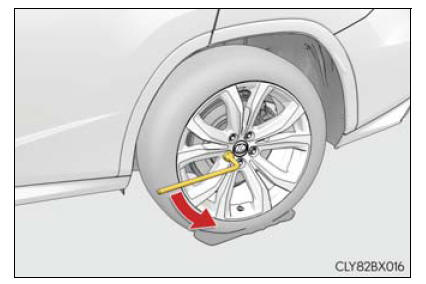
2. Slightly loosen the wheel nuts (one turn).
For vehicles with wheel lock nuts, loosen the wheel lock nut first.
3. Turn the tire jack portion A by hand until the notch of the jack is in contact with the jack point.
The jack point guides are located under the rocker panel. They indicate the jack point positions.
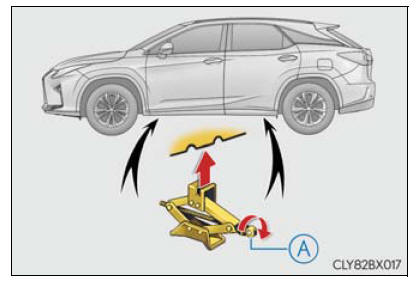
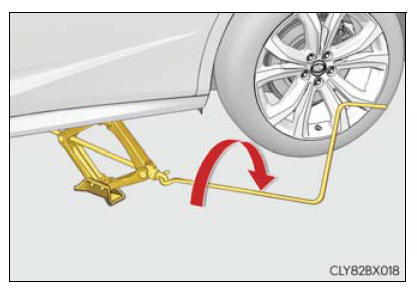
4. Raise the vehicle until the tire is slightly raised off the ground.
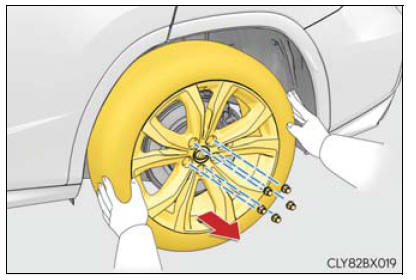
5. Remove all the wheel nuts and the tire.
When resting the tire on the ground, place the tire so that the wheel design faces up to avoid scratching the wheel surface.
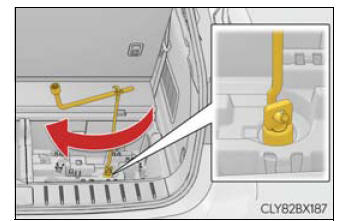
■ If the spare tire cannot be lowered (RX450hL) If the spare tire cannot be lowered, it may not have been stowed properly. Perform the following procedure:
1. Fully tighten the spare tire clamp bolt by turning the jack handle clockwise until two clicks are heard and the jack handle skips.
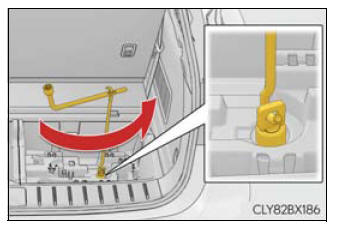
2. Turn the jack handle counterclockwise to lower the spare tire.
If the spare tire still cannot be lowered, attempt to fully tighten the spare tire clamp bolt again by turning the jack handle clockwise.
Then turn it counterclockwise at least 2 turns to lower the spare tire.
If the spare tire still cannot be lowered, the wire cable may be severed. Have the vehicle inspected by your Lexus dealer.
WARNING
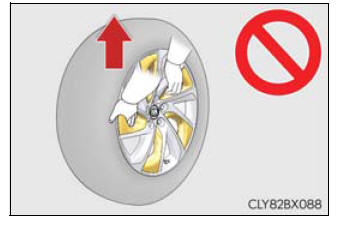
■When holding a tire with Selectable Color Trim (if equipped)
Do not hold the tire by the Selectable Color Trim. Otherwise, the Selectable Color Trim may be damaged or may fall off causing the tire to drop, possibly causing injury.
■ Replacing a flat tire
- Do not touch the disc wheels or the area around the brakes
immediately after the
vehicle has been driven.
After the vehicle has been driven the disc wheels and the area around the brakes will be extremely hot. Touching these areas with hands, feet or other body parts while changing a tire, etc. may result in burns.
- Failure to follow these precautions could cause the wheel nuts to
loosen and the tire
to fall off, resulting in death or serious injury.
- Never use oil or grease on the wheel bolts or wheel nuts.
Oil and grease may cause the wheel nuts to be excessively tightened, leading to bolt or disc wheel damage. In addition, the oil or grease can cause the wheel nuts to loosen and the wheel may fall off, causing a serious accident.
Remove any oil or grease from the wheel bolts or wheel nuts.
- Have the wheel nuts tightened with a torque wrench to 76 ft*lbf (103 N*m, 10.5 kgf*m) as soon as possible after changing wheels.
- When installing a tire, only use wheel nuts that have been specifically designed for that wheel.
- If there are any cracks or deformations in the bolt screws, nut threads or bolt holes of the wheel, have the vehicle inspected by your Lexus dealer.
- Never use oil or grease on the wheel bolts or wheel nuts.
- Observe the following precautions. (RX450hL)
Failure to do so may result in serious injury:- Do not try to remove the wheel ornament by hand. Take due care in handling the ornament to avoid unexpected personal injury.
- Lower the spare tire completely to the ground before removing it from under the vehicle.
■ Replacing a flat tire for vehicles with power back door In cases such as when replacing tires, make sure to turn off the power back door main switch. Failure to do so may cause the back door to operate unintentionally if the power back door switch is accidentally touched, resulting in hands and fingers being caught and injured.
Installing the spare tire
1. Remove any dirt or foreign matter from the wheel contact surface.
If foreign matter is on the wheel contact surface, the wheel nuts may loosen while the vehicle is in motion, causing the tire to come off.
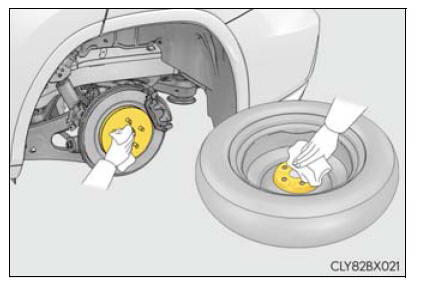
2. Install the spare tire and loosely tighten each wheel nut by hand by approximately the same amount.
Tighten the wheel nuts until the tapered portion comes into loose contact with the disc wheel seat.
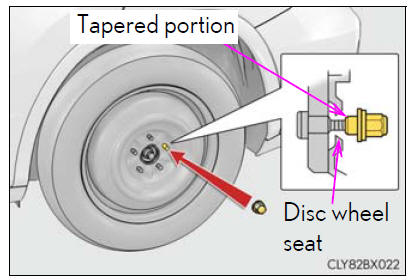
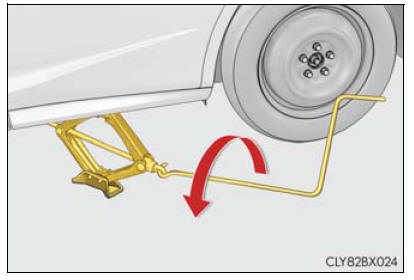
3. Lower the vehicle.
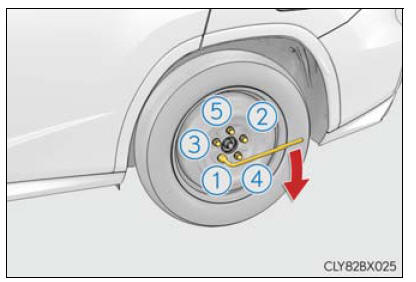
4. Firmly tighten each wheel nut two or three times in the order shown in the illustration.
For vehicles with wheel lock nuts, tighten the wheel lock nut last Tightening torque: 76 ft*lbf (103 N*m, 10.5 kgf*m)
5. RX450h: Stow the flat tire, tire jack and all tools.
WARNING
■ Stowing the flat tire Failure to follow steps listed under stowing the tire may result in damage to the spare tire carrier and loss of the tire, which could result in serious injury or death.
Stowing the flat tire, jack and all tools (RX450hL)
1. Remove the center wheel ornament by pushing from the reverse side.
Be careful not to lose the wheel ornament.
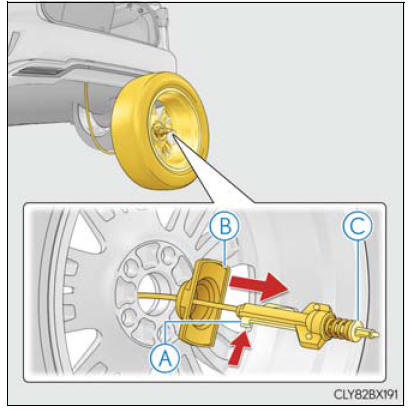
2. Stand the tire against the bumper with the inner surface facing toward you. Pass the hoist assembly C and holding bracket B through the wheel opening.
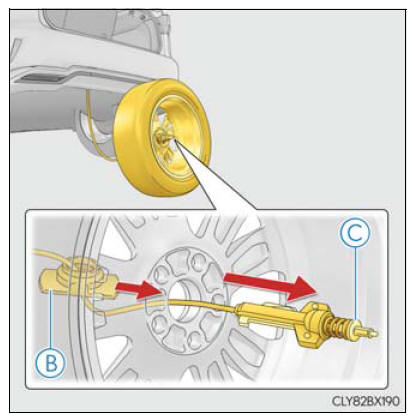
3. Fully depress the secondary latch A and install the bracket B to the hoist assembly C.
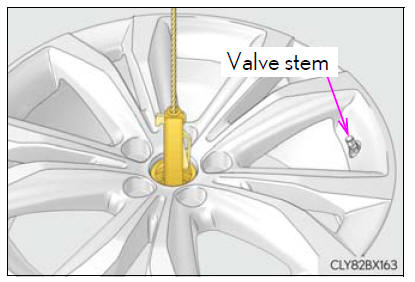
4. Lay the tire on the ground with the outer surface (valve stem) facing up.
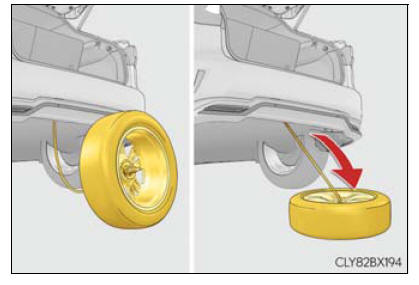
5. Before raising the tire, make sure that the hoist assembly is perpendicular to the wheel opening. (Try to place the tire directly beneath the vehicle, near where the wire cable is hanging from.)
6. Using the jack handle and adapter socket, tighten the tire clamp bolt by turning it clockwise until the tire is in the correct position and two clicks are heard as the jack handle skips.
7. Confirm it is not loose after tightening:
- Push and pull the tire
- Try rotating
Visually check to ensure tire is not hung on surrounding parts.
If looseness or misassembly exists, repeat steps 2 to 7.
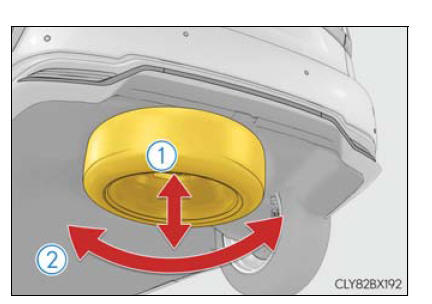
8. Repeat step 7, any time the tire is lowered or disturbed.
9. Stow the jack and all tools.
■ The compact spare tire
- The compact spare tire is identified by the label "TEMPORARY USE ONLY"
on the
tire sidewall.
Use the compact spare tire temporarily, and only in an emergency.
- Make sure to check the tire inflation pressure of the compact spare tire.
■ When using the compact spare tire As the compact spare tire is not equipped with a tire pressure warning valve and transmitter, low inflation pressure of the spare tire will not be indicated by the tire pressure warning system. Also, if you replace the compact spare tire after the tire pressure warning light comes on, the light remains on.
■ When the compact spare tire is equipped When driving with the compact spare tire installed, the vehicle height will be different than when driving with standard tires.
■ If you have a flat front tire on a road covered with snow or ice Install the compact spare tire on one of the rear wheels of the vehicle. Perform the following steps and fit tire chains to the front tires:
- Replace a rear tire with the compact spare tire.
- Replace the flat front tire with the tire removed from the rear of the vehicle.
- Fit tire chains to the front tires.
WARNING
■ When using the compact spare tire
- Remember that the compact spare tire provided is specifically designed for use with your vehicle. Do not use your compact spare tire on another vehicle.
- Do not use more than one compact spare tire simultaneously.
- Replace the compact spare tire with a standard tire as soon as possible.
- Avoid sudden acceleration, abrupt steering, sudden braking and shifting operations that cause sudden engine braking.
■ When the compact spare tire is attached The vehicle speed may not be correctly detected, and the following systems may not operate correctly:
- ABS & Brake assist
- VSC
- TRAC
- EPS
- Trailer Sway Control
- VDIM
- Adaptive Variable Suspension System (if equipped)
- Dynamic radar cruise control with full-speed range
- PCS (Pre-Collision System)
- LKA (Lane-Keeping Assist)
- Automatic High Beam
- AFS (Adaptive Front-lighting System) (if equipped)
- Tire pressure warning system
- Intuitive parking assist (if equipped)
- Intelligent Clearance Sonar (ICS) (if equipped)
- Lexus parking assist monitor (if equipped)
- Panoramic view monitor (if equipped)
- BSM (Blind Spot Monitor) (if equipped)
- Navigation system (if equipped)
Also, not only can the following system not be utilized fully, but it may even negatively affect the drive-train components:
- E-Four
■ Speed limit when using the compact spare tire Do not drive at speeds in excess of 50 mph (80 km/h) when a compact spare tire is installed on the vehicle.
The compact spare tire is not designed for driving at high speeds. Failure to observe this precaution may lead to an accident causing death or serious injury.
■ After using the tools and jack Before driving, make sure all the tools and jack are securely in place in their storage location to reduce the possibility of personal injury during a collision or sudden braking.
NOTICE
■ Be careful when driving over bumps with the compact spare tire installed on the vehicle When driving with the compact spare tire installed, the vehicle height will be different than when driving with standard tires. Be careful when driving over uneven road surfaces, etc.
■ Driving with tire chains and the compact spare tire Do not fit tire chains to the compact spare tire.
Tire chains may damage the vehicle body and adversely affect driving performance.
■When replacing the tires When removing or fitting the wheels, tires or the tire pressure warning valve and transmitter, contact your Lexus dealer as the tire pressure warning valve and transmitter may be damaged if not handled correctly.
■ When stowing the flat tire (RX450hL)
- Ensure that there is no object caught between the tire and the vehicle underbody.
- Securely tighten the spare tire clamp bolt to hold the spare wheel carrier by the hook.
- Stow the flat tire in the spare tire location. Failure to do so may cause damage to the spare tire carrier. Proper storage reduces the possibility of injury in a collision or during sudden braking.
- Have the flat tire repaired and the spare tire replaced with it as soon as possible.
■ Proper storage of the spare tire (RX450hL)
- If the hoist assembly is slanted when stowing a tire, the hoist assembly may become stuck in the wheel opening and the tire may not be raised properly, causing damage to the wheel or the wire cable.
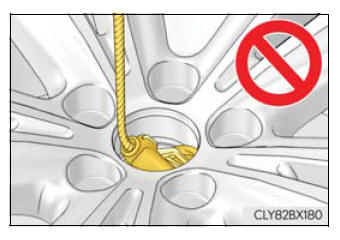
- If the spare tire clamp bolt is turned without a tire on the hoist assembly, the wire cable may not be able to be lowered. If the wire cable cannot be lowered, contact your Lexus dealer.
 If a warning message is
displayed
The multi-information display shows warnings of system malfunctions,
incorrectly
performed operations, and messages that indicate a need for maintenance.
When a message is shown, perform the cor ...
 If the hybrid system will
not start
Reasons for the hybrid system not starting vary depending on the
situation.
Check the following and perform the appropriate procedure:
The hybrid system will not start even though the correct st ...
Other materials:
Lexus RX (RX 350L, RX450h) 2016-2026 Owners Manual > Using the driving support
systems: Driving assist systems
To keep driving safety and performance, the following systems operate
automatically
in response to various driving situations. Be aware, however, that
these systems are supplementary and should not be relied upon too heavily
when operating the vehicle.
ECB (Electronically Controlled Brake Syst ...
Lexus RX (RX 350L, RX450h) 2016-2026 Repair Manual > Automatic Transaxle System: Shift Solenoid "A" Actuator Stuck On (P07507E)
DESCRIPTION Based on signals from the transmission revolution sensors (NT, NC3 and NC), the actual gear is detected. The ECM compares the actual gear with the shift schedule in the ECM memory to detect mechanical malfunctions of the shift solenoid valves, transmission valve body assembly and automat ...
Lexus RX (RX 350L, RX450h) 2016-{YEAR} Owners Manual
- For your information
- Pictorial index
- For safety and security
- Instrument cluster
- Operation of each component
- Driving
- Lexus Display Audio system
- Interior features
- Maintenance and care
- When trouble arises
- Vehicle specifications
- For owners
Lexus RX (RX 350L, RX450h) 2016-{YEAR} Repair Manual
0.027
