Lexus RX (RX 350L, RX450h) 2016-2026 Repair Manual: Installation
INSTALLATION
PROCEDURE
1. INSTALL HEATED OXYGEN SENSOR (for Bank 2)
Click here .gif)
2. INSTALL FRONT EXHAUST PIPE ASSEMBLY
(a) Install a new exhaust pipe gasket to the front exhaust pipe assembly.
(b) Install the front exhaust pipe assembly to the exhaust manifold assembly LH (TWC: Front Catalyst) with the 2 nuts.
Torque:
55 N·m {561 kgf·cm, 41 ft·lbf}
(c) Connect the heated oxygen sensor (for Bank 2) connector.
(d) Engage the 2 wire harnesses clamps.
3. INSTALL NO. 1 EXHAUST PIPE SUPPORT BRACKET (for Lower Side)
(a) Install the No. 1 exhaust pipe support bracket with the 2 bolts.
Torque:
21 N·m {214 kgf·cm, 15 ft·lbf}
4. INSTALL HEATED OXYGEN SENSOR (for Bank 1)
Click here
5. INSTALL FRONT NO. 3 EXHAUST PIPE SUB-ASSEMBLY
(a) Install 2 new exhaust pipe gaskets to the front No. 3 exhaust pipe sub-assembly.
(b) Install the front No. 3 exhaust pipe sub-assembly to the front exhaust pipe assembly and exhaust manifold (TWC: Front Catalyst) with the 2 bolts and 2 nuts.
Torque:
55 N·m {561 kgf·cm, 41 ft·lbf}
(c) Connect the heated oxygen sensor (for Bank 1) connector.
(d) Engage the 4 wire harness clamps.
6. INSTALL CENTER EXHAUST PIPE ASSEMBLY (TWC: Rear Catalyst)
| (a) Using a vernier caliper, measure the free length of the 2 compression springs.
If the free length is less than minimum, replace the compression spring. |
|
.png)
(b) Temporarily install a new exhaust pipe gasket to the front No. 3 exhaust pipe sub-assembly.
| (c) Using a plastic hammer and wooden block, tap in the exhaust pipe gasket until its surface is flush with the front No. 3 exhaust pipe sub-assembly. NOTICE:
|
|
.png)
(d) Connect the center exhaust pipe assembly (TWC: Rear Catalyst) to the 2 exhaust pipe supports.
(e) Install the center exhaust pipe assembly (TWC: Rear Catalyst) to the front No. 3 exhaust pipe sub-assembly with the 2 bolts and 2 compression springs.
Torque:
43 N·m {438 kgf·cm, 32 ft·lbf}
HINT:
After installation, check that the space between the flanges of the center exhaust pipe assembly (TWC: Rear Catalyst) and front No. 3 exhaust pipe sub-assembly is consistent front-to-rear and left-to-right.
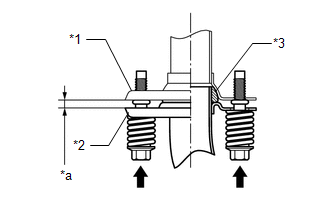
| *1 | Center Exhaust Pipe Assembly (TWC: Rear Catalyst) |
| *2 | Front No. 3 Exhaust Pipe Sub-assembly |
| *3 | Exhaust Pipe Gasket |
| *a | Space between Flanges: 8.5 mm (0.335 in.) |
7. INSTALL TAIL EXHAUST PIPE ASSEMBLY (w/o Rear No. 2 Seat)
(a) Install a new exhaust pipe gasket to the center exhaust pipe assembly (TWC: Rear Catalyst).
(b) Connect the tail exhaust pipe assembly to the 2 exhaust pipe supports.
(c) Install the tail exhaust pipe assembly to the center exhaust pipe assembly (TWC: Rear Catalyst) with the 2 bolts.
Torque:
55 N·m {561 kgf·cm, 41 ft·lbf}
8. INSTALL TAIL EXHAUST PIPE ASSEMBLY (w/ Rear No. 2 Seat)
(a) Install a new exhaust pipe gasket to the center exhaust pipe assembly (TWC: Rear Catalyst).
(b) Connect the tail exhaust pipe assembly to the 4 exhaust pipe supports.
(c) Install the tail exhaust pipe assembly to the center exhaust pipe assembly (TWC: Rear Catalyst) with the 2 bolts.
Torque:
55 N·m {561 kgf·cm, 41 ft·lbf}
9. INSTALL NO. 2 TAIL EXHAUST PIPE ASSEMBLY (w/o Rear No. 2 Seat)
(a) Install a new exhaust pipe gasket to the tail exhaust pipe assembly.
(b) Connect the No. 2 tail exhaust pipe assembly to the 2 exhaust pipe supports.
(c) Install the No. 2 tail exhaust pipe assembly to the tail exhaust pipe assembly with the 2 bolts.
Torque:
55 N·m {561 kgf·cm, 41 ft·lbf}
10. INSPECT FOR EXHAUST GAS LEAK
If gas is leaking, tighten the areas necessary to stop the leak. Replace damaged parts as necessary.
(a) Perform Inspection After Repair after repairing an exhaust gas leak.
Click here
11. INSTALL FRONT FLOOR COVER LH
Click here
 Components
COMPONENTS ILLUSTRATION *A for TMC Made *B for TMMC Made *1 CENTER EXHAUST PIPE ASSEMBLY (TWC: Rear Catalyst) *2 FRONT FLOOR COVER LH *3 FRONT NO. 3 EXHAUST PIPE SUB-ASSEMBLY ...
 Removal
REMOVAL CAUTION / NOTICE / HINT The necessary procedures (adjustment, calibration, initialization or registration) that must be performed after parts are removed and installed, or replaced during fron ...
Other materials:
Lexus RX (RX 350L, RX450h) 2016-2026 Repair Manual > Can Communication System: How To Proceed With Troubleshooting
CAUTION / NOTICE / HINT PRECAUTIONS WHEN TROUBLESHOOTING NOTICE:
Because the order of diagnosis is important to allow correct diagnosis, make sure to begin troubleshooting using How to Proceed with Troubleshooting when CAN communication system related DTCs are output.
If the CAN communication s ...
Lexus RX (RX 350L, RX450h) 2016-2026 Repair Manual > Vehicle Stability Control System: Brake Warning Light does not Come ON
DESCRIPTION The skid control ECU (brake actuator assembly) controls the brake warning light in the combination meter assembly via CAN communication. CAUTION / NOTICE / HINT NOTICE: After replacing the skid control ECU (brake actuator assembly), perform "Calibration". Click here PROCEDURE 1. ...
Lexus RX (RX 350L, RX450h) 2016-{YEAR} Owners Manual
- For your information
- Pictorial index
- For safety and security
- Instrument cluster
- Operation of each component
- Driving
- Lexus Display Audio system
- Interior features
- Maintenance and care
- When trouble arises
- Vehicle specifications
- For owners
Lexus RX (RX 350L, RX450h) 2016-{YEAR} Repair Manual

0.0086