Lexus RX (RX 350L, RX450h) 2016-2026 Repair Manual: Removal
REMOVAL
CAUTION / NOTICE / HINT
The necessary procedures (adjustment, calibration, initialization or registration) that must be performed after parts are removed and installed, or replaced during front exhaust pipe assembly, front No. 3 exhaust pipe sub-assembly, center exhaust pipe assembly (TWC: Rear Catalyst), tail exhaust pipe assembly and No. 2 tail exhaust pipe assembly removal/installation are shown below.
Necessary Procedures After Parts Removed/Installed/Replaced| Replaced Part or Performed Procedure | Necessary Procedure | Effect/Inoperative Function when Necessary Procedure not Performed | Link |
|---|---|---|---|
| Inspection After Repair |
| |
CAUTION:
To prevent burns, do not touch the engine, exhaust pipe or other high temperature components while the engine is hot.
.png)
PROCEDURE
1. REMOVE NO. 2 TAIL EXHAUST PIPE ASSEMBLY (w/o Rear No. 2 Seat)
CAUTION:
To prevent burns, do not touch the engine, exhaust pipe or other high temperature components while the engine is hot.
| (a) Remove the 2 bolts to disconnect the No. 2 tail exhaust pipe assembly from the tail exhaust pipe assembly. |
|
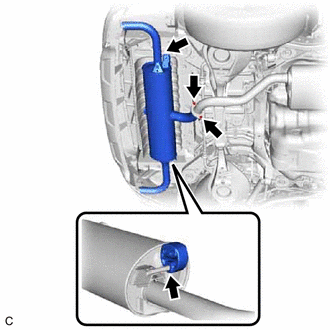
(b) Remove the No. 2 tail exhaust pipe assembly from the 2 exhaust pipe supports.
(c) Remove the exhaust pipe gasket from the tail exhaust pipe assembly.
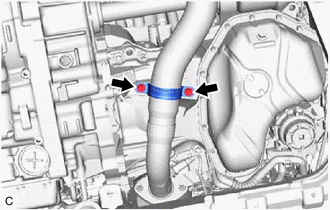
2. REMOVE TAIL EXHAUST PIPE ASSEMBLY (w/o Rear No. 2 Seat)
CAUTION:
To prevent burns, do not touch the engine, exhaust pipe or other high temperature components while the engine is hot.
| (a) Remove the 2 bolts to disconnect the tail exhaust pipe assembly from the center exhaust pipe assembly (TWC: Rear Catalyst). |
|
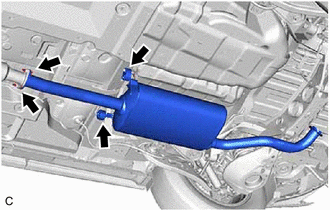
(b) Remove the tail exhaust pipe assembly from the 2 exhaust pipe supports.
(c) Remove the exhaust pipe gasket from the center exhaust pipe assembly (TWC: Rear Catalyst).
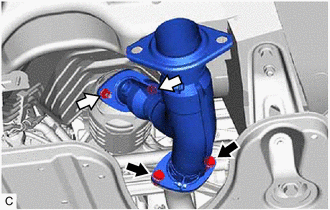
3. REMOVE TAIL EXHAUST PIPE ASSEMBLY (w/ Rear No. 2 Seat)
CAUTION:
To prevent burns, do not touch the engine, exhaust pipe or other high temperature components while the engine is hot.
| (a) Remove the 2 bolts to disconnect the tail exhaust pipe assembly from the center exhaust pipe assembly (TWC: Rear Catalyst). |
|

(b) Remove the tail exhaust pipe assembly from the 4 exhaust pipe supports.
(c) Remove the exhaust pipe gasket from the center exhaust pipe assembly (TWC: Rear Catalyst).
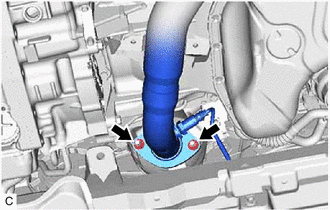
4. REMOVE CENTER EXHAUST PIPE ASSEMBLY (TWC: Rear Catalyst)
CAUTION:
To prevent burns, do not touch the engine, exhaust pipe or other high temperature components while the engine is hot.
| (a) Remove the 2 bolts and 2 compression springs to disconnect the center exhaust pipe assembly (TWC: Rear Catalyst) from the front No. 3 exhaust pipe sub-assembly. |
|
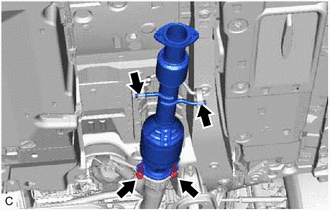
(b) Remove the center exhaust pipe assembly (TWC: Rear Catalyst) from the 2 exhaust pipe supports.
(c) Remove the exhaust pipe gasket from the front No. 3 exhaust pipe sub-assembly.
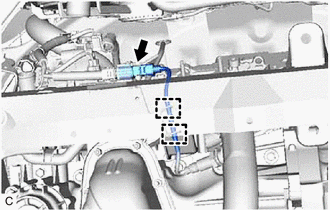
5. REMOVE FRONT FLOOR COVER LH
Click here .gif)
6. REMOVE FRONT NO. 3 EXHAUST PIPE SUB-ASSEMBLY
CAUTION:
To prevent burns, do not touch the engine, exhaust pipe or other high temperature components while the engine is hot.
| (a) Disengage the 4 wire harness clamps. |
|
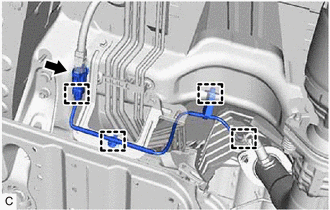
(b) Disconnect the heated oxygen sensor (for Bank 1) connector.
(c) Remove the 2 bolts and 2 nuts to remove the front No. 3 exhaust pipe sub-assembly from the front exhaust pipe assembly and exhaust manifold (TWC: Front Catalyst).
.png) | Bolt |
.png) | Nut |
(d) Remove the 2 exhaust pipe gaskets from the front No. 3 exhaust pipe sub-assembly.
7. REMOVE HEATED OXYGEN SENSOR (for Bank 1)
Click here
8. REMOVE NO. 1 EXHAUST PIPE SUPPORT BRACKET (for Lower Side)
CAUTION:
To prevent burns, do not touch the engine, exhaust pipe or other high temperature components while the engine is hot.
| (a) Remove the 2 bolts and No. 1 exhaust pipe support bracket. |
|
9. REMOVE FRONT EXHAUST PIPE ASSEMBLY
CAUTION:
To prevent burns, do not touch the engine, exhaust pipe or other high temperature components while the engine is hot.
| (a) Disengage the 2 wire harness clamps. |
|
(b) Disconnect the heated oxygen sensor (for Bank 2) connector.
| (c) Remove the 2 nuts and front exhaust pipe assembly from the exhaust manifold assembly LH (TWC: Front Catalyst). |
|
(d) Remove the exhaust pipe gasket from the front exhaust pipe assembly.
10. REMOVE HEATED OXYGEN SENSOR (for Bank 2)
Click here
 Installation
INSTALLATION PROCEDURE 1. INSTALL HEATED OXYGEN SENSOR (for Bank 2) Click here 2. INSTALL FRONT EXHAUST PIPE ASSEMBLY (a) Install a new exhaust pipe gasket to the front exhaust pipe assembly. (b) In ...
 Intake Air Control Valve (for Acis)
On-vehicle InspectionON-VEHICLE INSPECTION PROCEDURE 1. INSPECT INTAKE AIR CONTROL VALVE (for ACIS) (a) Remove the V-bank cover sub-assembly. Click here (b) Disconnect the vacuum hose sub-asse ...
Other materials:
Lexus RX (RX 350L, RX450h) 2016-2026 Repair Manual > Roof Rack(w/o Rear No. 2 Seat): Components
COMPONENTS ILLUSTRATION *A for Panoramic Moon Roof - - *1 FRONT SLIDING ROOF HOUSING MOUNTING BRACKET LH *2 ROOF RACK ASSEMBLY LH N*m (kgf*cm, ft.*lbf): Specified torque - - ILLUSTRATION *A except TMMC Made - - *1 FRONT ROOF RACK LEG CUSHION LH *2 ...
Lexus RX (RX 350L, RX450h) 2016-2026 Repair Manual > Safety Connect System: Telephone Sub Antenna Circuit Short to Ground (B153711,B153713)
DESCRIPTION These DTCs are stored when a malfunction occurs in the telephone and GPS antenna (for Front Side). DTC No. Detection Item DTC Detection Condition Trouble Area B153711 Telephone Sub Antenna Circuit Short to Ground Telephone antenna (sub) impedance (Ω) is lower than the m ...
Lexus RX (RX 350L, RX450h) 2016-{YEAR} Owners Manual
- For your information
- Pictorial index
- For safety and security
- Instrument cluster
- Operation of each component
- Driving
- Lexus Display Audio system
- Interior features
- Maintenance and care
- When trouble arises
- Vehicle specifications
- For owners
Lexus RX (RX 350L, RX450h) 2016-{YEAR} Repair Manual

0.0097