Lexus RX (RX 350L, RX450h) 2016-2026 Repair Manual: Parts Location
PARTS LOCATION
ILLUSTRATION
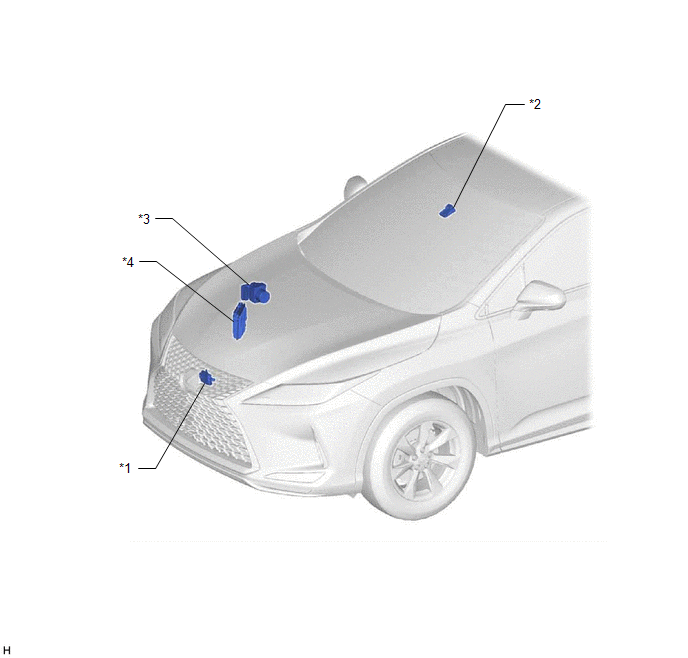
| *1 | MILLIMETER WAVE RADAR SENSOR ASSEMBLY | *2 | FORWARD RECOGNITION CAMERA |
| *3 | SKID CONTROL ECU (BRAKE ACTUATOR ASSEMBLY) | *4 | ECM |
ILLUSTRATION
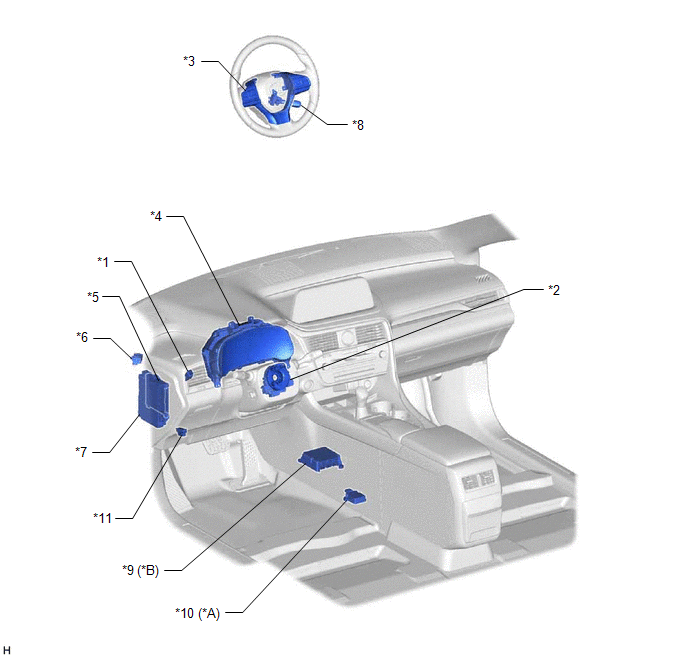
| *A | for TFT Meter Type | *B | for Optitron Meter Type |
| *1 | STOP LIGHT SWITCH ASSEMBLY | *2 | SPIRAL CABLE WITH SENSOR SUB-ASSEMBLY - SPIRAL CABLE SUB-ASSEMBLY - STEERING SENSOR |
| *3 | STEERING PAD SWITCH ASSEMBLY - VEHICLE-TO-VEHICLE DISTANCE CONTROL SWITCH | *4 | COMBINATION METER ASSEMBLY |
| *5 | MAIN BODY ECU (MULTIPLEX NETWORK BODY ECU) | *6 | SKID CONTROL BUZZER ASSEMBLY |
| *7 | INSTRUMENT PANEL JUNCTION BLOCK ASSEMBLY - STOP FUSE - ECU-IG1 NO. 2 FUSE - ECU-IG2 NO. 3 FUSE | *8 | CRUISE CONTROL MAIN SWITCH |
| *9 | AIRBAG SENSOR ASSEMBLY | *10 | YAW RATE SENSOR ASSEMBLY |
| *11 | DLC3 | - | - |
 Definition Of Terms
DEFINITION OF TERMS Term Definition Monitor description Description of what the ECM monitors and how it detects malfunctions (monitoring purpose and details). Related DTCs Group of di ...
 System Diagram
SYSTEM DIAGRAM LOCAL BUS ...
Other materials:
Lexus RX (RX 350L, RX450h) 2016-2026 Repair Manual > Fuel Tank: Removal
REMOVAL CAUTION / NOTICE / HINT The necessary procedures (adjustment, calibration, initialization or registration) that must be performed after parts are removed and installed, or replaced during fuel pump removal/installation are shown below. Necessary Procedures After Parts Removed/Installed/Repla ...
Lexus RX (RX 350L, RX450h) 2016-2026 Repair Manual > Steering Column Assembly: Reassembly
REASSEMBLY CAUTION / NOTICE / HINT NOTICE:
Do not drop the power steering ECU assembly, strike it with tools or subject it to impacts.
If the power steering ECU assembly is subjected to an impact, replace it with a new one.
Do not pull the wire harness.
Do not allow any moisture to come int ...
Lexus RX (RX 350L, RX450h) 2016-{YEAR} Owners Manual
- For your information
- Pictorial index
- For safety and security
- Instrument cluster
- Operation of each component
- Driving
- Lexus Display Audio system
- Interior features
- Maintenance and care
- When trouble arises
- Vehicle specifications
- For owners
Lexus RX (RX 350L, RX450h) 2016-{YEAR} Repair Manual

0.009