
Lexus RX (RX 350L, RX450h) 2016-2026 Repair Manual: Open in Bus 3 Main Bus Line
DESCRIPTION
There may be an open circuit in one of the bus 3 main lines when the resistance between terminals 6 (CA3H) and 21 (CA3L) of the network gateway ECU is 70 Ω or higher.
| Symptom | Trouble Area |
|---|---|
| Resistance between terminals 6 (CA3H) and 21 (CA3L) of network gateway ECU is 70 Ω or higher. |
|
This malfunction is not related to the lines of a bus 3 branch or to ECUs or sensors connected to a bus 3 branch.
WIRING DIAGRAM
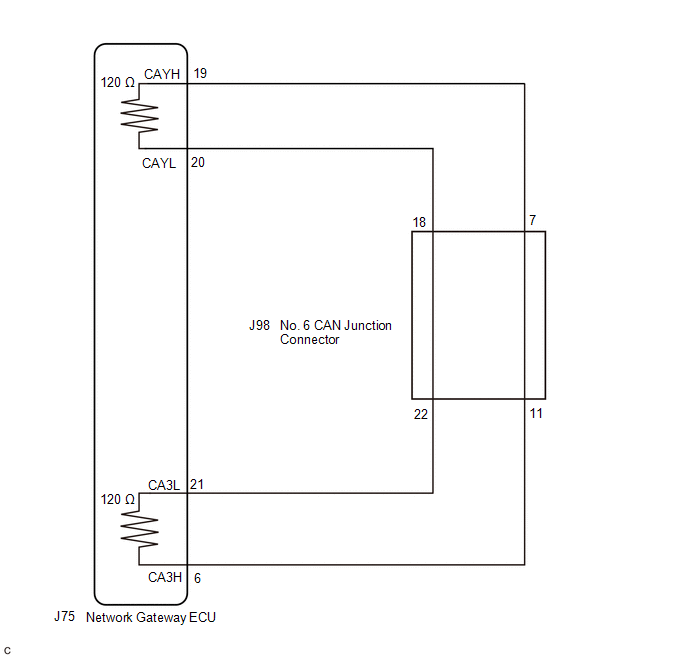
CAUTION / NOTICE / HINT
NOTICE:
- Before measuring the resistance of the CAN bus, turn the engine switch off and leave the vehicle for 1 minute or more without operating the key or any switches, or opening or closing the doors. After that, disconnect the cable from the negative (-) battery terminal and leave the vehicle for 1 minute or more before measuring the resistance.
-
After turning the engine switch off, waiting time may be required before disconnecting the cable from the negative (-) battery terminal. Therefore, make sure to read the disconnecting the cable from the negative (-) battery terminal notices before proceeding with work.
Click here
.gif)
-
Because the order of diagnosis is important to allow correct diagnosis, make sure to begin troubleshooting using How to Proceed with Troubleshooting when CAN communication system related DTCs are output.
Click here
- After performing repairs, perform the DTC check procedure and confirm that the DTCs are not output again.
- DTC check procedure: Turn the engine switch on (IG) and wait for at least 31 seconds.
-
After the repair, perform the CAN bus check and check that all the ECUs and sensors connected to the CAN communication system are displayed.
Click here
HINT:
- Operating the engine switch, any other switches or a door triggers related ECU and sensor communication on the CAN. This communication will cause the resistance value to change.
- Even after DTCs are cleared, if a DTC is stored again after driving the vehicle for a while, the malfunction may be occurring due to vibration of the vehicle. In such a case, wiggling the ECUs or wire harness while performing the inspection below may help determine the cause of the malfunction.
PROCEDURE
| 1. | CHECK FOR OPEN IN CAN BUS LINES (NO. 6 CAN JUNCTION CONNECTOR) |
(a) Disconnect the cable from the negative (-) battery terminal.
| (b) Disconnect the J98 No. 6 CAN junction connector. |
|
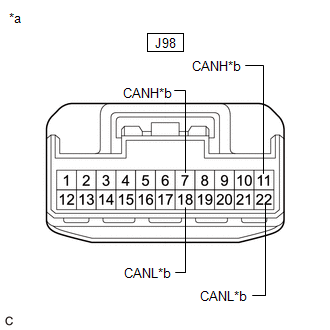
(c) Measure the resistance according to the value(s) in the table below.
Standard Resistance:
| Tester Connection | Condition | Specified Condition | Connected to |
|---|---|---|---|
| J98-7 (CANH) - J98-18 (CANL) | Cable disconnected from negative (-) battery terminal | 108 to 132 Ω | Network gateway ECU |
| J98-11 (CANH) - J98-22 (CANL) | Cable disconnected from negative (-) battery terminal | 108 to 132 Ω | Network gateway ECU |
| OK | .gif) | REPLACE NO. 6 CAN JUNCTION CONNECTOR |
|
.gif)
| 2. | CHECK FOR OPEN IN CAN BUS LINES (NETWORK GATEWAY ECU - NO. 6 CAN JUNCTION CONNECTOR) |
(a) Reconnect the J98 No. 6 CAN junction connector.
| (b) Disconnect the J75 network gateway ECU connector. |
|
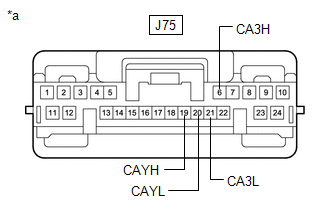
(c) Measure the resistance according to the value(s) in the table below.
Standard Resistance:
| Tester Connection | Condition | Specified Condition |
|---|---|---|
| J75-6 (CA3H) - J75-19 (CAYH) | Cable disconnected from negative (-) battery terminal | Below 1 Ω |
| J75-21 (CA3L) - J75-20 (CAYL) | Cable disconnected from negative (-) battery terminal | Below 1 Ω |
| OK | | REPLACE NETWORK GATEWAY ECU |
| NG | | REPAIR OR REPLACE CAN MAIN BUS LINES OR CONNECTOR (NETWORK GATEWAY ECU - NO. 6 CAN JUNCTION CONNECTOR) |
 Check Bus 2 Line for Short to GND
DESCRIPTION There may be a short circuit between one of the CAN bus lines and GND when there is no resistance between terminal 18 (CA4H) of the network gateway ECU and terminal 4 (CG) of the DLC3, or ...
 Check Bus 3 Lines for Short Circuit
DESCRIPTION There may be a short circuit between the bus 3 main lines and/or bus 3 branch lines when the resistance between terminals 6 (CA3H) and 21 (CA3L) of the network gateway ECU is below 54 Ω. ...
Other materials:
Lexus RX (RX 350L, RX450h) 2016-2026 Repair Manual > Wireless Door Lock Control System: Data List / Active Test
DATA LIST / ACTIVE TEST DATA LIST HINT: Using the Techstream to read the Data List allows the values or states of switches, sensors, actuators and other items to be read without removing any parts. This non-intrusive inspection can be very useful because intermittent conditions or signals may be dis ...
Lexus RX (RX 350L, RX450h) 2016-2026 Repair Manual > Power Window Control System: Power Window Motor Malfunction (B2311)
DESCRIPTION The power window regulator motor assemblies are operated by the multiplex network master switch assembly, power window regulator switch assembly or a rear power window regulator switch assembly. The power window regulator motor assemblies have motor, regulator and ECU functions. This DTC ...
Lexus RX (RX 350L, RX450h) 2016-{YEAR} Owners Manual
- For your information
- Pictorial index
- For safety and security
- Instrument cluster
- Operation of each component
- Driving
- Lexus Display Audio system
- Interior features
- Maintenance and care
- When trouble arises
- Vehicle specifications
- For owners
Lexus RX (RX 350L, RX450h) 2016-{YEAR} Repair Manual

0.01