Lexus RX (RX 350L, RX450h) 2016-2026 Repair Manual: Back Door Opener Switch
Components
COMPONENTS
ILLUSTRATION
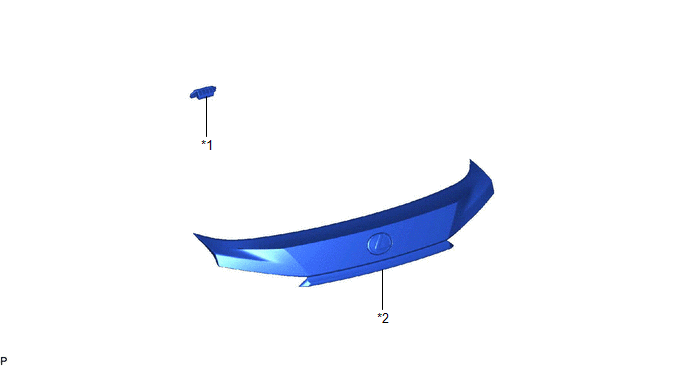
| *1 | BACK DOOR OPENER SWITCH ASSEMBLY | *2 | BACK DOOR OUTSIDE GARNISH SUB-ASSEMBLY |
Inspection
INSPECTION
PROCEDURE
1. INSPECT BACK DOOR OPENER SWITCH ASSEMBLY
(a) Check the operation of the opener switch.
| (1) Measure the resistance according to the value(s) in the table below. Standard Resistance:
If the result is not as specified, replace the back door opener switch assembly. |
|
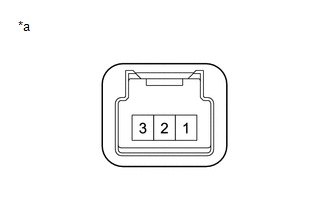
(b) Check the operation of the lock switch.
(1) Measure the resistance according to the value(s) in the table below.
Standard Resistance:
| Tester Connection | Condition | Specified Condition |
|---|---|---|
| 1 - 2 | Back door lock switch not pushed | 10 kΩ or higher |
| 1 - 2 | Back door lock switch pushed | Below 1 Ω |
If the result is not as specified, replace the back door opener switch assembly.
Removal
REMOVAL
PROCEDURE
1. REMOVE BACK DOOR OUTSIDE GARNISH SUB-ASSEMBLY
Click here .gif)
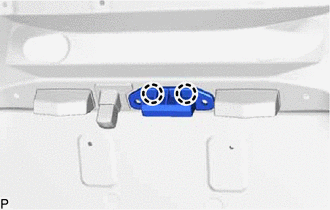
2. REMOVE BACK DOOR OPENER SWITCH ASSEMBLY
| (a) Disconnect the connector. |
|

| (b) Disengage the 2 claws to remove the back door opener switch assembly. |
|
Installation
INSTALLATION
PROCEDURE
1. INSTALL BACK DOOR OPENER SWITCH ASSEMBLY
(a) Engage the 2 claws to install the back door opener switch assembly.
(b) Connect the connector.
2. INSTALL BACK DOOR OUTSIDE GARNISH SUB-ASSEMBLY
Click here .gif)
 Removal
REMOVAL CAUTION / NOTICE / HINT The necessary procedures (adjustment, calibration, initialization, or registration) that must be performed after parts are removed and installed, or replaced during bac ...
 Back Door Weatherstrip
ComponentsCOMPONENTS ILLUSTRATION *1 BACK DOOR WEATHERSTRIP - - ● Non-reusable part - - RemovalREMOVAL PROCEDURE 1. REMOVE BACK DOOR WEATHERSTRIP (a) Remove the back door w ...
Other materials:
Lexus RX (RX 350L, RX450h) 2016-2026 Repair Manual > Intuitive Parking Assist System (w/ Intelligent Clearance Sonar System): Customize Parameters
CUSTOMIZE PARAMETERS CUSTOMIZE INTUITIVE PARKING ASSIST SYSTEM (a) Customizing with the Techstream. NOTICE:
When the customer requests a change in a function, first make sure that the function can be customized.
Be sure to make a note of the current settings before customizing.
When troublesh ...
Lexus RX (RX 350L, RX450h) 2016-2026 Repair Manual > Front Seat Assembly: Components
COMPONENTS ILLUSTRATION *1 FRONT INNER SEAT TRACK BRACKET COVER *2 FRONT OUTER SEAT TRACK BRACKET COVER *3 FRONT SEAT ASSEMBLY *4 FRONT SEAT HEADREST ASSEMBLY *5 REAR INNER SEAT TRACK BRACKET COVER *6 REAR OUTER SEAT TRACK BRACKET COVER N*m (kgf*cm, ft.*lbf): Spe ...
Lexus RX (RX 350L, RX450h) 2016-{YEAR} Owners Manual
- For your information
- Pictorial index
- For safety and security
- Instrument cluster
- Operation of each component
- Driving
- Lexus Display Audio system
- Interior features
- Maintenance and care
- When trouble arises
- Vehicle specifications
- For owners
Lexus RX (RX 350L, RX450h) 2016-{YEAR} Repair Manual

0.0109