Lexus RX (RX 350L, RX450h) 2016-2026 Repair Manual: Back Door Weatherstrip
Components
COMPONENTS
ILLUSTRATION
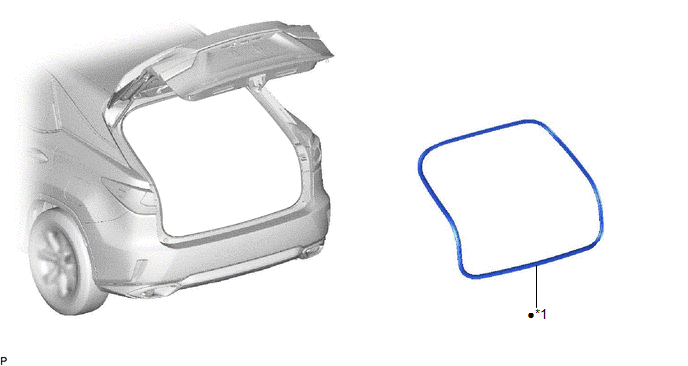
| *1 | BACK DOOR WEATHERSTRIP | - | - |
| ● | Non-reusable part | - | - |
Removal
REMOVAL
PROCEDURE
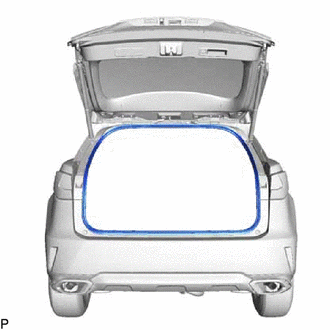
1. REMOVE BACK DOOR WEATHERSTRIP
| (a) Remove the back door weatherstrip. |
|
Installation
INSTALLATION
PROCEDURE
1. INSTALL BACK DOOR WEATHERSTRIP (w/o Rear No. 2 Seat)
(a) Clean the vehicle body.
(b) Align the joint of a new back door weatherstrip with the back door lock striker and temporarily install the back door weatherstrip.
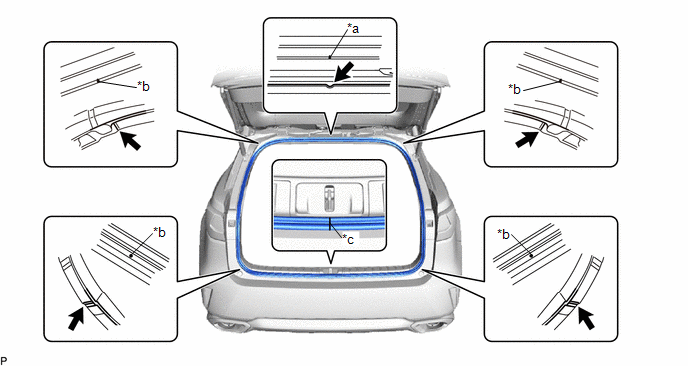
| *a | Alignment mark (White) | *b | Alignment mark (Pink) |
| *c | Joint | - | - |
.png) | Flange Position | - | - |
(c) Align the alignment marks on the back door weatherstrip with the flanges on the vehicle body indicated by the arrows, and install the back door weatherstrip.
NOTICE:
After installation, check that the corners fit correctly.
2. INSTALL BACK DOOR WEATHERSTRIP (w/ Rear No. 2 Seat)
(a) Clean the vehicle body.
(b) Align the joint of a new back door weatherstrip with the back door lock striker and temporarily install the back door weatherstrip.
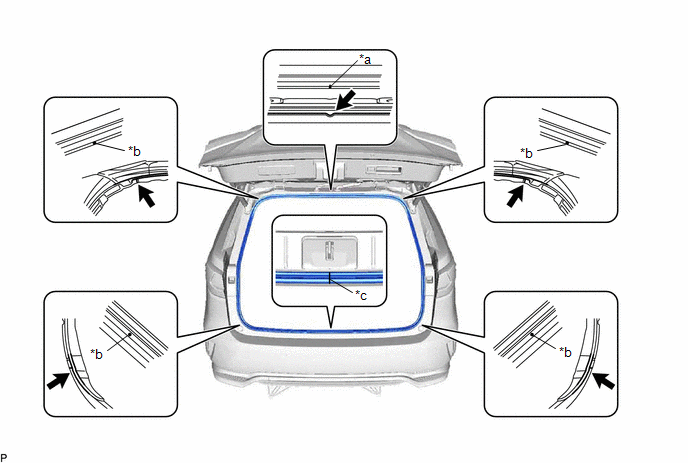
| *a | Alignment mark (Green) | *b | Alignment mark (Pink) |
| *c | Joint | - | - |
| | Flange Position | - | - |
(c) Align the alignment marks on the back door weatherstrip with the flanges on the vehicle body indicated by the arrows, and install the back door weatherstrip.
NOTICE:
After installation, check that the corners fit correctly.
 Back Door Opener Switch
ComponentsCOMPONENTS ILLUSTRATION *1 BACK DOOR OPENER SWITCH ASSEMBLY *2 BACK DOOR OUTSIDE GARNISH SUB-ASSEMBLY InspectionINSPECTION PROCEDURE 1. INSPECT BACK DOOR OPENER SWITCH ASSEMBLY ...
 Front Door
...
Other materials:
Lexus RX (RX 350L, RX450h) 2016-2026 Repair Manual > Power Steering System: PIG Power Supply Voltage (C1552,C1554)
DESCRIPTION If a problem occurs in the system, the power source relay circuit and the motor relay circuit are shut off to stop power assist. The ECU must be replaced when there is a problem with the relays because the relays are built into the ECU. DTC No. Detection Item DTC Detection Conditi ...
Lexus RX (RX 350L, RX450h) 2016-2026 Repair Manual > Wireless Charging System: Terminals Of Ecu
TERMINALS OF ECU MOBILE WIRELESS CHARGER CRADLE ASSEMBLY Terminal No. (Symbol) Wiring Color Terminal Description Condition Specified Condition
*1: When the engine switch is turned from off to on (ACC), the mobile wireless charger cradle assembly monitors the charging suspension signa ...
Lexus RX (RX 350L, RX450h) 2016-{YEAR} Owners Manual
- For your information
- Pictorial index
- For safety and security
- Instrument cluster
- Operation of each component
- Driving
- Lexus Display Audio system
- Interior features
- Maintenance and care
- When trouble arises
- Vehicle specifications
- For owners
Lexus RX (RX 350L, RX450h) 2016-{YEAR} Repair Manual

0.0094