
Lexus RX (RX 350L, RX450h) 2016-2026 Repair Manual: Installation
INSTALLATION
CAUTION / NOTICE / HINT
HINT:
- Use the same procedure for the RH side and LH side.
- The following procedure is for the LH side.
PROCEDURE
1. INSTALL FRONT DOOR OPENING TRIM WEATHERSTRIP
(a) Align the alignment mark on the front door opening trim weatherstrip with the flange on the vehicle body indicated by the arrow in the illustration, and install the front door opening trim weatherstrip.
Alignment Mark:
| Location | Color |
|---|---|
| for TMC Made LH Side | Purple |
| for TMC Made RH Side | Yellow or Green |
| for TMMC Made LH Side | Orange |
| for TMMC Made RH Side | Green |
NOTICE:
After installation, check that the corners fit correctly.
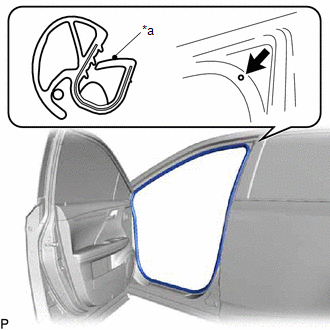
| *a | Alignment Mark |
 | Flange Position |
2. INSTALL COWL SIDE TRIM BOARD
(a) Engage the clip and claw as shown in the illustration.
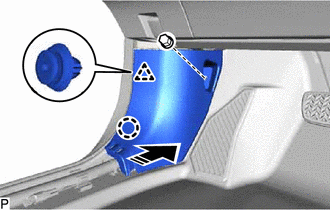
 | Install in this Direction |
(b) Install the cowl side trim board with the clip.
3. INSTALL INSTRUMENT PANEL GARNISH
Click here 
4. INSTALL ROOF HEADLINING ASSEMBLY
w/o Rear No. 2 Seat:
Click here
w/ Rear No. 2 Seat:
Click here
 Components
COMPONENTS ILLUSTRATION *1 COWL SIDE TRIM BOARD *2 FRONT DOOR OPENING TRIM WEATHERSTRIP *3 INSTRUMENT PANEL GARNISH - - ...
 Removal
REMOVAL CAUTION / NOTICE / HINT The necessary procedures (adjustment, calibration, initialization or registration) that must be performed after parts are removed and installed, or replaced during fron ...
Other materials:
Lexus RX (RX 350L, RX450h) 2016-2026 Repair Manual > Mass Air Flow Meter: Installation
INSTALLATION PROCEDURE 1. INSTALL MASS AIR FLOW METER SUB-ASSEMBLY HINT: Perform "Inspection After Repair" after replacing the mass air flow meter sub-assembly. Click here (a) Install the mass air flow meter sub-assembly to the air cleaner cap sub-assembly with the 2 screws. NOTICE:
If the mas ...
Lexus RX (RX 350L, RX450h) 2016-2026 Repair Manual > Brake Control / Dynamic Control Systems: Brake Hold Switch
ComponentsCOMPONENTS ILLUSTRATION *1 BRAKE HOLD SWITCH (ELECTRIC PARKING BRAKE SWITCH ASSEMBLY) *2 CONSOLE PANEL SUB-ASSEMBLY RemovalREMOVAL PROCEDURE 1. PRECAUTION Click here 2. REMOVE CONSOLE PANEL SUB-ASSEMBLY Click here 3. REMOVE BRAKE HOLD SWITCH (ELECTRIC PARKING BRAKE SWIT ...
Lexus RX (RX 350L, RX450h) 2016-{YEAR} Owners Manual
- For your information
- Pictorial index
- For safety and security
- Instrument cluster
- Operation of each component
- Driving
- Lexus Display Audio system
- Interior features
- Maintenance and care
- When trouble arises
- Vehicle specifications
- For owners
Lexus RX (RX 350L, RX450h) 2016-{YEAR} Repair Manual

0.0101