
Lexus RX (RX 350L, RX450h) 2016-2026 Repair Manual: Disassembly
DISASSEMBLY
PROCEDURE
1. REMOVE HOOD TO RADIATOR SUPPORT SEAL
| (a) Using a clip remover, disengage the 10 hood to radiator support seal clips to remove the hood to radiator support seal. |
|
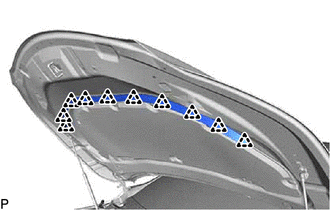
(b) Remove the 10 hood to radiator support seal clips from the hood to radiator support seal.
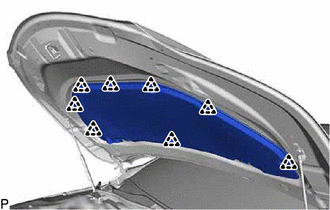
2. REMOVE HOOD INSULATOR
| (a) Using a clip remover, remove the 8 hood insulator clips and hood insulator. |
|
3. REMOVE WASHER NOZZLE SUB-ASSEMBLY
Click here .gif)
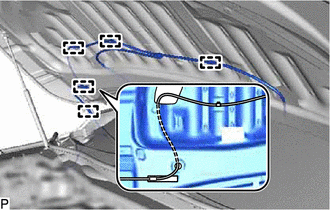
4. DISCONNECT WASHER HOSE ASSEMBLY
| (a) Disengage the 5 clamps and disconnect the washer hose assembly. |
|
5. REMOVE HOOD SUPPORT ASSEMBLY LH
Click here
6. REMOVE HOOD STAY BRACKET LH
Click here
7. REMOVE HOOD SUPPORT ASSEMBLY RH
HINT:
Use the same procedure as for the LH side.
8. REMOVE HOOD STAY BRACKET RH
HINT:
Use the same procedure as for the LH side.
 On-vehicle Inspection
ON-VEHICLE INSPECTION PROCEDURE 1. INSPECT HOOD SUB-ASSEMBLY (a) Check that the clearance measurements of areas a through c are within each standard range. Standard Clearance Area Measurement ...
 Adjustment
ADJUSTMENT CAUTION / NOTICE / HINT *a Centering Bolt *b Standard Bolt HINT:
Centering bolts are used to install the hood hinges and hood lock. The hood and hood lock cannot be adjust ...
Other materials:
Lexus RX (RX 350L, RX450h) 2016-2026 Repair Manual > Forced Release: Operation Method
OPERATION METHOD PROCEDURE 1. PRECAUTION Click here 2. PARKING BRAKE FORCED RELEASE CAUTION: Work on a level surface to ensure safety. NOTICE:
To release the parking brake, follow the procedure for when using SST.
If the parking brake cannot be released, follow the procedure for when not usi ...
Lexus RX (RX 350L, RX450h) 2016-2026 Repair Manual > Park Assist / Monitoring: Clearance Warning Buzzer (for Front Side)
ComponentsCOMPONENTS ILLUSTRATION *1 NO. 1 CLEARANCE WARNING BUZZER - - RemovalREMOVAL CAUTION / NOTICE / HINT The necessary procedures (adjustment, calibration, initialization, or registration) that must be performed after parts are removed and installed, or replaced during No. 1 clear ...
Lexus RX (RX 350L, RX450h) 2016-{YEAR} Owners Manual
- For your information
- Pictorial index
- For safety and security
- Instrument cluster
- Operation of each component
- Driving
- Lexus Display Audio system
- Interior features
- Maintenance and care
- When trouble arises
- Vehicle specifications
- For owners
Lexus RX (RX 350L, RX450h) 2016-{YEAR} Repair Manual

0.0107