Lexus RX (RX 350L, RX450h) 2016-2026 Repair Manual: Adjustment
ADJUSTMENT
CAUTION / NOTICE / HINT
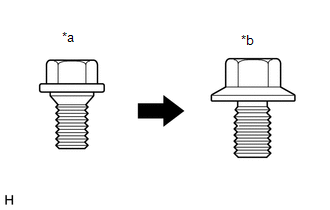
| *a | Centering Bolt |
| *b | Standard Bolt |
HINT:
- Centering bolts are used to install the hood hinges and hood lock. The hood and hood lock cannot be adjusted with the centering bolts installed. Substitute the centering bolts with standard bolts (with washers) when making adjustments.
-
The specified torque for standard bolts is shown in the standard bolt chart.
Click here
.gif)
PROCEDURE
1. INSPECT HOOD SUB-ASSEMBLY
Click here
2. ADJUST HOOD SUB-ASSEMBLY
(a) Horizontally and vertically adjust the hood.
| (1) Loosen the 4 hinge bolts of the hood. |
|
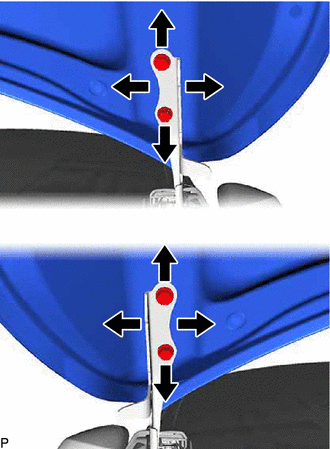
(2) Adjust the clearance between the hood and front fenders by moving the hood.
(3) Tighten the 4 hinge bolts after adjustment.
Torque:
13 N·m {133 kgf·cm, 10 ft·lbf}
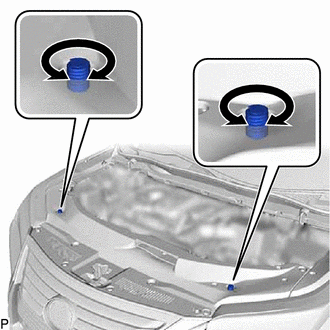
(b) Adjust the height of the front end of the hood using the hood bumper cushions.
| (1) Adjust the 2 hood bumper cushions so that the heights of the hood and fenders are aligned. HINT: Raise or lower the front end of the hood by turning the 2 hood bumper cushions. |
|
(c) Adjust the hood lock.
(1) Remove the cool air intake duct seal.
Click here
(2) Remove the hood lock release lever protector.
Click here
| (3) Loosen the 3 bolts. |
|
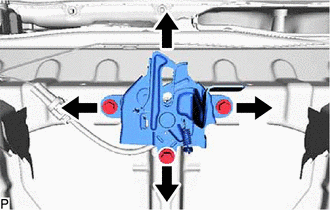
(4) Adjust the hood lock and tighten the 3 bolts.
Torque:
8.0 N·m {82 kgf·cm, 71 in·lbf}
(5) Check that the striker can engage the hood lock smoothly.
(6) Install the hood lock release lever protector.
Click here
(7) Install the cool air intake duct seal.
Click here
 Disassembly
DISASSEMBLY PROCEDURE 1. REMOVE HOOD TO RADIATOR SUPPORT SEAL (a) Using a clip remover, disengage the 10 hood to radiator support seal clips to remove the hood to radiator support seal. ...
 Reassembly
REASSEMBLY PROCEDURE 1. INSTALL HOOD STAY BRACKET LH Click here 2. INSTALL HOOD SUPPORT ASSEMBLY LH Click here 3. INSTALL HOOD STAY BRACKET RH HINT: Use the same procedure as for the LH side. 4. I ...
Other materials:
Lexus RX (RX 350L, RX450h) 2016-2026 Owners Manual > Using the driving support
systems: Driving mode select
switch
The driving modes can be selected to suit driving conditions.
Vehicles without Adaptive Variable Suspension System
Normal mode
Provides an optimal balance of fuel economy, quietness, and dynamic
performance.
Suitable for city driving.
Press the switch to change the driving mode to no ...
Lexus RX (RX 350L, RX450h) 2016-2026 Repair Manual > 2gr-fks (engine Control): Relay
On-vehicle InspectionON-VEHICLE INSPECTION PROCEDURE 1. INSPECT INJECTOR RELAY (INJ) (a) Measure the resistance according to the value(s) in the table below. Standard Resistance: Tester Connection Condition Specified Condition 3 - 5 Battery voltage not applied between terminals 1 and ...
Lexus RX (RX 350L, RX450h) 2016-{YEAR} Owners Manual
- For your information
- Pictorial index
- For safety and security
- Instrument cluster
- Operation of each component
- Driving
- Lexus Display Audio system
- Interior features
- Maintenance and care
- When trouble arises
- Vehicle specifications
- For owners
Lexus RX (RX 350L, RX450h) 2016-{YEAR} Repair Manual

0.011