Lexus RX (RX 350L, RX450h) 2016-2026 Repair Manual: Installation
INSTALLATION
CAUTION / NOTICE / HINT
HINT:
- Use the same procedure for the RH side and LH side.
- The following procedure is for the LH side.
PROCEDURE
1. INSTALL FRONT DOOR FRONT WINDOW FRAME MOULDING
(a) Using an air riveter or hand riveter with a nose piece, install the front door front window frame moulding with 2 new rivets.
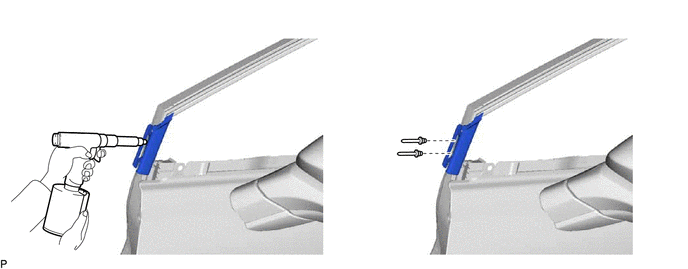
NOTICE:
To prevent damage, when installing the front door front window frame moulding, make sure that there are enough people available to hold it securely.
HINT:
If the mandrel of the rivet does not come off on the first operation of the rivet gun, slide the rivet gun forward on the mandrel and operate it again.
NOTICE:
-
Do not pry the rivet with the riveter, as this will cause damage to the riveter and mandrel.
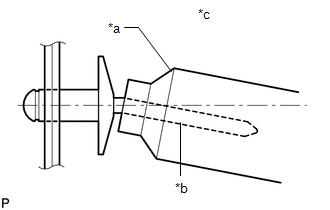
*a
Riveter
*b
Mandrel
*c
Incorrect
-
Confirm that the rivets are seated properly against the moulding.
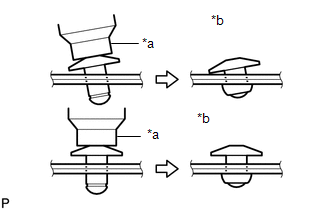
*a
Riveter
*b
Incorrect
- Do not tilt the riveter when installing the rivet to the moulding.
- Do not leave any space between the rivet head and moulding.
-
Do not leave any space between the moulding and door frame. Firmly hold the 2 items together while installing the rivet.
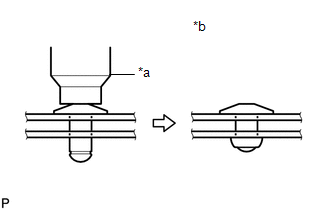
*a
Riveter
*b
Incorrect
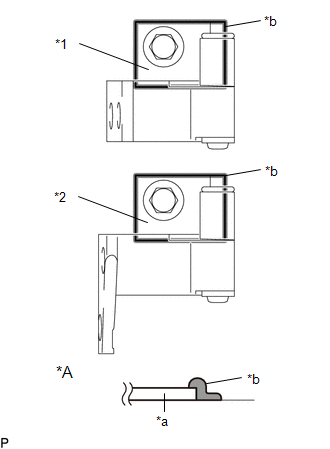
| (b) Install the front door panel sub-assembly with the 2 bolts <A>. Torque: 32.5 N·m {331 kgf·cm, 24 ft·lbf} NOTICE: To prevent damage, when installing the front door panel sub-assembly, make sure that there are enough people available to hold it securely. |
|
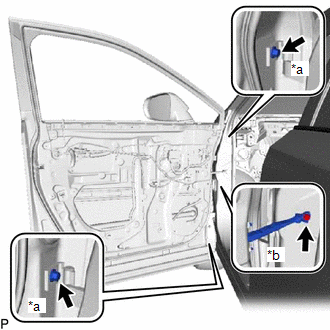
(c) Apply adhesive to the threads of the bolt <B>.
Adhesive:
Toyota Genuine Adhesive 1324, Three Bond 1324 or equivalent
(d) Install the bolt <B>.
Torque:
29 N·m {296 kgf·cm, 21 ft·lbf}
| (e) Using a brush, apply anti-rust coating to the front door hinge assembly as shown in the illustration. |
|
(f) Connect each connector.
(g) Engage each clamp.
2. INSTALL COWL SIDE TRIM BOARD
Click here .gif)
3. INSTALL FRONT DOOR SCUFF PLATE
w/o Rear No. 2 Seat: Click here
w/ Rear No. 2 Seat: Click here
4. INSTALL FRONT DOOR UPPER WINDOW FRAME MOULDING
(a) Engage the guide of the front door upper window frame moulding to the door frame.
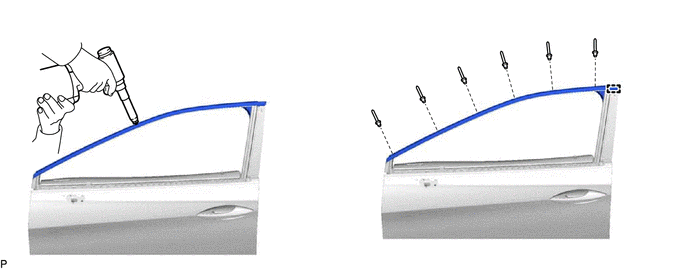
(b) Using an air riveter or hand riveter with a nose piece, install the front door upper window frame moulding with 6 new rivets.
HINT:
If the mandrel of the rivet does not come off on the first operation of the rivet gun, slide the rivet gun forward on the mandrel and operate it again.
NOTICE:
-
Do not pry the rivet with the riveter, as this will cause damage to the riveter and mandrel.
*a
Riveter
*b
Mandrel
*c
Incorrect
-
Confirm that the rivets are seated properly against the moulding.
*a
Riveter
*b
Incorrect
- Do not tilt the riveter when installing the rivet to the moulding.
- Do not leave any space between the rivet head and moulding.
-
Do not leave any space between the moulding and door frame. Firmly hold the 2 items together while installing the rivet.
*a
Riveter
*b
Incorrect
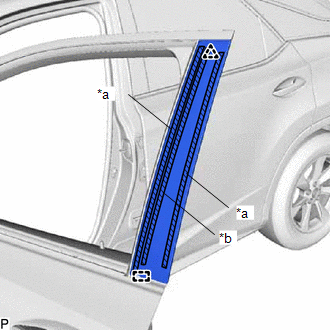
5. INSTALL FRONT DOOR REAR WINDOW FRAME MOULDING
HINT:
When installing a new front door rear window frame moulding, heat the vehicle body and front door rear window frame moulding using a heat light.
Heating Temperature| Item | Temperature |
|---|---|
| Vehicle Body | 40 to 60°C (104 to 140°F) |
| Front Door Rear Window Frame Moulding | 20 to 30°C (68 to 86°F) |
CAUTION:
- Do not touch the heat light and heated parts, touching the heat light may result in burns.
- Touching heated parts for a long time may result in burns.
.png)
| *a | Heated Part |
| *b | Heat Light |
NOTICE:
Do not heat the vehicle body or front door rear window frame moulding excessively.
(a) Clean the vehicle body surface.
(1) Using a heat light, heat the vehicle body surface.
(2) Remove any double-sided tape from the vehicle body.
(3) Wipe off any tape adhesive residue with cleaner.
| (b) Install a new front door rear window frame moulding. (1) Using a heat light, heat the vehicle body and front door rear window frame moulding. (2) Remove the release paper from the new front door rear window frame moulding. HINT: After removing the release paper, keep the exposed adhesive free from foreign matter. (3) Engage the guide and clip and attach the double-sided tape and caulking sponge to install the front door rear window frame moulding. HINT: Press the front door rear window frame moulding firmly to install it. |
|
6. CONNECT FRONT DOOR WEATHERSTRIP
(a) Engage the 9 clips and connect the front door weatherstrip.
7. INSTALL FRONT DOOR BELT MOULDING ASSEMBLY
Click here
 Components
COMPONENTS ILLUSTRATION *1 FRONT DOOR FRONT WINDOW FRAME MOULDING *2 FRONT DOOR REAR WINDOW FRAME MOULDING *3 FRONT DOOR UPPER WINDOW FRAME MOULDING *4 FRONT DOOR WEATHERSTRIP ...
 Removal
REMOVAL CAUTION / NOTICE / HINT The necessary procedures (adjustment, calibration, initialization or registration) that must be performed after parts are removed and installed, or replaced during fron ...
Other materials:
Lexus RX (RX 350L, RX450h) 2016-2026 Repair Manual > Rear No. 2 Seat Outer Belt Assembly: On-vehicle Inspection
ON-VEHICLE INSPECTION CAUTION / NOTICE / HINT CAUTION: Be sure to correctly follow the removal and installation procedures for the rear No. 2 seat outer belt assembly. PROCEDURE 1. INSPECT REAR NO. 2 SEAT OUTER BELT ASSEMBLY (for Vehicle not Involved in Collision) (a) Visually check for defects with ...
Lexus RX (RX 350L, RX450h) 2016-2026 Repair Manual > Vehicle Stability Control System: Data List / Active Test
DATA LIST / ACTIVE TEST DATA LIST NOTICE: In the table below, the values listed under "Normal Condition" are reference values. Do not depend solely on these reference values when deciding whether a part is faulty or not. HINT: Using the Techstream to read the Data List allows the values or states of ...
Lexus RX (RX 350L, RX450h) 2016-{YEAR} Owners Manual
- For your information
- Pictorial index
- For safety and security
- Instrument cluster
- Operation of each component
- Driving
- Lexus Display Audio system
- Interior features
- Maintenance and care
- When trouble arises
- Vehicle specifications
- For owners
Lexus RX (RX 350L, RX450h) 2016-{YEAR} Repair Manual

0.0106