Lexus RX (RX 350L, RX450h) 2016-2026 Repair Manual: Installation
INSTALLATION
CAUTION / NOTICE / HINT
HINT:
When installing the name plates, heat the vehicle body and name plates using a heat light.
Heating Temperature| Item | Temperature |
|---|---|
| Vehicle Body | 40 to 60°C (104 to 140°F) |
| Name Plate | 20 to 30°C (68 to 86°F) |
CAUTION:
- Do not touch the heat light and heated parts, touching the heat light may result in burns.
- Touching heated parts for a long time may result in burns.
.png)
| *a | Heated Part |
| *b | Heat Light |
NOTICE:
Do not heat the vehicle body or name plate excessively.
PROCEDURE
1. INSTALL NO. 3 BACK DOOR NAME PLATE
(a) Clean the vehicle body surface.
(1) Using a heat light, heat the vehicle body surface.
(2) Remove any remaining double-sided tape from the vehicle body.
(3) Wipe off any tape adhesive residue with cleaner.
(b) Using a heat light, heat the vehicle body and a new No. 3 back door name plate.
(c) Remove the release paper from the No. 3 back door name plate.
HINT:
After removing the release paper, keep the exposed adhesive free from foreign matter.
(d) Install the No. 3 back door name plate as shown in the illustration.
for RX350 Plate: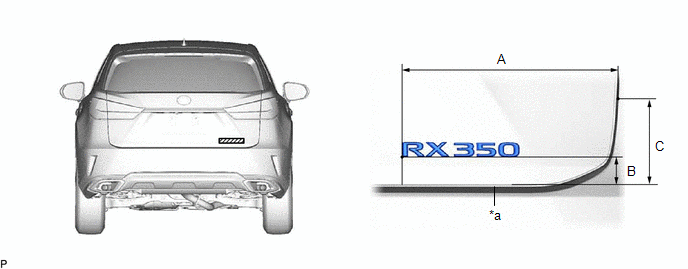
| *a | Profile of Luggage Compartment Door Panel | - | - |
Standard Measurement:
| Area | Measurement | Area | Measurement |
|---|---|---|---|
| A | 324.2 mm (12.8 in.) | B | 40.3 mm (1.59 in.) |
| C | 159.4 mm (6.28 in.) | - | - |
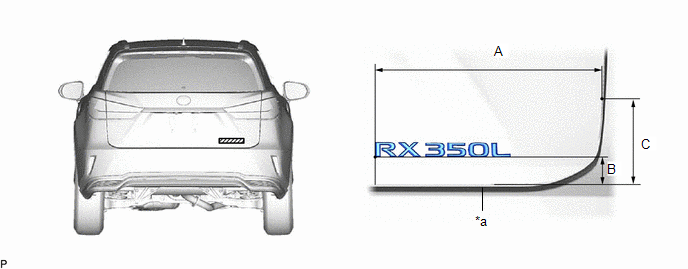
| *a | Profile of Luggage Compartment Door Panel | - | - |
Standard Measurement:
| Area | Measurement | Area | Measurement |
|---|---|---|---|
| A | 357.3 mm (14.1 in.) | B | 40.6 mm (1.60 in.) |
| C | 159.5 mm (6.28 in.) | - | - |
2. INSTALL NO. 2 BACK DOOR NAME PLATE (for F-Sport)
(a) Clean the vehicle body surface.
(1) Using a heat light, heat the vehicle body surface.
(2) Remove any remaining double-sided tape from the vehicle body.
(3) Wipe off any tape adhesive residue with cleaner.
(b) Using a heat light, heat the vehicle body and a new No. 2 back door name plate.
(c) Remove the release paper from the No. 2 back door name plate.
HINT:
After removing the release paper, keep the exposed adhesive free from foreign matter.
(d) Install the No. 2 back door name plate as shown in the illustration.
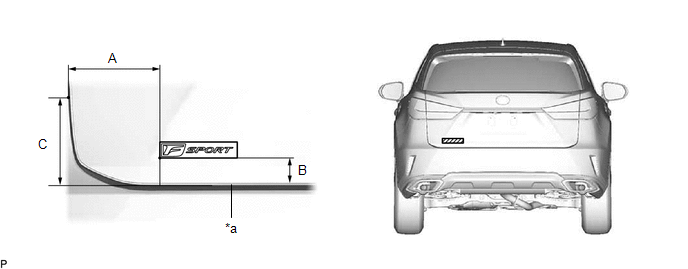
| *a | Profile of Luggage Compartment Door Panel | - | - |
Standard Measurement:
| Area | Measurement | Area | Measurement |
|---|---|---|---|
| A | 150 mm (5.91 in.) | B | 38.2 mm (1.50 in.) |
| C | 159.4 mm (6.28 in.) | - | - |
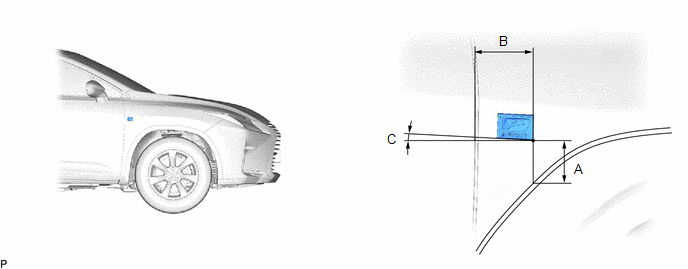
3. INSTALL NO. 2 FRONT FENDER NAME PLATE (for F-Sport)
(a) Clean the vehicle body surface.
(1) Using a heat light, heat the vehicle body surface.
(2) Remove any remaining double-sided tape from the vehicle body.
(3) Wipe off any tape adhesive residue with cleaner.
(b) Using a heat light, heat the vehicle body and a new No. 2 front fender name plate.
(c) Remove the release paper from the No. 2 front fender name plate.
HINT:
After removing the release paper, keep the exposed adhesive free from foreign matter.
(d) Install the No. 2 front fender name plate as shown in the illustration.
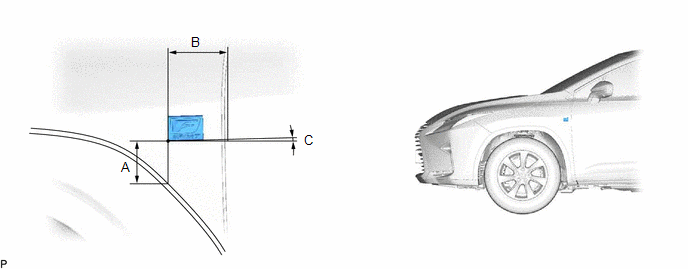
Standard Measurement:
| Area | Measurement | Area | Measurement |
|---|---|---|---|
| A | 64 mm (2.52 in.) | B | 79.2 mm (3.12 in.) |
| C | 1.5 deg | - | - |
4. INSTALL NO. 1 FRONT FENDER NAME PLATE (for F-Sport)
(a) Clean the vehicle body surface.
(1) Using a heat light, heat the vehicle body surface.
(2) Remove any remaining double-sided tape from the vehicle body.
(3) Wipe off any tape adhesive residue with cleaner.
(b) Using a heat light, heat the vehicle body and a new No. 1 front fender name plate.
(c) Remove the release paper from the No. 1 front fender name plate.
HINT:
After removing the release paper, keep the exposed adhesive free from foreign matter.
(d) Install the No. 1 front fender name plate as shown in the illustration.
Standard Measurement:
| Area | Measurement | Area | Measurement |
|---|---|---|---|
| A | 64 mm (2.52 in.) | B | 79.2 mm (3.12 in.) |
| C | 3.0 deg | - | - |
 Components
COMPONENTS ILLUSTRATION *A for F-Sport - - *1 NO. 2 BACK DOOR NAME PLATE *2 NO. 3 BACK DOOR NAME PLATE ● Non-reusable part - - ILLUSTRATION *A for F-Sport - ...
 Removal
REMOVAL CAUTION / NOTICE / HINT HINT: When removing the name plates, heat the vehicle body and name plates using a heat light. Heating Temperature Item Temperature Vehicle Body 40 to 60°C ...
Other materials:
Lexus RX (RX 350L, RX450h) 2016-2026 Repair Manual > Rear Combination Light Assembly (w/ Rear No. 2 Seat): Components
COMPONENTS ILLUSTRATION *A for RH Side *B for LH Side *1 FRONT DECK SIDE TRIM COVER *2 REAR DOOR INSIDE SCUFF PLATE *3 REAR DOOR SCUFF PLATE *4 REAR SEAT OUTER TRACK BRACKET COVER LH *5 REAR SEAT OUTER TRACK BRACKET COVER RH *6 REAR SEAT SIDE GARNISH ILLUST ...
Lexus RX (RX 350L, RX450h) 2016-2026 Repair Manual > Rear No. 1 Seat Assembly (for Captain Seat Type): Components
COMPONENTS ILLUSTRATION *1 REAR DOOR SCUFF PLATE LH *2 REAR NO. 1 SEAT ASSEMBLY LH *3 REAR SEAT HEADREST ASSEMBLY *4 REAR SEAT INNER TRACK BRACKET COVER LH *5 REAR SEAT OUTER TRACK BRACKET COVER LH *6 REAR SEAT OUTER TRACK BRACKET COVER LH *7 SEAT INNER TRACK BRAC ...
Lexus RX (RX 350L, RX450h) 2016-{YEAR} Owners Manual
- For your information
- Pictorial index
- For safety and security
- Instrument cluster
- Operation of each component
- Driving
- Lexus Display Audio system
- Interior features
- Maintenance and care
- When trouble arises
- Vehicle specifications
- For owners
Lexus RX (RX 350L, RX450h) 2016-{YEAR} Repair Manual

0.0119