Lexus RX (RX 350L, RX450h) 2016-2026 Repair Manual: Removal
REMOVAL
CAUTION / NOTICE / HINT
HINT:
When removing the name plates, heat the vehicle body and name plates using a heat light.
Heating Temperature| Item | Temperature |
|---|---|
| Vehicle Body | 40 to 60°C (104 to 140°F) |
| Name Plate | 20 to 30°C (68 to 86°F) |
CAUTION:
- Do not touch the heat light and heated parts, touching the heat light may result in burns.
- Touching heated parts for a long time may result in burns.
.png)
| *a | Heated Part |
| *b | Heat Light |
NOTICE:
Do not heat the vehicle body or name plate excessively.
PROCEDURE
1. REMOVE NO. 3 BACK DOOR NAME PLATE
(a) Apply protective tape around the No. 3 back door name plate as shown in the illustration.
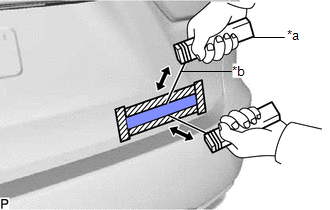
| *a | Wooden Block |
| *b | Piano Wire |
.png) | Protective Tape |
(b) Insert a piano wire between the vehicle body and No. 3 back door name plate.
(c) Tie objects that can serve as handles (for example, wooden blocks) to both wire ends.
(d) Pull the piano wire and cut the double-sided tape that holds the No. 3 back door name plate to the vehicle body.
NOTICE:
Be careful not to damage the vehicle body.
(e) Remove the No. 3 back door name plate.
2. REMOVE NO. 2 BACK DOOR NAME PLATE (for F-Sport)
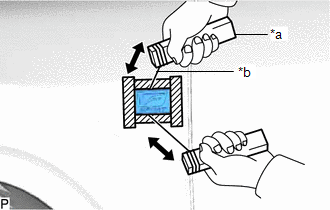
(a) Apply protective tape around the No. 2 back door name plate as shown in the illustration.

| *a | Wooden Block |
| *b | Piano Wire |
| | Protective Tape |
(b) Insert a piano wire between the vehicle body and No. 2 back door name plate.
(c) Tie objects that can serve as handles (for example, wooden blocks) to both wire ends.
(d) Pull the piano wire and cut the double-sided tape that holds the No. 2 back door name plate to the vehicle body.
NOTICE:
Be careful not to damage the vehicle body.
(e) Remove the No. 2 back door name plate.
3. REMOVE NO. 2 FRONT FENDER NAME PLATE (for F-Sport)
(a) Apply protective tape around the No. 2 front fender name plate as shown in the illustration.
| *a | Wooden Block |
| *b | Piano Wire |
| | Protective Tape |
(b) Insert a piano wire between the vehicle body and No. 2 front fender name plate.
(c) Tie objects that can serve as handles (for example, wooden blocks) to both wire ends.
(d) Pull the piano wire and cut the double-sided tape that holds the No. 2 front fender name plate to the vehicle body.
NOTICE:
Be careful not to damage the vehicle body.
(e) Remove the No. 2 front fender name plate.
4. REMOVE NO. 1 FRONT FENDER NAME PLATE (for F-Sport)
(a) Apply protective tape around the No. 1 front fender name plate as shown in the illustration.
| *a | Wooden Block |
| *b | Piano Wire |
| | Protective Tape |
(b) Insert a piano wire between the vehicle body and No. 1 front fender name plate.
(c) Tie objects that can serve as handles (for example, wooden blocks) to both wire ends.
(d) Pull the piano wire and cut the double-sided tape that holds the No. 1 front fender name plate to the vehicle body.
NOTICE:
Be careful not to damage the vehicle body.
(e) Remove the No. 1 front fender name plate.
 Installation
INSTALLATION CAUTION / NOTICE / HINT HINT: When installing the name plates, heat the vehicle body and name plates using a heat light. Heating Temperature Item Temperature Vehicle Body 40 to ...
 Quarter Panel Wheel Opening Moulding
ComponentsCOMPONENTS ILLUSTRATION *1 NO. 6 ROCKER PANEL MOULDING PROTECTOR *2 QUARTER OUTSIDE MOULDING SUB-ASSEMBLY *3 QUARTER PANEL WHEEL OPENING MOULDING - - ● Non-reusab ...
Other materials:
Lexus RX (RX 350L, RX450h) 2016-2026 Repair Manual > Lighting System (w/ Automatic Headlight Beam Level Control System): Turn Signal Switch Circuit
DESCRIPTION The combination meter assembly receives the turn signal switch information and controls the turn signal lights. WIRING DIAGRAM CAUTION / NOTICE / HINT NOTICE: When replacing the combination meter assembly, always replace it with a new one. If a combination meter assembly which was insta ...
Lexus RX (RX 350L, RX450h) 2016-2026 Repair Manual > Power Window Regulator Motor (for Front Door): Components
COMPONENTS ILLUSTRATION *A for Driver Side *B for Front Passenger Side *1 COURTESY LIGHT ASSEMBLY *2 DOOR ARMREST COVER *3 FRONT DOOR INSIDE HANDLE BEZEL PLUG *4 FRONT DOOR NO. 1 STIFFENER CUSHION *5 FRONT DOOR TRIM BOARD SUB-ASSEMBLY *6 MULTIPLEX NETWORK MAST ...
Lexus RX (RX 350L, RX450h) 2016-{YEAR} Owners Manual
- For your information
- Pictorial index
- For safety and security
- Instrument cluster
- Operation of each component
- Driving
- Lexus Display Audio system
- Interior features
- Maintenance and care
- When trouble arises
- Vehicle specifications
- For owners
Lexus RX (RX 350L, RX450h) 2016-{YEAR} Repair Manual

0.0104