Lexus RX (RX 350L, RX450h) 2016-2026 Repair Manual: Removal
REMOVAL
PROCEDURE
1. REMOVE BACK WINDOW UPPER PANEL TRIM (w/o Rear No. 2 Seat)
Click here .gif)
2. REMOVE BACK WINDOW UPPER PANEL TRIM (w/ Rear No. 2 Seat)
Click here
3. REMOVE REAR SPOILER SUB-ASSEMBLY (w/o Rear No. 2 Seat)
| (a) Disconnect the 2 connectors. |
|
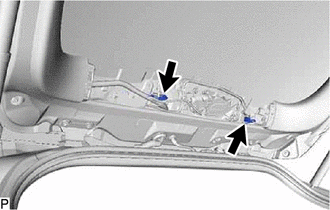
| (b) Remove the 2 hole plugs. |
|
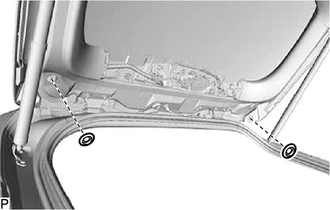
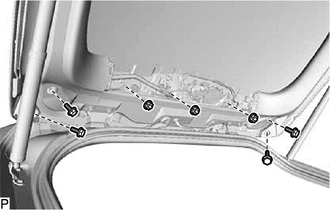
| (c) Remove the 4 bolts and 3 nuts. |
|
(d) Apply protective tape around the rear spoiler sub-assembly.
.png) | Protective Tape |
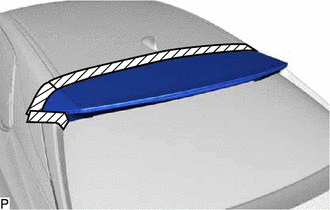
(e) Disengage the 6 clips as shown in the illustration to remove the rear spoiler sub-assembly.
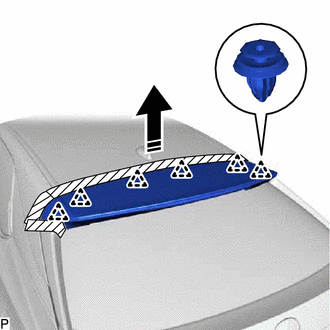
.png) | Remove in this Direction |
4. REMOVE REAR SPOILER SUB-ASSEMBLY (w/ Rear No. 2 Seat)
| (a) Disconnect the 2 connectors. |
|
| (b) Remove the 2 hole plugs. |
|
| (c) Remove the 4 bolts and 3 nuts. |
|
(d) Apply protective tape around the rear spoiler sub-assembly.
| | Protective Tape |
(e) Disengage the 7 clips as shown in the illustration to remove the rear spoiler sub-assembly.
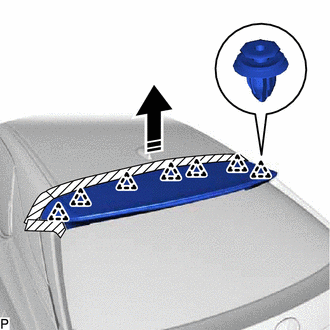
| | Remove in this Direction |
5. REMOVE SIDE REAR SPOILER PROTECTOR SUB-ASSEMBLY LH
(a) Apply protective tape around the side rear spoiler protector sub-assembly LH.
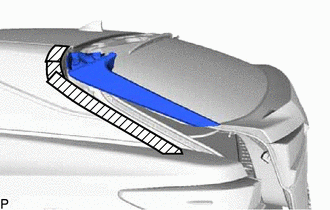
| | Protective Tape |
(b) Disengage the 4 clips as shown in the illustration to remove the side rear spoiler protector sub-assembly LH.
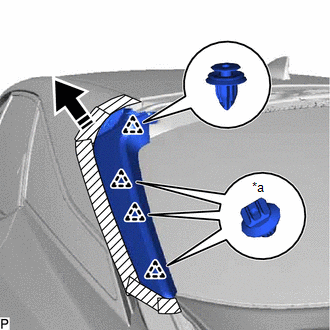
| *a | Clip <A> |
| | Remove in this Direction |
(c) Remove the 3 clips <A>.
6. REMOVE SIDE REAR SPOILER PROTECTOR SUB-ASSEMBLY RH
HINT:
Use the same procedure as for the LH side.
 Reassembly
REASSEMBLY PROCEDURE 1. INSTALL CENTER STOP LIGHT ASSEMBLY Click here 2. INSTALL NO. 2 REAR SPOILER SEAL HINT: When installing the No. 2 rear spoiler seal, heat the rear spoiler using a heat light. ...
 Rear Wheel House Plate
ComponentsCOMPONENTS ILLUSTRATION *1 NO. 6 ROCKER PANEL MOULDING PROTECTOR - - RemovalREMOVAL CAUTION / NOTICE / HINT HINT:
Use the same procedure for the RH side and LH side.
The fo ...
Other materials:
Lexus RX (RX 350L, RX450h) 2016-2026 Repair Manual > Panoramic View Monitor System: ECU Power Source Circuit
DESCRIPTION This circuit is the power source circuit to operate the parking assist ECU. The parking assist ECU controls the panoramic view monitor system. WIRING DIAGRAM CAUTION / NOTICE / HINT NOTICE: Inspect the fuse for circuits related to this system before performing the following inspection p ...
Lexus RX (RX 350L, RX450h) 2016-2026 Owners Manual > Using the driving support
systems: Lexus Safety System+
The Lexus Safety System+ consists of the following drive assist systems
and
contributes to a safe and comfortable driving experience:
PCS (Pre-Collision System)
LKA (Lane-Keeping Assist)
Automatic High Beam
Dynamic radar cruise control with full-speed range
WARNING
■ Lexus Safety ...
Lexus RX (RX 350L, RX450h) 2016-{YEAR} Owners Manual
- For your information
- Pictorial index
- For safety and security
- Instrument cluster
- Operation of each component
- Driving
- Lexus Display Audio system
- Interior features
- Maintenance and care
- When trouble arises
- Vehicle specifications
- For owners
Lexus RX (RX 350L, RX450h) 2016-{YEAR} Repair Manual

0.0095