Lexus RX (RX 350L, RX450h) 2016-2026 Repair Manual: Removal
REMOVAL
CAUTION / NOTICE / HINT
The necessary procedures (adjustment, calibration, initialization or registration) that must be performed after parts are removed and installed, or replaced during windshield outside moulding removal/installation are shown below.
Necessary Procedures After Parts Removed/Installed/Replaced| Replaced Part or Performed Procedure | Necessary Procedure | Effect/Inoperative Function when Necessary Procedure not Performed | Link |
|---|---|---|---|
| Windshield glass sub-assembly | Adjust forward recognition camera |
| or |
NOTICE:
When replacing the windshield glass of a vehicle equipped with a forward recognition camera, make sure to use a Toyota genuine part. If a non-Toyota genuine part is used, the forward recognition camera may not be able to be installed due to a missing bracket. Also, the dynamic radar cruise control system, lane control system, road sign assist system, pre-collision system, front camera system or lighting system may not operate properly due to a difference in the transmissivity or black ceramic border.
HINT:
- Use the same procedure for the RH side and LH side.
- The following procedure is for the LH side.
PROCEDURE
1. REMOVE WINDSHIELD OUTSIDE MOULDING
(a) Apply protective tape around the windshield outside moulding.
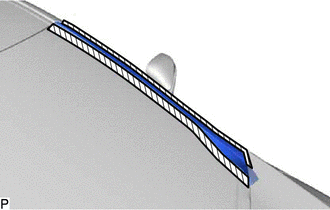
.png) | Protective Tape |
(b) Disengage the 2 clips as shown in the illustration.
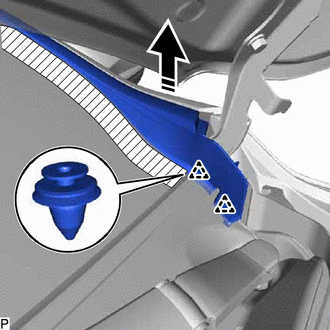
.png) | Remove in this Direction |
| (c) Using a moulding remover, disengage the 10 claws and remove the windshield outside moulding. |
|

2. REMOVE NO. 1 WINDSHIELD OUTSIDE MOULDING CLIP
HINT:
Perform the following procedure only when replacement of a No. 1 windshield outside moulding clip is necessary.
(a) Disengage the 5 claws as shown in the illustration to remove the 5 No. 1 windshield outside moulding clips.
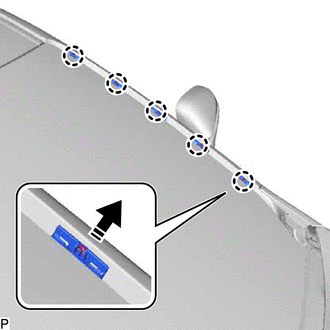
| | Remove in this Direction |
3. REMOVE NO. 3 WINDSHIELD OUTSIDE MOULDING CLIP
HINT:
Perform the following procedure only when replacement of a No. 3 windshield outside moulding clip is necessary.
(a) Remove the windshield glass sub-assembly.
Click here .gif)
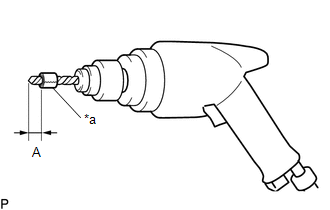
(b) Insert a 4.0 mm (0.157 in.) drill bit into a drill.
| (c) Tape the 4.0 mm (0.157 in.) drill bit 5.0 mm (0.197 in.) from the tip as shown in the illustration. Standard Measurement:
NOTICE: Tape the 4.0 mm (0.157 in.) drill bit to prevent the drill bit from going too deep. |
|
| (d) Lightly press the drill bit against the No. 3 windshield outside moulding clip to drill off the No. 3 windshield outside moulding clip flanges, and remove the 5 No. 3 windshield outside moulding clips. CAUTION: Be careful of the drilled No. 3 windshield outside moulding clips, as they may be hot. NOTICE:
|
|
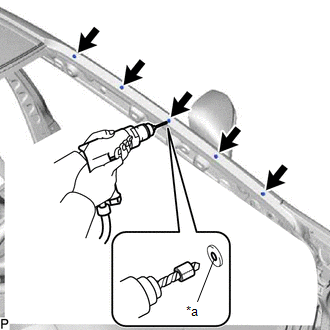
(e) Using a vacuum cleaner, remove the No. 3 windshield outside moulding clip fragments and shavings from the drilled areas.
 Components
COMPONENTS ILLUSTRATION *1 NO. 1 WINDSHIELD OUTSIDE MOULDING CLIP *2 NO. 3 WINDSHIELD OUTSIDE MOULDING CLIP *3 WINDSHIELD OUTSIDE MOULDING *4 WINDSHIELD GLASS ASSEMBLY ● No ...
 Installation
INSTALLATION CAUTION / NOTICE / HINT HINT:
Use the same procedure for the RH side and LH side.
The following procedure is for the LH side.
PROCEDURE 1. INSTALL NO. 3 WINDSHIELD OUTSIDE MOULDIN ...
Other materials:
Lexus RX (RX 350L, RX450h) 2016-2026 Repair Manual > Roof Headlining (w/o Rear No. 2 Seat): Components
COMPONENTS ILLUSTRATION *A for TMC Made *B for TMMC Made *1 DECK BOARD ASSEMBLY *2 DECK SIDE TRIM BOX RH *3 FRONT DECK FLOOR BOX *4 REAR DECK FLOOR BOX *5 REAR FLOOR FINISH PLATE *6 REAR NO. 3 FLOOR BOARD *7 REAR NO. 4 FLOOR BOARD *8 TONNEAU COVER AS ...
Lexus RX (RX 350L, RX450h) 2016-2026 Repair Manual > Meter / Gauge System: Speed Signal Circuit
DESCRIPTION The combination meter assembly receives the vehicle speed signal from this circuit. The wheel speed sensors produce an output that varies according to the vehicle speed. The wheel speed sensor output is received by the brake actuator assembly (skid control ECU) which uses this informatio ...
Lexus RX (RX 350L, RX450h) 2016-{YEAR} Owners Manual
- For your information
- Pictorial index
- For safety and security
- Instrument cluster
- Operation of each component
- Driving
- Lexus Display Audio system
- Interior features
- Maintenance and care
- When trouble arises
- Vehicle specifications
- For owners
Lexus RX (RX 350L, RX450h) 2016-{YEAR} Repair Manual

0.0101