Lexus RX (RX 350L, RX450h) 2016-2026 Repair Manual: Installation
INSTALLATION
CAUTION / NOTICE / HINT
HINT:
- Use the same procedure for the RH side and LH side.
- The following procedure is for the LH side.
PROCEDURE
1. INSTALL NO. 3 WINDSHIELD OUTSIDE MOULDING CLIP
HINT:
Perform the following procedure only when replacement of a No. 3 windshield outside moulding clip is necessary.
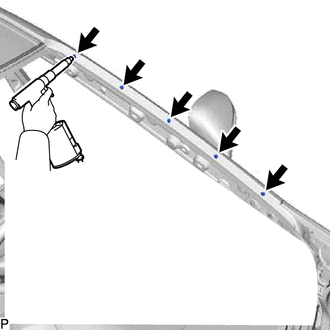
(a) Using a riveter with a nose piece, install 5 new No. 3 windshield outside moulding clips.
HINT:
If the mandrel of the No. 3 windshield outside moulding clip does not come off on the first operation of the rivet gun, slide the rivet gun forward on the mandrel and operate it again.
NOTICE:
- Do not pry the No. 3 windshield outside moulding clip with the riveter, as this will cause damage to the riveter and mandrel.
-
Confirm that the No. 3 windshield outside moulding clips are seated properly against the vehicle body.
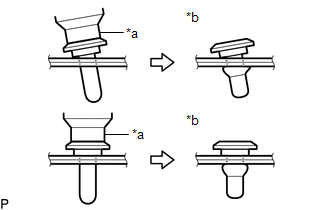
*a
Riveter
*b
Incorrect
- Do not tilt the riveter when installing the No. 3 windshield outside moulding clip to the vehicle body.

| *a | Riveter |
| *b | Mandrel |
| *c | Incorrect |
(b) Install the windshield glass sub-assembly.
Click here .gif)
2. INSTALL NO. 1 WINDSHIELD OUTSIDE MOULDING CLIP
HINT:
Perform the following procedure only when replacement of a No. 1 windshield outside moulding clip is necessary.
(a) Engage the 5 claws as shown in the illustration to install 5 new No. 1 windshield outside moulding clips to the No. 3 windshield outside moulding clip.
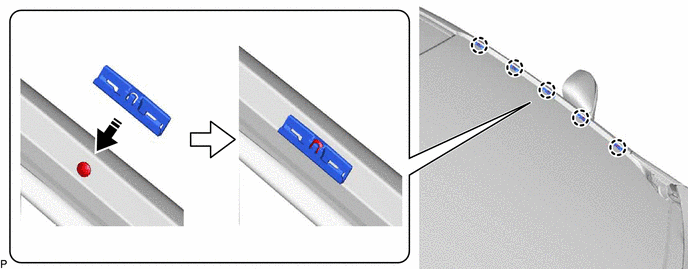
.png) | Install in this Direction | - | - |
3. INSTALL WINDSHIELD OUTSIDE MOULDING
| (a) Engage the 10 claws. |
|

(b) Engage the 2 clips as shown in the illustration to install the windshield outside moulding.
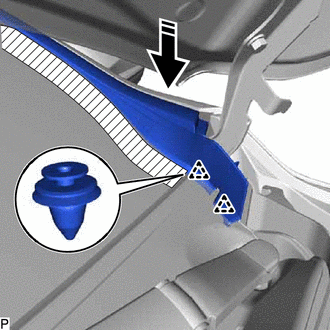
| | Install in this Direction |
 Removal
REMOVAL CAUTION / NOTICE / HINT The necessary procedures (adjustment, calibration, initialization or registration) that must be performed after parts are removed and installed, or replaced during wind ...
 Horn
Horn
...
Other materials:
Lexus RX (RX 350L, RX450h) 2016-2026 Repair Manual > Power Tilt And Power Telescopic Steering Column System: Fail-safe Chart
FAIL-SAFE CHART HINT: If the power source voltage to the multiplex tilt and telescopic ECU returns to normal within 10 seconds during tilt or telescopic operation, the operation will be resumed. If it returns to normal after 10 seconds have elapsed, the operation restarts when a tilt or telescopic o ...
Lexus RX (RX 350L, RX450h) 2016-2026 Repair Manual > Brake System: Problem Symptoms Table
PROBLEM SYMPTOMS TABLE HINT: Use the table below to help determine the cause of problem symptoms. If multiple suspected areas are listed, the potential causes of the symptoms are listed in order of probability in the "Suspected Area" column of the table. Check each symptom by checking the suspected ...
Lexus RX (RX 350L, RX450h) 2016-{YEAR} Owners Manual
- For your information
- Pictorial index
- For safety and security
- Instrument cluster
- Operation of each component
- Driving
- Lexus Display Audio system
- Interior features
- Maintenance and care
- When trouble arises
- Vehicle specifications
- For owners
Lexus RX (RX 350L, RX450h) 2016-{YEAR} Repair Manual

0.0106